Sunday, December 31, 2023

Pizzas à la mexicaine


Voici une autre recette de Tous à Table! par Isabelle Huot et Nathalie Regimbal. Pour le sans-viande haché, j’ai fait avec ce que j’ai pu trouver – ce n’était peut-être pas exactement la même quantité ou les mêmes saveurs, mais c’était bon! J’ai mis ça dans la boîte à lunch des enfants; le Petit Prince a bien aimé! J’ai servi ça avec de la roquette, des fraises et une galette pour superhéros; une pizza pour le Renard, deux pour le Petit Prince.

1 emballage de 340 g. de sans-viande haché assaisonné à la mexicaine
2 tomates moyennes, coupées en petits cubes
4 pains minces de grains entiers (j’avais 8 petits naans)
1 tasse de fromage mozzarella râpé sans lactose

Préchauffer le four à 450 °F.

Dans un grand bol, défaire le sans-viande haché en petits morceaux. Ajouter les cubes de tomates. Mélanger. Répartir ce mélange sur chaque pain mince et ajouter ensuite le fromage.

Déposer les pizzas sur une plaque de cuisson recouverte de papier parchemin. Cuire au four 10 minutes, ou jusqu’à ce que le mélange soit chaud et que le fromage soit fondu.

Instant Pot Chicken and Broccoli Stir-Fry


Here’s an easy but satisfying recipe for the Instant Pot: a chicken and broccoli stir-fry with carrots. The recipe calls for grated carrots, but I think that next time, I would buy matchstick carrots. The amounts below make about 4 servings.

For the sauce and marinade
6 Tbsp. tamari or low-sodium soy sauce (or coconut aminos for a Paleo version)
1 ½ Tbsp. oyster sauce (leave out for low carb & use fish sauce instead if you like)
1 ½ tsp. toasted sesame oil
1 tsp. coconut sugar (use low carb sweetener like erythritol, stevia or monk fruit for low carb)
½ tsp. mirin, Chinese cooking wine or dry sherry (omit for Paleo & keto version)
½ tsp. fresh minced ginger
2 cloves garlic, minced
1/3 - ½ cup water OR chicken broth

For the chicken
1 ¼ lb. chicken thighs or breasts, cut into 1-inch pieces
sea salt and black pepper, to taste
1-2 Tbsp. coconut oil or olive oil
3 ½ cups broccoli florets
1/3 cup very thinly sliced or grated carrots (see note above)
1 Tbsp. arrowroot starch or cornstarch , or 1 teaspoon xanthan gum for low carb
2 Tbsp. water plus more as needed to thin out sauce
red pepper chili flakes, toasted sesame seeds, thinly sliced green onion (for garnish)

In a medium bowl, combine the soy sauce, oyster sauce, sesame oil, sweetener (if using), Mirin (if using), ginger, and garlic for the sauce. Set aside.

Season chicken with salt, pepper and 1 tablespoon of the sauce/marinade. Allow to sit while you chop and prep your vegetables.

Turn your Instant Pot to SAUTE, then add in oil. Once oil is hot, add the chicken and allow to cook for 1-2 minutes. Pour in the remaining sauce along with 1/3 cup water (or chicken broth). Cover with lid.

Press the valve to SEALING and press MANUAL or PRESSURE COOK for 4 minutes. The Instant Pot will take some time to come to pressure. Once the 4 minutes are up, use a long spoon and push the valve to VENTING for a QUICK RELEASE.

Once all the pressure is released, carefully unlock the lid. Press the SAUTE button, then whisk the arrowroot starch (or xanthan gum) with 2 tablespoons water until combined and stir into the Instant Pot.

Add the broccoli and carrots and cook for 4-5 minutes, or until the vegetables are crisp-tender and the sauce has thickened up. Adjust seasonings with salt, pepper or red pepper chili flakes; add more water as needed to thin out sauce. Give everything a final tossing to coat well.

Transfer to a platter and serve warm on a large platter or over zoodles, cauliflower rice (paleo), quinoa or regular rice or noodles. (I didn’t have an accompaniment and it was fine!) Sprinkle with pepper flakes, sesame seeds and green onions, if desired.

BBQ Chicken Roll-Ups


Here’s an easy recipe that I tried for the kids’ lunches – BBQ chicken roll-ups. The Fox wasn’t too fond of them (though he’s notoriously difficult to please), but the Little Prince says they are his new favorite lunch!

1 lb pizza dough, refrigerated
½ cup BBQ sauce (I like Whole Foods’ 365 brand)
1 ½ cups rôtisserie chicken, shredded
½ red onion, finely chopped
1 cup shredded lactose-free cheese (I used sharp cheddar)
¼ cup parsley, chopped

Preheat oven to 425°F. Put a silpat on a baking sheet and set aside.

On a lightly floured surface, roll out the pizza crust into a rectangle. Spread on the BBQ sauce. Top with chicken, onion, cheese, and parsley.

Roll it up longways and cut into slices (I got about 12). Bake face-up for 15 minutes. Enjoy!

Saturday, December 30, 2023

No-Bake Peanut Butter Cup Bars


These no-bake peanut butter cup bars are not unlike my marzipan buckeye bars, but that’s a good thing! It’s a simple dessert, not too sweet, that everyone in my house seems to like.

Note that I used “regular” peanut butter that wasn’t the natural, drippy kind, and I liked the consistency of the bars; had I used the natural kind, I think I would have had to increase the almond flour a bit.

For the peanut butter base
¾ cup creamy salted peanut butter
½ cup almond flour
2 Tbsp. maple syrup
¼ tsp. sea salt

For the chocolate topping
½ cup semi-sweet chocolate chips or chunks
2 Tbsp. creamy salted peanut butter
½ tsp. coconut oil
flaky sea salt, like Maldon (optional)

Line a standard-size loaf pan with parchment paper and set aside.

In a double boiler, put the peanut butter, almond flour, maple syrup, and optional sea salt. (In my case, I did this over heat, as my peanut butter needed a bit of coaxing to melt enough to be mixed properly.) Use a spatula or spoon to stir until well combined. Scrape all of the peanut butter mixture out of the bowl and into the loaf pan. Set aside.

Place the chocolate chips into the (now empty) double-boiler until smooth and melted. Add the 2 tablespoons of peanut butter and coconut oil. Stir until a smooth mixture is achieved. Pour the chocolate mixture over the peanut butter base and top with optional flaky sea salt. Place in the freezer for about 20 minutes until the chocolate is set.

Remove from the pan by lifting the sides of the parchment paper and slice into bars (I recommend about 14 bars as the recipe is written — they're rich!). Enjoy! Leftovers can be stored in the refrigerator or freezer.


Chicken Meatball Curry


I really liked this chicken meatball curry! It’s not entirely unlike the turkey coconut curry meatballs I made recently, but if I had to choose between the two, I think I would pick this one. There’s zucchini in the meatballs, and I added an extra red bell pepper to the dish. As a matter of fact, I used the turkey meatball recipe to change this one a bit: I doubled the quantities for the meatballs and baked them in the oven instead of cooking them in a pan, but I left the amount of liquid in the sauce the same, and I really liked the results. I recommend the oven method because not only is it much more hands-off and easier to clean up, but since the meatballs were very soft, I suspect that some would fall apart if cooked in a pan, so this way is less frustrating.

The quantities below are what I used in order to have leftovers for a second night (a total of 40 meatballs). I served this with steamed carrots and cilantro-garlic Right Rice.

2 lbs. ground chicken
1 cup shredded zucchini (about 1 medium)
4 green onions, chopped
2 large shallots, chopped, divided
2 Tbsp. grated ginger, divided
3 cloves garlic, grated, divided
¼ tsp. cayenne pepper
black pepper
1 Tbsp. tamari/soy sauce
3 Tbsp. extra virgin olive oil, divided (see note below)
2 red bell peppers, sliced (I chopped mine)
2 Tbsp. lactose-free butter
1-3 Tbsp. Thai red curry paste
1 (14-oz.) can of coconut milk
3 Tbsp. tamari/soy sauce
¼ cup fresh cilantro, chopped
basil and limes, for serving

Put the chicken, zucchini, green onions, 1 shallot, 1 tablespoon ginger, 2 garlic cloves, cayenne, a pinch of pepper, and 1 tablespoon tamari/soy sauce in a bowl. Mix to combine. Coat your hands with oil (I didn’t, I just used my small scoop), and roll the meat into tablespoon-size balls (I got 40 meatballs).

Heat a large skillet with sides over medium-high heat. Add 2 tablespoons of olive oil and the meatballs. Sear until crisp, 4-5 minutes, turning them 2-3 times. Move to a plate. (I did this in the oven instead: Line a baking sheet with tin foil and spray with oil. Bake for 25 minutes at 350 °F.)

To the same skillet, add the remaining 1 tablespoon of oil, 1 shallot, 1 garlic clove, 1 tablespoon of ginger, the bell peppers, butter, and curry paste. Cook until fragrant, 2 minutes. Stir in the coconut milk and 3 tablespoons of tamari or soy sauce. Slide the meatballs into the curry sauce. Simmer over medium heat until the meatballs are cooked through, 5 minutes. Stir in the cilantro.

Serve the meatballs and sauce over rice with a squeeze of fresh lime, some fresh basil, and/or green onions.

Fall 2023 outings

For once, we had slightly more than our goal of one monthly outing this fall, and it was really nice!

In September, we went to North Star Mall and I finally (finally!) got my picture taken next to the biggest cowboy boots in the world. It was like playing tourist in our own city, and I actually feel like I checked something off my bucket list, because I had been waiting so long to do that!


In October, we went to Canyon Lake to ride the Cliff Carver, the first (and, so far, only) alpine coaster in Texas. We bought our tickets in advance, and even then, there was more of a line-up than expected, but we really loved it! Without a lineup, I’d consider going twice in a row. The ride is roughly 10 minutes, with three points at which you are pulled uphill. You control the speed of your cart, though there are points where it’s obviously safer not to go beyond a certain speed. (I have no good pictures, sorry!)

In November, we finally went to Enchanted Rock State Park. (This is also definitely a place where you should buy tickets in advance!) The cooler weather and overcast sky were actually nice on the way up, though I could have done with a bit less wind. The climb was faster than I thought it would be upon looking at it, and there were interesting rocks formations on the way as well as ponds at the top. (I didn’t see any fairy shrimp, but I didn’t look thoroughly.) We only climbed on Summit Trail, but we felt like we had conquered the place.


After that, since my mother-in-law was visiting, we also went to the Doseum and we also went horseback riding at Westcreek Trail Rides. The ride itself was fine, though the guides failed to make the whole thing interactive (and this is coming from an introvert). The stables also have ponies, chickens, and goats for smaller kids to pet. It was a fun experience, though I’m not sure I’d necessarily recommend that place over another one locally.


In December, we made a last-minute decision to go see the Cirque du Soleil’s Bazzar, because it’s not every day that Quebec’s Cirque du Soleil is in San Antonio! There was ample parking, though we didn’t realize until we got there that we had to pay for parking in addition to the circus tickets... I really enjoyed the show itself, though the sound was much too loud (we were in the second-to-last row, not even in the front). It was loud enough that the Little Prince had to leave with the Engineer pretty quickly, and they returned after an attendant gave them a pair of ear plugs. I have to say, though, that the Engineer and I enjoyed it more than the kids – the Fox thought it was okay, and the Little Prince actually said he was bored (after he was done being overwhelmed by the noise). Oh well, we tried.

 
Finally, we didn’t get around to seeing Christmas light displays, though we did see an amazing installation at a private home near where we live – they probably had as many lights as any neighborhood, but concentrated in a single house, and it was amazing. We also took a walk on a nearby trail to get some air. A good way to end the year!


Friday, December 22, 2023

Gâteau Bundt au lait de coco, avec framboises et grenade


J’ai fait ce gâteau de Ricardo en octobre, mais je le trouve parfait pour Noël, alors voici voilà! J’ai ajouté quelques branches de romarin pour la décoration. C’était aussi bon que beau!

375 g (2 ½ tasses) de farine tout-usage (j’ai utilisé 200g de farine de blé blond et 175 de farine tout-usage)
1 c. à soupe de poudre à pâte
¼ c. à thé de sel
1 boîte de 14 oz de lait de coco léger
1 c. à soupe de jus de lime
1 c. à thé d’extrait de vanille
225 g (1 tasse ou 2 bâtons) de beurre sans lactose, ramolli
420 g (2 tasses) de sucre
3 œufs
sucre à glacer, pour le service
270 g (2 tasses) de framboises fraîches
45 g (¼ tasse) de grains de grenade

Placer la grille au centre du four. Préchauffer le four à 350 °F. Beurrer généreusement et fariner un moule Bundt de 2,5 à 3 litres (10 à 12 tasses).

Dans un bol, mélanger la farine, la poudre à pâte et le sel. Réserver.

Dans un autre bol, mélanger le lait de coco, le jus de lime et la vanille.

Dans un troisième bol, crémer le beurre avec le sucre au batteur électrique. Ajouter les œufs, un à la fois, et fouetter jusqu’à ce que le mélange soit homogène. À basse vitesse, incorporer les ingrédients secs en alternant avec le mélange de lait de coco. Répartir la pâte uniformément dans le moule.

Cuire au four 1 heure ou jusqu’à ce qu’un cure-dents inséré au centre du gâteau en ressorte propre. Laisser tiédir 15 minutes. Démouler le gâteau en le renversant sur une grille. Laisser refroidir complètement, soit environ 3 heures.

Sur une assiette de service, couvrir complètement le gâteau de sucre à glacer en le saupoudrant à l’aide d’un petit tamis. Déposer les fruits dans le centre du gâteau et servir avec de la crème fouettée sans lactose, si désiré.


Thursday, December 21, 2023

Portobello Fajita Bowl


I made this portobello fajita bowl as a vegetarian meal in which everyone could find something they like, and it turns out it was all good. Even the mushrooms turned out better than I had hoped! Note that I started with 2 cups of dry brown rice; I think that I would use Right Rice next time just to be more carb-conscious, but this was really good!

1 yellow bell pepper, sliced
1 red bell pepper, sliced
1 green bell pepper, sliced
1 tsp. salt, divided
½ tsp. cumin, divided
1 tsp. smoked paprika, divided
1 ½ tsp. chili powder, divided (I used much less)
1 tsp. red pepper flakes, divided (I used much less)
4 portobello mushroom caps
1 Tbsp. oil
1 large white onion
3 cloves garlic, minced
3 cups brown rice, cooked
1 cup pico de gallo
1 cup black beans, drained and rinsed
1 cup corn
1 cup shredded lactose-free cheddar cheese
1 avocado, sliced
1 lime, sliced into wedges
fresh cilantro, for garnish

Put the sliced bell peppers into a large bowl. Add ½ teaspoon salt, ¼ teaspoon cumin, ½ teaspoon smoked paprika, 1 teaspoon chili powder, and ½ teaspoon red pepper flakes. Toss to coat the peppers evenly in the spices and set aside.

Remove the stems from the portobello mushrooms and slice into 1-inch-wide pieces (mine were narrower), then transfer a medium bowl. Add the remaining ½ teaspoon salt, ½ teaspoon chili powder, ½ teaspoon smoked paprika, ¼ teaspoon cumin, and ½ teaspoon red pepper flakes. Toss to coat the mushrooms evenly in the spices and set aside.

Thinly slice the onion.

Heat the oil in a large cast-iron pan over medium-high heat. Add the onion and cook, stirring occasionally, until translucent, about 3 minutes. Add the garlic and bell peppers, and cook for about 5 more minutes, stirring constantly until peppers are tender. Remove the pepper and onion mixture from the pan and set aside.

Add the mushrooms to the skillet and cook until the mushrooms are tender, stirring constantly, about 5 minutes

Divide the brown rice between 4 bowls or plates. Top each serving with pico de gallo, black beans, corn, cheddar cheese, the cooked bell peppers and onions, and the sliced portobello. Garnish with an avocado slice, a lime wedge, and cilantro. Enjoy!

Mini Lemon Thyme Pound Cakes


I tried these mini chocolate olive oil cakes with orange and Earl Grey. The recipe calls for mini bundt pans, but this was a mistake, because the cakes completely fell apart upon unmolding! Some parts stuck to the pan, but really, it looked like the crumb was much too loose and light to survive. (Judging from the comments online, it’s not me, it’s the recipe!) I ended up serving piles of chocolate crumbs topped with chocolate glaze and orange zest, and they were good, but not the mini bundt cakes I wanted. And I decided that if mini bundt cakes were going to fall apart all the time (because it’s happened before), maybe I should just stop doing this to myself and get rid of the pans.
    

This made me think back to why I got the mini bundt pan in the first place – it was a recipe from Martha Stewart for mini lemon thyme pound cakes that, as far as I could remember, had been very good. So I pulled out the recipe and tried it again – it works super well! I think it’s because pound cake has a crumb that is dense enough to hold together when unmolded.

I didn’t have lemon thyme growing in my garden this time, just regular thyme, so that’s what I used. I love the result, and the Engineer was surprised at how well thyme works in dessert form.

The original recipe called for a muscat and lemon thyme syrup, but I made an alcohol-free version with simple syrup, lemon, and thyme – my version is below.

For the pound cakes
18 Tbsp. (2 sticks plus 2 Tbsp.) lactose-free butter, softened, plus more for pan
1 ½ cups all-purpose flour, sifted, plus more for pan
12 sprigs fresh lemon thyme, divided, plus more for garnish
½ tsp. saltv finely grated zest of 1 lemon (about 2 tsp. zest)
1 ¼ cups sugar
½ tsp. pure vanilla extract
6 large eggs, room temperature

For the syrup
¼ cup sugar
¼ cup water
some lemon zest
some thyme sprigs


For the pound cakes
Preheat oven to 350 °F, with rack in lower third. Butter six (1-cup) molds of a mini angel food cake pan or mini bundt pan. Dust with flour, and tap out excess. Pick 2 teaspoons small sprigs from tops of lemon thyme sprigs, and divide evenly among molds; set aside.

Coarsely chop remaining lemon thyme leaves to make tablespoons; whisk chopped lemon thyme with the flour, salt, and lemon zest in a small bowl. Set aside.

Put butter into the bowl of an electric mixer fitted with the paddle attachment. Cream on medium speed until pale and fluffy, scraping down sides of bowl as needed, about 4 minutes. Add sugar. Mix until pale and fluffy, scraping down sides of bowl as needed, about 3 minutes.

Mix in vanilla. Add eggs, 1 at a time, mixing well after each addition; mix until smooth. Reduce speed to low. Add flour mixture in 3 batches, mixing until just combined after each addition.

Spoon batter over lemon thyme in prepared molds. Smooth tops using a small rubber spatula. Firmly tap the pan on counter to eliminate any air bubbles. Bake until a cake tester inserted into centers comes out clean, about 40 minutes. Let cakes cool slightly in pan on a wire rack, about 10 minutes. Run a knife around edges of molds to loosen; unmold cakes. Place each cake on a serving plate, and drizzle with about 1 tablespoon syrup. Garnish with lemon thyme sprigs.


For the syrup
Stir water, sugar, lemon zest, and thyme in a saucepan. Bring to a simmer over medium-high heat. Reduce heat to medium-low; simmer 20 minutes.

Pour syrup through a fine sieve into a bowl; discard lemon zest and thyme. Let cool slightly, about 5 minutes, before serving. Syrup can be refrigerated in an airtight container up to 1 week; reheat over medium-low heat before serving.


Chocolate Peanut Butter Banana Bread


I ended up browsing the recipes on the Skippy website because the Fox became interested in a picture he saw on our jar of Skippy Natural peanut butter. And then I got sidetracked looking for the recipe and bookmarked several things to try, such as this chocolate peanut butter banana bread, which my kids liked! I rearranged the order of the ingredients below to make more sense. You can garnish the cooled loaf with a drizzle of warm peanut butter and a handful of chocolate chips, if you are so inclined.

1 cup all-purpose (or white whole wheat) flour 
½ cup dark chocolate morsels 
½ cup cocoa powder, sifted 
¾ cup sugar 
1 tsp. baking soda 
¾ tsp. baking powder 
½ tsp. salt 
1 cup mashed ripened bananas 
½ cup melted lactose-free butter 
2 large eggs, lightly beaten 
1 ½ tsp. vanilla extract

Heat oven to 350 °F. Grease a loaf pan and set aside.

In a medium bowl, whisk together flour, chocolate morsels, cocoa powder, sugar, baking soda, baking powder, and salt.

In large bowl, stir together the bananas, butter, eggs, and vanilla.

Stir flour mixture into banana mixture until blended.

Transfer batter to prepared pan and bake 45 to 55 minutes, or until a cake tester inserted in center comes out clean.

Cool completely on a wire rack 20 minutes.


Wednesday, December 13, 2023

Creamy Chickpea and Roasted Garlic Soup For One


I tried a few dishes for lunch that looked good, but fell flat (looking at you, frittata with chips and caramelized onions or avocado baked eggs!). Then there was this very simple creamy chickpea and roasted garlic soup for one by America’s Test Kitchen, which perked me right up. 

The original recipe called for the chickpeas *and* the liquid in the can, but I didn’t realize this until they were drained and rinsed, and this dish turned out great, so do as you will. Also, the cloves of garlic were meant to be pan-roasted whole, but I decided to slice them and pan-fry them because it makes for a nicer topping. Either way, roasting really deepens the flavor of the garlic, and the simple flavors go really well together! If you happen to have some crumbled bacon on hand, it would be a great topper for this. 

4 garlic cloves, unpeeled 
1 15-oz. can of chickpeas 
1 ¼ cups chicken or vegetable broth 
1 Tbsp. minced fresh parsley, tarragon, or chives 
1 Tbsp. lemon juice 

Toast garlic in a medium saucepan over medium heat, stirring occasionally, until fragrant and skins are just beginning to brown, about 5 minutes. Remove garlic from saucepan and let cool slightly. Once cool enough to handle, peel the garlic, then return to the now-empty saucepan along with the chickpeas and broth. Bring to a simmer and cook over medium-low heat, stirring occasionally, until chickpeas begin to break down, about 5 to 7 minutes. 

Process soup in a blender until smooth (you can also use an immersion blender or a food processor), about 2 minutes. Return soup to now-empty saucepan and adjust consistency if needed (by adding extra broth, for example; mine was fine). Off heat, stir in parsley and lemon juice, and season with salt and pepper to taste. Serve.

Sunday, December 10, 2023

Triple-Chocolate Pudding


I know, I know. I should just find a good chocolate pudding recipe and stick with it, right? But then there’s a name like triple-chocolate chocolate pudding, and how can I say no? It’s an easy dessert, and since I was going to post either this or crème caramel but the pictures of the crème didn’t turn out too well, chocolate pudding it is. I got 6 ramekins (I believe they are 4 ounces each) plus 2 little glass jars. 

3 Tbsp. lactose-free butter 
4 ½ oz. semisweet or bittersweet chocolate (no more than 62% cacao), finely chopped 
1 oz. unsweetened chocolate, finely chopped 
3 cups lactose-free whole milk 
1 cup granulated sugar, divided 
¼ cup Dutch-process cocoa powder 
3 Tbsp. cornstarch 
⅛ tsp. fine sea salt 
3 large eggs, at room temperature 
1 large egg yolk, at room temperature 
¼ cup lactose-free cream (mine was vegan) 
1 Tbsp. dark rum (optional) 
1 tsp. pure vanilla extract 
lactose-free whipped cream, for garnish 
chocolate shavings, for garnish 

Bring 1 inch of water to a simmer in a medium saucepan over low heat. Place butter in a heatproof bowl set over (but not touching) simmering water and melt butter. Add semisweet and unsweetened chocolates and let stand, stirring often, until melted and smooth. Remove bowl from heat and set aside. 

Heat milk and 1/3 cup sugar in a medium saucepan over low heat until it begins to steam. Meanwhile, whisk remaining 2/3 cup sugar, cocoa, cornstarch, and salt in a medium heatproof bowl. Add eggs, yolk, and cream; whisk until well combined. Gradually whisk in half of the hot milk mixture. Add cocoa mixture to saucepan with remaining milk mixture and bring to a boil over medium heat, whisking often, making sure to whisk into the corners of the pan. Reduce heat to low and let boil for 30 seconds. 

Remove from heat. Add melted chocolate mixture, rum, and vanilla; whisk until combined. Pour into six 6-ounce glass jars or individual bowls. Cover with plastic wrap, pressing down on the surface to prevent a skin from forming. Pierce the plastic with the tip of a knife a few times and let cool to room temperature, about 1 hour. 

Transfer puddings to a refrigerator; refrigerate until chilled, at least 2 hours and up to 3 days. Serve topped with whipped cream and garnished with chocolate shavings.


Boursin-Stuffed Chicken

I made a chicken shawarma sheet-pan dinner that was very good, but somehow it didn’t look photogenic over at my house, so I’m not posting it. This dish turned out a bit prettier – when I saw this recipe for Boursin-stuffed chicken, I knew I had to make it! Ever since I realized that they make vegan Boursin last year, I’ve been buying it occasionally. It works well in this recipe, though I suspect that it melts more than the regular dairy kind. I used 6 chicken breasts and 6 slices of prosciutto; it was great! I served it with broccoli slaw

4 boneless skinless chicken breasts 
kosher salt 
freshly ground black pepper 
1 4-oz. package vegan Boursin cheese or lactose-free herbed goat cheese 
½ cup lactose-free shredded mozzarella 
4 slices prosciutto 

Preheat oven to 400 °F. 

Using a meat tenderizer, pound the chicken until ¼" thick. Pat dry and liberally season it with salt and pepper on both sides. Place a spoonful or two of Boursin on one end of each piece, top with a sprinkle of mozzarella cheese, and roll the chicken up, starting at the cheese-topped end. Wrap chicken with a slice of prosciutto and place in a baking dish seam-side down, so the prosciutto doesn't unravel. Repeat with each piece of chicken. 

Bake for 30 to 35 minutes, or until chicken is no longer pink and juices run clear when pierced with a fork or knife.


Saturday, December 09, 2023

Black Tahini and Poppy Seed Swirls


When I was last browsing in my local secondhand bookstore, I came across a cookbook titled The Magic of Tahini by Dunja Gulin. I flipped through it and took pictures of two recipes to try them. (I have since purchased the book, but have not explored it enough to officially recommend it yet!) This is the first recipe that I’m trying.

I couldn’t find black tahini in stores, so I ordered a jar online. I’ll post more recipes soon to use up the rest of the jar – it’s delicious! I also love how black it is, without using any food coloring. I made a few changes below; for example, my light icing calls for powdered sugar so that it is almost white, and I reduced the amount by half. (I had tried it the way the recipe calls for at first, with a larger amount of unrefined brown sugar, but did not like the results.) Also, since ground poppy seeds are hard to find here, and poppy seeds are expensive as it is, I lightly ground ½ cup of poppy seeds in a spice grinder, so it wasn’t quite a paste, then reduced the rest of the filling ingredients by half. And I used lactose-free milk instead of soy milk.

These buns were a hit. Not too sweet, and with flavors (like poppy and sesame) that are not in your typical bun. I highly recommend these!


For the dough 
1 cup soy milk 
3 Tbsp. coconut oil 
2 ¼ tsp. active dry yeast 
1 Tbsp. coconut sugar (I used brown sugar) 
½ tsp. salt 
3 cups (290 g) unbleached all-purpose flour 

For the dark icing 
¾ cup (140 g) coconut sugar (I used brown sugar) 
2 Tbsp. arrowroot powder 
2 Tbsp. black tahini coconut or soy milk, if needed 

For the light icing (my version) 
½ cup (80 g) powdered sugar, sifted 
1 Tbsp. white tahini coconut or soy milk, if needed 

For the filling (I only used half as much) 
2/3 cup (90 g) coconut sugar (I used brown sugar) 
1 tsp. ground Ceylon cinnamon 
1 cup (100 g) ground poppy seeds 
2 Tbsp. coconut oil, melted 
2 Tbsp. black tahini


Heat the soy milk and coconut oil in a nonstick pan over a low heat until the oil is dissolved. Leave to cool slightly, then add the yeast, coconut sugar, and salt and whisk well. Transfer to a large bowl and, using a wooden spoon, mix the flour. Place on a clean, lightly floured surface and knead for a couple of minutes. (I did this in the stand mixer with the dough hook.)

Oil a large bowl and the dough. Put the dough in the bowl, cover with a damp tea towel, and leave to rise for 1 hour or until doubled in size.

Preheat the oven to 350 °F. Grease a 9”x13” baking pan; line the bottom with parchment paper, and grease it again (I used a nonstick spray). Set aside.

Meanwhile, prepare the icings. In two separate bowls, whisk together the ingredients for the dark icing and the light icing until thick. Set aside.

When the dough is ready, place it between two sheets of parchment paper and use a rolling pin to roll it into a rectangular shape about 5mm thick. (I just rolled it out on the floured countertop.)

To make the filling, combine the sugar, cinnamon, and ground poppy seeds in a bowl. Brush the surface of the dough with the melted coconut oil, spread with the tahini and sprinkle the poppy seed mixture evenly over the top.

Gently roll the dough away from you into a log, starting from the longer side of the rectangle. Using a serrated knife, cut the log across into 12 equal rolls. Carefully put the rolls into the prepared baking pan, leaving space between each one. Leave to rise for a further 10-20 minutes, then bake in the preheated oven for 25-30 minutes. Remove from the oven and drizzle with the icings while still hot. Serve.


Wednesday, December 06, 2023

Raspberry Graham Cottage Cheese Pudding


Alright, this post is a bit long-winded, so feel free to skip right down to the unexpected breakfast dish. For the rest of you, have you heard of cottage cheese ice cream? I started seeing variations on the recipe over the summer and wanted to try it – it’s got less fat and more protein than regular ice cream, so I figured I could get behind that! 

I started with this chocolate chip cookie dough ice cream, but did not like the result. It made too much cookie dough for the amount of ice cream; I had to use the whole pouch of vanilla pudding mix because otherwise the ice cream would have been bland AF, but the ice cream was too hard when taken right from the freezer, but then had an unpleasant pudding-y texture when thawed a bit. It just wasn’t my jam. It was ugly as sin, too, so I’m not posting pictures. 

Then I tried raspberry graham cracker ice cream. Once I puréed the cottage cheese mixture, I tasted it and swooned! That was fantastic stuff right there; I seriously considered just eating it straight. I then used my ice cream maker to freeze the cottage cheese mixture properly, so that I did not disturb it once it was layered with the raspberries and graham crackers. Once it was frozen, I had to let it thaw a bit before serving it. And it was fine. I mean, it was good, but the mixture by itself had been so great. And neither my husband nor my kids were big fans. So I did the only logical thing: I put the leftovers in the fridge overnight and had them as pudding for breakfast – it was heaven! 


I made it a few times since then, using maple syrup instead of granulated sugar and reducing the amount (since it’s not eaten frozen, you really don’t need as much). Obviously, this is not a low-calorie food, but it’s got calcium and protein, so there’s that. Make sure you purée the cottage cheese to a very smooth consistency. The version below is mine. 

16 oz. lactose-free cottage cheese
1 pint raspberries, divided 
2 Tbsp. maple syrup 
1 Tbsp. brown sugar 
½ tsp. vanilla extract 
3 rectangular graham crackers, crumbled 

With an immersion blender (or a food processor), purée the cottage cheese, half of the raspberries, sugar, brown sugar, and vanilla until the mixture has NO visible chunks remaining. 

Chop the remaining raspberries. 

In two mason jars, layer the cottage cheese mixture with chopped raspberries and crumbled graham crackers. Enjoy!


Copilot and Pussywillow

I had picked up some variegated sock yarn a while back (maybe a year and a half ago), simply because I liked the colors. We all feed the stash once in a while, right? And then I was diagnosed with carpal tunnel syndrome, so I don’t knit as much as I used to. Anyway, so there was this skein of Malabrigo Sock Yarn in the Cake Please colorway that I got to first, and I decided to make the Copilot cowl (it’s a free pattern, too!). 


After casting on the proper number of stitches, you join in the round, knit a border, and get started with a sort of lattice pattern. As I knit, I got the pattern down pretty quickly, and ended up missing an important line on the paper. I thought it was simply a matter of repeating the lattice pattern established after the border, so that’s what I did, right up until finishing the border along with the last yards of my skein of yarn. It was only as I was taking pictures for this post that I realized it didn’t look like the image… It looked more like the Autopilot, which is in fact how I was knitting. 


So I set it aside for a while, and eventually frogged it to remake it. This time, I cast on fewer stitches, since I thought the cowl had been a bit too long the first time around. I knit up the cowl the correct way, but when I looked at it, I didn’t like it. I think I must have knit two extra rows in one of the lattice stretches at some point, despite using a stitch counter. Plus, it now felt a little too short. Like, too long to wear it without wrapping it twice around your neck, but not long enough to comfortably wrap twice around your neck. 


I eventually frogged it again and knit it up one last time, shorter than the first time but longer than the second, making sure to count my rows properly. I’ve decided to leave it as is now because I’m just tired of this project! I perhaps should have steamed the yarn to make sure it wasn’t twisted, but I didn’t have it in me. It looks pretty good, honestly, but I’m annoyed with how long it took! 


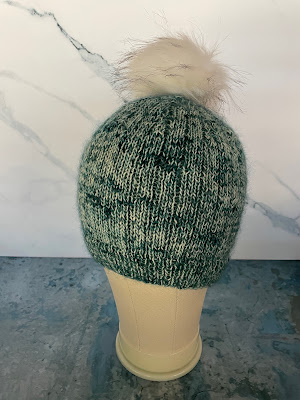
After that, because I can’t help myself when it comes to yarn in pretty colors, I decided to knit the Pussywillow Cap (in which you hold together a strand of fingering weight and a strand of lace weight yarns), with Madelinetosh Tosh Merino Light Yarn in Lakefront Speckle and Shibui Knits Silk Cloud Yarn in Lakefront (the colorways are no longer available at my usual store, Jimmy Beans Wool, but I have seen them elsewhere online as I post this). And I added a faux fur pompom just because. 

Once again, I managed to not pay enough attention and knit a rib pattern on every row instead of ribbing the wrong side and knitting the right side. *sigh* I just didn’t want to start over, so it is what it is. The result is really cute, and I just love the colors, but of course I wish I had more opportunities to wear knit hats. I still have half of my yarn left, too, so I might make another hat for the Etsy shop (but a different pattern, since this one is for personal use only).