Tuesday, September 26, 2023

The Elvis Sandwich


I wasn’t really going to post this recipe, but I ended up making it for my kids after bringing it up over the summer, and dang it if it isn’t a crowd-pleaser every time! I’m not necessarily recommending precise measurements, just giving rough amounts for 1 sandwich, and you can scale up as you need. (It should go without saying, but this is not healthy fare, and you shouldn’t have this sandwich often. But hey, it was a first for the kids and a second for me, I think, so we’re good.) For the bread, I used potato bread because I figured if you’re going to be decadent, you should just go all in. 

2 slices of white bread 
1 banana 
4 Tbsp. peanut butter (I really didn’t measure) 
2 slices of bacon, cooked to your liking 
2 Tbsp. lactose-free butter, at room temperature 

I cooked the bacon in a pan, then made sure there was only a little bit of bacon grease left in there and used the same pan for the sandwiches, at medium heat. 

Spread peanut butter on one side of each slice of bread. Slice the banana and put maybe 9 slices on one slice of bread, and put the bacon pieces on the other slice. Close the sandwich and butter the outside of each slice. 

Cook the sandwich until the bread is golden-brown on each side, a few minutes per side. Cut in half and serve (be careful, the peanut butter will be near liquid when hot). Enjoy!

Monday, September 25, 2023

Chocolate Cake with Strawberry Marshmallow Frosting


The Little Prince has a book called Cook It! The Dr. Seuss Cookbook for Kid Chefs, by Daniel Gercke. He asked me to make a specific recipe from it for his birthday, the cake called Cat in the Bath Birthday Cake. The name isn’t very descriptive, though, hence my title of Chocolate Cake with Strawberry Marshmallow Frosting. The first thing I have to say is that this isn’t a recipe for kids – the frosting is a grown-up undertaking, for sure. As a matter of fact, I couldn’t help but notice that in this official video, the chef makes the frosting while her kid is off somewhere else! It was so worth it, though, because the frosting was divine! 

The only thing that I would change would be to heat the sugar and strawberry purée to 230 °F, like in a seven-minute frosting, while whisking the egg whites with the cream of tartar and salt separately, then drizzling the syrup into the egg white mixture. My frosting was runny, like in the video, come to think of it; I would have preferred a stiffer consistency, like in the photo in the cookbook. The seven-minute frosting method seems better to achieve this. 

As a reminder, to make a lactose-free buttermilk substitute, you can use about 1 tablespoon of vinegar or lemon juice in 1 cup of lactose-free milk, or use lactose-free plain yogurt thinned out with some lactose-free milk. I also added some precisions regarding the size of the bowls to use. 


For the cake 
2 ½ oz. bittersweet chocolate, chopped 
1 ¼ cups hot decaffeinated coffee (or water) 
2 ½ cups sugar 
2 cups unsweetened Dutch-processed cocoa powder 
2 ¼ cups all-purpose flour 
1 ½ tsp. baking soda 
1 tsp. kosher salt 
¾ tsp. baking powder 
1 ¼ cups lactose-free buttermilk substitute (see note above)
2/3 cup neutral vegetable oil 
1 tsp. vanilla extract 
3 large eggs 

For the frosting 
8 oz. fresh strawberries, hulled 
2 large egg whites 
1 ½ cups sugar 
1 pinch of cream of tartar 
1 pinch of kosher salt 
sprinkles (optional) 


For the cake 
Preheat the oven to 325 °F. Grease three 9-inch round cake pans; line the bottom with parchment with parchment paper and grease again. 

In a medium microwave-safe bowl, microwave the chocolate on medium-low power in 30-second intervals, stirring in between, until melted. Whisk in the coffee until completely combined, then set aside to cool. (I did this in a double-boiler.) 

In a large-ish bowl (not your largest), whisk together the sugar and cocoa powder until there are no lumps. Whisk in the flour, baking soda, salt, and baking powder. 

In a small bowl, whisk together the buttermilk substitute, oil, and vanilla. 

In another large bowl (this time, your largest), beat the eggs with a handheld mixer until pale and frothy, about 3 minutes. Scrape in the cooled chocolate mixture and beat to combine. Pour in one-third of the buttermilk mixture and beat until just combined. 

Pour in one-third of the flour mixture and beat until just combined, then scrape down the sides of the bowl. Repeat two more times, alternating the buttermilk and flour mixtures, mixing just until the batter is smooth and free of lumps. 

Divide the batter among the prepared pans and bake until the tops spring back when touched and a toothpick inserted in the center comes out clean, 30 to 35 minutes. Transfer the pans to a wire rack to cool completely. 

When the cakes are cool, run a thin offset spatula or butter knife around the edges of the pans to loosen them, then invert them and remove the parchment paper. Turn the cakes right side up and trim the tops with a serrated knife so the layers are even (I didn’t bother). 

When the cakes are trimmed, move on to the frosting. (Don’t make the frosting ahead of time; it doesn’t stay spreadable for very long. If needed, the cakes can be baked a day ahead and stored in the refrigerator, tightly wrapped with plastic wrap.) 

For the frosting 
In a blender, purée the strawberries until very smooth, then press through a fine-mesh sieve. You should end up with 2/3 cup of strawberry purée. 

Heat 1 inch of water in a medium pot until simmering. 

(This is where you should read the note above regarding the method for the frosting – the following instructions are as they originally appeared in the cookbook.) In the metal bowl of a stand mixer, whisk together the strawberry purée, egg whites, sugar, cream of tartar, and salt. Place the bowl over the simmering water (without letting it touch the water) and whisk constantly until the sugar has dissolved. (The bowl will heat up, so use an oven mitt to hold it.) Transfer the bowl back to the mixer and whisk on high speed until thick and glossy with medium peaks, 3 to 5 minutes. Use the frosting immediately. 

Place one cake layer on a serving plate or sake stand and spread some of the frosting on top. Repeat with the remaining layers, stacking them on top of each other. Spread the frosting on the sides of the cake and smooth the top and sides, making swirls and swags if you like. Top with sprinkles, if using. This cake is best eaten the day it’s made. (Personally, I kept the leftover frosting in the fridge to use on other stuff, and I regret nothing. It was fantastic!)

Sunday, September 24, 2023

One-Skillet Creamy Sundried Tomato Chicken and Orzo

I had set aside this one-skillet sun-dried tomato chicken and orzo skillet recipe to make over the summer. Of course, since I found vegan lactose-free cream in the U.S., I can now make it in either country! And I will, too, because this was really a hit. 

2 Tbsp. extra virgin olive oil 
1 lb. boneless, skinless chicken breasts or small thighs 
1 tsp. dried oregano 
1 tsp. paprika 
¼-½ tsp. crushed red pepper flakes 
kosher salt and black pepper 
2 Tbsp. lactose-free butter 
1 medium shallot, chopped 
2 cloves garlic, minced or grated 
1 cup dry orzo pasta 
1/3 cup dry white wine, such as Pinot Grigio or Sauvignon Blanc 
1 cup lactose-free cream 
2 tsp. Dijon mustard 
1/3 cup grated parmesan cheese 
2 cups fresh baby spinach 
½ cup oil-packed sundried tomatoes, drained 
juice of 1 lemon 
fresh rosemary, for serving (optional) 

Preheat the oven to 400 °F. 

Heat 1 tablespoon olive oil in a large oven-safe skillet set over medium-high heat. Rub the chicken with 1 tablespoon olive oil, the oregano, paprika, red pepper flakes, salt, and pepper. When the oil is shimmering, add the chicken. Sear on both sides until golden, about 3-5 minutes per side. Remove the chicken from the skillet. 

To the same skillet, add the butter and shallot, cooking until fragrant, about 3 minutes. Add the garlic and orzo, cooking until lightly golden, 2-3 minutes. Add the wine and de-glaze the pan. Add 1 ½ cups water. Bring to a boil, cook 3-5 minutes, then add the cream, mustard, parmesan, spinach, and sun-dried tomatoes, stirring until the spinach has wilted. Slide the chicken and any juices left on the plate back into the skillet. Transfer to the oven and cook, uncovered for 10-15 minutes, until the chicken is cooked through. 

Serve the chicken topped with lemon juice and rosemary, if desired.


Tuesday, September 19, 2023

Stracciatella Dip


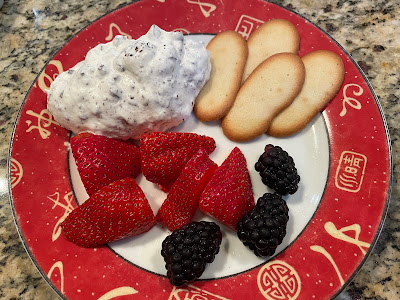
This Bon Appétit recipe was a great, easy dessert in the summer. Of course, it’s still quite warm in San Antonio, so I wouldn’t hesitate to serve this again! Everyone loved it, including the Little Prince, who doesn’t usually like sour cream (though the Fox just ate the berries and cookies). 

1 cup chilled lactose-free cream 
¼ cup lactose-free sour cream (Greek yogurt could work too) 
2 Tbsp. powdered sugar 
1 Tbsp. amaro, whiskey or rum (I omitted it) 
¼ tsp. kosher salt 
3.5 oz dark chocolate, finely chopped 
2 pints blackberries, strawberries, and/or pitted cherries (I threw in some cookies) 

Using an electric mixer, beat cream, sour cream, powdered sugar, amaro, and salt in a medium bowl until soft peaks form. Fold in chocolate. 

Transfer dip to a small bowl and serve with fruit for dipping.


Puffed Quinoa Peanut Butter Balls


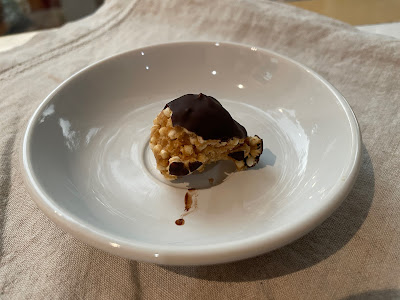
I finally got to try these puffed quinoa peanut butter balls this summer, since my mother had a huge bag of puffed quinoa on hand. It’s a quick treat that makes for a light dessert. The original recipe says it would also work with regular Rice Krispies (not the brown rice kind), but then you’d have more carbs and less protein, so seek out puffed quinoa if you can. 

1 cup puffed quinoa 
½ cup peanut butter 
3–4 Tbsp. agave nectar (or honey or maple syrup) 
1 Tbsp. crushed peanuts (optional, for extra crunch if using smooth peanut butter) 
1 tsp. vanilla extract 
vegan dark chocolate (optional, but highly recommended) 

In a mixing bowl, combine the peanut butter, agave and vanilla. If the mixture is too firm, heat it up on the stove a little bit. 

Add the puffed quinoa (and peanuts, if using), and stir to combine. 

Place mixture in the fridge for 15 minutes to let it firm up. 

Remove from fridge, roll into 12 balls, and return to fridge for 15 minutes before serving. 

Optional: dip some or all of the balls in dark chocolate.


Monday, September 18, 2023

Pizza à la crème de parmesan et à la saucisse


Cet été, j’ai fait cette pizza à la crème de parmesan et à la saucisse de Ricardo. Je n’avais pas de batteur sur socle, alors j’ai fait simple et j’ai acheté de la pâte à pizza à l’épicerie. J’ai fait la garniture, et c’était délicieux! Tout le monde a aimé. J’ai fait deux pizzas en tout avec les quantités de garniture ci-dessous et 2 livres de pâte. L’Ingénieur en voulait une avec du fromage mozzarella (sans lactose), alors j’en ai rajouté pour lui (sur la dernière photo), mais j’ai préféré la pizza telle quelle. 

Pour la pâte 
280 g (2 tasses) de farine tout usage non blanchie 
1 c. à thé de levure instantanée 
1 c. à thé de sel 1 tasse d’eau froide 

Pour la garniture 
1 tasse de crème sans lactose 
1 c. à soupe de jus de citron 
35 g (½ tasse) de fromage parmigiano reggiano râpé 
225 g (½ lb) de chair de saucisses italiennes (environ 2 saucisses – j’en avais 5) 
1 oignon rouge, émincé (j’en avais quelques tranches) 
1 c. à soupe de persil plat ciselé 
poivre 


Pour la pâte 
Dans un grand bol, à l’aide d’une cuillère de bois, ou dans un batteur sur socle, en utilisant le crochet à pétrir, mélanger la farine, la levure et le sel. Ajouter l’eau et mélanger jusqu’à l’obtention d’une boule molle. Pétrir la pâte environ 5 minutes sur un plan de travail fariné ou au batteur sur socle jusqu’à ce qu’elle devienne lisse. 

Former une boule avec la pâte et la déposer en la retournant dans un bol propre et légèrement huilé. Couvrir d’un linge humide et laisser reposer dans un endroit tiède et humide environ 2 heures ou jusqu’à ce que la pâte ait doublé de volume. 

Pour la garniture 
Placer la grille au centre du four. Préchauffer le four à 450 °F. Tapisser une plaque de cuisson d’environ 43 x 30 cm (17 x 12 po) de papier parchemin. 

Dans un bol, mélanger la crème et le jus de citron. Laisser reposer 5 minutes. Ajouter le parmesan. Réserver. (Vraiment, j’en avais assez pour deux pizzas, avec 1 livre de pâte chacune.) 

Avec les mains, former des boulettes d’environ ½ c. à thé avec la chair à saucisses. Réserver. 

Sur un plan de travail fariné, abaisser la pâte le plus finement possible jusqu’à ce qu’elle ait environ la même taille que la plaque. Déposer la pâte sur la plaque. 

Étaler la crème sur la pâte. Y répartir les oignons et les boulettes de saucisses. Poivrer. Cuire au four environ 15 minutes ou jusqu’à ce que la croûte soit cuite et dorée. 

Parsemer de persil. Couper en carrés et servir la pizza bien chaude.


Thursday, September 14, 2023

Candied carrots


I think I haven’t talked about the cookbook Keepers by Kathy Brennan and Caroline Campion, but I’m enjoying making a recipe from it now and again! This is their candied carrots, which I really enjoyed. I used a large pan and 1 ½ cups of water; my carrots took a bit longer to cook through, but it was worth it! I served them with TVP nuggets

1 lb. carrots, cut on the diagonal into ¼-inch thick slices 
2 Tbsp. lactose-free butter 
1 ½ Tbsp. sugar 
1 very large pinch of salt 

In a medium skillet, combine the carrots, enough cold water to barely cover (about 1 ¼ cups), the butter, sugar, and salt. Bring to a boil over high heat, then reduce the heat and simmer, partially covered, until the carrots are crisp-tender, about 5 minutes. 

Uncover, raise the heat to high, and cook, tossing occasionally (and more often toward the end), until the liquid has reduced to a clear glaze and evenly coats the carrots, 5 to 7 minutes more. (If the liquid is almost evaporated, but the carrots aren’t tender, add a little more water and continue to cook.) Check the seasonings and serve.

Croquettes à la protéine végétale texturée


J’ai essayé une recette de Julie Desgroseillers, soit ces croquettes à la protéine végétale texturée. J’ai déjà parlé de la PVT auparavant, j’en ai utilisé tout un sac. J’utilise la marque Bob’s Red Mill, mais je suis sûre qu’il y en a d’autres bonnes aussi! Les morceaux ne sont pas très gros, et je pense que c’était très bien comme ça pour ces croquettes, puisque de toute façon, tout passe au robot. On a bien aimé! Pour la sauce barbecue, j’avais celle-ci au congélateur, et j’ai servi ça avec des carottes confites

100 g (2 ½ tasses) de protéine végétale texturée (PVT) en gros morceaux 
1 tasse d’eau chaude 
3 c. à soupe de moutarde de Dijon (j’en mettrais moins la prochaine fois) 
2 œufs 
½ tasse de fromage cheddar fort sans lactose, râpé et bien compact 
2 c. à thé de poudre d’ail 
2 c. à thé de poudre d’oignon 
½ c. à thé de sel d’ail 
1 c. à thé de fumée liquide 
¼ tasse de graines de lin moulues 
1/3 tasse de farine blanche non blanchie 
poivre, au goût 
sauce barbecue, au goût 

Réhydrater la PVT avec l’eau chaude 2-3 minutes ou jusqu’à ce que les morceaux aient absorbés tout le liquide. 

Verser dans le robot culinaire et ajouter le reste des ingrédients (à part la sauce barbecue). 

Façonner les croquettes avec environ 2 c. à soupe de pâte pour chacune. Le tout devrait donner environ 18 croquettes. 

Dans un poêlon, faire chauffer de l’huile à feu moyen et y faire dorer les croquettes environ 2-3 minutes par côté. 

Servir les croquettes accompagnées de sauce barbecue. 

Pour réchauffer les restes, je recommande de les mettre au four à 400 °F pendant 15 minutes.


Porc satay à l'autocuiseur


J’ai fait ce porc satay à l’autocuiseur de Ricardo et nous avons vraiment adoré! C’est le genre de recette que je vais refaire au retour des températures d’automne… 

1 kg (2,2 lb) d’épaule de porc sans os et sans couenne, coupée en cubes 
3 c. à soupe d’huile végétale 
6 oignons verts, émincés, le blanc et le vert séparés 
2 gousses d’ail, hachées finement 
1 c. à soupe de gingembre frais haché finement 
1 tasse de bouillon de poulet 
¼ tasse de jus de lime 
¼ tasse de sauce soya 
1 c. à soupe de miel 
2 c. à thé de sambal oelek, ou plus au goût (je n’en ai mis que 1 c. à thé) 
¾ tasse de beurre d’arachide 
½ tasse de yogourt nature 10 % sans lactose 
¼ tasse d’arachides grillées et concassées 
½ tasse de coriandre fraîche ciselée 

Préchauffer le récipient de l’autocuiseur à la fonction sauté 2 minutes. Dorer la moitié du porc à la fois dans l’huile. Saler et poivrer. Vers la fin de la cuisson, ajouter le blanc des oignons verts, l’ail et le gingembre. Poursuivre la cuisson 2 minutes. Ajouter le bouillon, le jus de lime, la sauce soya, le miel et le sambal oelek. Bien mélanger. 

Couvrir et sélectionner la fonction viande. Régler le temps de cuisson à 25 minutes. 

Dépressuriser l'appareil naturellement (environ 15 minutes), puis retirer le couvercle. Prélever 250 ml (1 tasse) de jus de cuisson et verser dans un bol. Y ajouter le beurre d’arachide et bien mélanger au fouet. Transvider dans l’autocuiseur avec le vert des oignons verts. Bien mélanger. Rectifier l’assaisonnement. Servir dans des bols avec du riz basmati, si désiré. Garnir de yogourt, d’arachides et de coriandre.


Wednesday, September 13, 2023

Hot Fudge

It took me a long time to post this recipe because I actually ended up doing a face-off between two recipes. That totally tracks, right? I got the recipe below from Matthew Amster-Burton in a bonus episode of Spilled Milk, though it was also mentioned in Episode 507. It’s originally by Erin Nesbit. And then, a few months later, I tried this vintage recipe from Occidental Hotel and… it paled in comparison. Erin Nesbit’s recipe, which to me is now Matthew Amster-Burton’s recipe, is by far the best hot fudge you’ll make! 

4 ½ oz. unsweetened chocolate, chopped 
5 ½ oz. white sugar 
1/8 tsp. salt 
1 Tbsp. lactose-free butter 
1 cup lactose-free cream 
½ tsp. vanilla extract 

Place chocolate in a microwave-safe bowl and cook on high 1 to 2 minutes, stirring frequently, until mostly melted (I did this in a double-boiler). Transfer to a heavy-bottomed saucepan over medium-low heat and stir in sugar, salt, and butter. Stir in cream, a little at a time, until smooth. Heat through, without boiling, then remove from heat and stir in vanilla. Serve warm, but store in the refrigerator.