Thursday, March 30, 2023

Grain-Free Sugar Cookies and Raspberry White Chocolate Ganache


For Valentine's Day, I made these grain-free sugar cookies from Eat Yourself Skinny, and they were fantastic! We really couldn’t tell there was anything unusual about them, and they were just as delicious as they looked. I made some of them dipped in the recommended white chocolate glaze, which had an okay consistency, but then I also made a half-batch of raspberry white chocolate ganache from an Instagram account that no longer exists (for the record, the user was about.fig.and.thyme from Waterloo, Ontario, in 2021). Good thing I had a screenshot! The full recipe is below, and it was glorious. I froze the leftovers and put them in my kids’ lunchboxes once in a while. 

For the grain-free sugar cookies 
2 cups almond flour 
½ cup coconut flour 
½ tsp. baking soda 
½ tsp. salt 
½ cup lactose-free butter, softened to room temperature 
¼ cup coconut oil, melted and cooled 
¼ cup sugar 
¼ cup baking Stevia (I used monkfruit sugar; regular sugar will work too) 
1 egg 
1 ½ tsp. vanilla extract 

In a medium bowl, whisk together almond flour, coconut flour, baking soda and salt; set aside. 

In the bowl of your stand mixer (or you could use a hand mixer), cream together butter, coconut oil, sugar and Stevia. Then add the egg and vanilla, mixing until combined. 

While the mixer is still running, slowly add the flour mixture to the creamed ingredients, a cupful at a time, until all combined. 

Form the dough into a ball and wrap with plastic wrap. Chill the dough in the fridge for at least one hour, but best overnight. 

Preheat oven to 350 °F and line two baking sheets with parchment paper silpat baking mats. 

Roll out the dough between two pieces of parchment paper to about ¼″ thickness and cut into shapes. You will need to continually roll out the dough so if it gets too sticky you can place the dough back in the fridge (or freezer) to chill again so that it’s easier to roll out. 

Transfer cookies to baking sheets and bake in the oven for 10 to 13 minutes, until slightly golden (my cookies were smallish and I baked them 8 minutes). Allow cookies to cool completely on a wire rack before decorating. 


For the white chocolate glaze (Eat Yourself Skinny) 
½ cup white chocolate chips 
1 Tbsp. coconut oil 
2 drops pink or red food coloring 
assortment of sprinkles, optional 

While the cookies are cooling, put the chocolate and coconut oil in a small microwavable-safe bowl and melt in the microwave in 15 to 30 second intervals (mixing each time) until you reached the desired consistency. (I did this in a double boiler.) Dip the cookies into the melted chocolate and immediately top with sprinkles. 


For the raspberry white chocolate ganache (about.fig.and.thyme) 
2 cups raspberries (frozen is fine) 
1/3 cup sugar 
½ cup lactose-free whipping cream 
1 ½ cups white chocolate chips 
1 Tbsp. lactose-free butter 

Heat the raspberries and sugar until they bubble up and make a sauce. Strain it through a metal sieve and set aside. 

In a saucepan, simmer whipping cream until you see gentle bubbling (not boiling!), then remove from heat. Immediately add the white chocolate chips and butter and let them melt. 

Stir until you achieve a smooth consistency, then stir in the raspberry mixture. Pour in a bowl and refrigerate until it thickens like frosting, then spread on cookies.


Wednesday, March 29, 2023

Peggy Sue Cardigan


Here’s the latest big knitting project I worked on. I had decided to get back to knitting that summer cardigan, and since I no longer had yarn in mind for it, I went about choosing the pattern first. The one I had liked best when looking around months earlier was the Peggy Sue cardigan, so I circled back to it, then set out to look for yarn. The timing was perfect since I had a gift certificate from Dear Sister to use, and I wanted to spend it on something for myself instead of something I would give away. 

Did I mention that I have a thing for variegated yarn? Even though I know it’s not the best for stitch definition and this pattern has cables, I just can’t help myself? Well, I found the Video Baby colorway by Madelinetosh and just had to have it. It reminded me of what I was trying to achieve on one of those skeins I dyed. I ended up choosing the Farm Twist yarn over the Tosh DK, and it was a joy to work with! 


This cardigan is knit from the top down, which I prefer to other methods. The sizing was accurate and the 4 skeins I had calculated (based on the pattern’s yardage requirements) were enough, though I got nervous at the end. When I was about to start my third skein, I decided to knit the sleeves before continuing down the body as instructed, because I didn’t want to run out of yarn before finishing them. That being said, if I made this cardigan again, I think I would take it a step further and actually knit the button bands as I go instead of picking up stitches on the finished cardigan and making a moss stitch edge. It would make button spacing more difficult, that’s true, but then again I used 9 buttons (from my stash) instead of the 8 recommended, so couldn’t that be fudged a bit too? I think I would have had enough yarn for another repeat of the cables, but there’s no way to figure that out until you’ve finished the whole thing with the button bands, so you’re definitely not going to frog it at that point… 

Anyway, this was pretty easy to knit. The beginning is much faster than the cables, which get a bit tedious, but even those weren’t too bad. I notice the pooling of color changed depending on how many rows I could get from a given yardage (as I increased for the shoulders and suddenly cast off after the arm holes), but the overall look doesn’t bother me, so I don’t regret my choice of yarn. I really look forward to wearing the cardigan with my dress now!


Sunday, March 26, 2023

Paleo Muffins


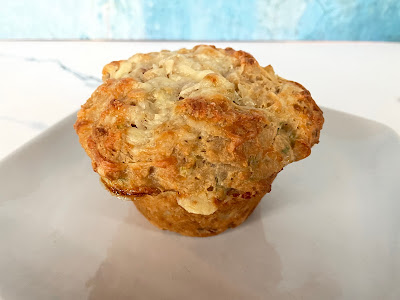
I came across this recipe for Paleo morning glory muffins last fall and tried it for the first time in November. I prefer weighing my dry ingredients, especially when it comes to gluten-free flours, so I looked at the nutrition label on the bag of almond flour to figure out what that would be. It said that 1 tablespoon of almond flour weighs 15 grams, which means that ¾ cup would be 180 grams. I proceeded with that amount, using slivered almonds instead of walnuts and topping up the raisins with dried cherries when I didn’t have enough of the former; I baked them 25 minutes, a bit less than required. 


While the results were encouraging, I thought it was clear that the muffins had way too much almond flour. When I looked it up online, I found another source that said the weight of almond flour should be half that (much closer to the weight of all-purpose wheat per cup). So I decided to make them again to take with us on the plane in December, this time tailoring the ingredients to suit my kids: mini chocolate chips instead of the dried fruit, no nuts and (sadly) no shredded coconut, but a whole shredded carrot to compensate. And I used 90 grams of almond flour. I found these too soft and think they would have needed more flour (*facepalm*). However, on the plane, the Fox said these were the best! At this point, I was also questioning whether the baking powder was even doing anything, and I’ve since established that it does not. 


So I made them a third time, eliminating the baking powder and reducing the cinnamon, and can no longer call them morning glory muffins because I’ve changed too many things. Here’s my recipe – it makes 8 muffins, and you can double it. 

1 cup (135 g) almond flour 
(½ cup shredded coconut, if you or your kids would like) 
½ cup mashed sweet potato 
½ cup mini chocolate chips 
¼ cup honey 
1 shredded carrot (about ½ cup) 
2 eggs
½ tsp. cinnamon 
1 tsp. vanilla extract 

Preheat the oven to 350 °F. Grease a muffin pan or use paper liners (I tried with a greased silicone pan and with paper liners in a metal pan; both work). 

Combine all ingredients in a large mixing bowl and mix well (I used a whisk). 

Portion the dough into the prepared muffin pan and bake 25-28 minutes. Allow to cool completely and enjoy.


Saturday, March 25, 2023

Honey Garlic Chicken

This great recipe was originally for skewers, and instead I decided to roast everything in the oven. I ended up nearly doubling the amount of chicken, but left the amounts of marinade and ingredients as is, which was a better ratio for our family. I still had leftovers, so I put them in the freezer for another day. 

For the marinade 
3 Tbsp. vegetable oil 
⅓ cup honey 
⅓ cup soy sauce 
3 cloves garlic, minced 
1 tsp. pepper 

For the chicken and vegetables 
3 chicken breasts, cubed 
1 red onion 
2 red bell peppers 
2 orange bell peppers 
2 yellow bell peppers 
fresh parsley, to serve (optional) 

Soak the skewers in water for 5-10 minutes and set aside. 

In a bowl, mix together the ingredients for the marinade. Add the chicken, stir to coat, cover with plastic wrap and refrigerate for 30 minutes to 2 hours. 

If baking, preheat the oven to 400°F. (I also lined two baking sheets with parchment paper.) 

Prepare the vegetables by cutting them into 1-inch (2 ½ cm) squares. 

Assemble the skewers starting with the red onion, followed by the bell peppers and chicken. Repeat three times. (I just tossed everything together on the prepared baking sheets.) 

Place the prepared skewers on a baking sheet and brush with remaining marinade. 

Bake or grill for 20-30 minutes or until chicken is no longer pink. (I had one baking sheet on the lower rack and one on the upper rack; after 15 minutes, I switched them out and roasted them an extra 15 minutes, so 30 minutes total.) 

Sprinkle with parsley and serve.


Friday, March 24, 2023

Almond Flour Chocolate Chip Cookies


I recently compared two recipes of chocolate chip cookies made with almond flour (and so, gluten-free): one was printed on the bag of almond flour, and the other was from someone’s blog. I’d had the one from the blog bookmarked for some time, and I initially thought it had less sugar than the one from the bag of flour, but it turns out that the yield is different, so it wasn’t a fair comparison. While both recipes are good, I had a slight preference for the one on the bag of flour. I’ve written it out below, with my modifications (weight amounts, no nuts, ingredients in the proper order). It’s a good cookie in and of itself, but all the more so considering that it contains only one type of “flour” instead of all-purpose wheat, and it’s not even grain flour. My mother-in-law can’t have gluten anymore and she really enjoyed these too! 

3 cups (360 g) almond flour 
½ tsp. baking soda 
½ tsp. salt 
1 ½ sticks (¾ cup) lactose-free butter, at room temperature 
½ cup brown sugar 
½ cup granulated sugar 
1 egg 
1 tsp. vanilla extract 
1 ½ cups (10 oz) chocolate chips 

Preheat oven to 350 °F. Line two baking sheets with parchment paper or a silpat. 

In a medium bowl, mix together almond flour, baking soda, and salt. 

In a stand mixer bowl, put the butter and sugars. Cream together using the paddle attachment. 

Add in the egg and vanilla; mix well, scraping down the sides of the bowl as needed. 

Add the dry ingredients to the mixture and mix at low speed until a soft dough forms. Add the chocolate chips and mix until incorporated. 

Scoop out heaping tablespoons of dough (I used my cookie scoop) and place on the prepared baking sheets, 2 inches apart. 

Bake for 9 to 13 minutes (11 minutes in my case) until the edges are slightly brown and the interior looks barely set. (This will yield chewy cookies; for crispy ones, bake an additional 1 or 2 minutes.) 

Allow the cookies to cool for 5 minutes on the tray before transferring to a wire rack for another 10 minutes of colling (I just let them cool right on the baking sheets).


Waffle Omelette


I really had my doubts when I saw this recipe – will it work? Will it just stick to the waffle iron and make me question my life choices? Well, this waffle omelette totally works! I used cheese and ham as filling, but I’d add vegetables next time. I also ended up using a third egg when I doubted my egg-to-filling ratio, but am not sure it was necessary. I really liked this! 

2 eggs, beaten 
fillings/toppings of your choice 
salt and pepper, to taste 

In a medium bowl, add the beaten eggs, any of your favorite toppings, salt, and pepper. Mix well. 

Grease a waffle iron with nonstick spray. Add the egg mixture and cook according to machine instructions to until the eggs are fully set and slightly browned, 2 minutes. 

Remove the egg from the waffle iron and serve.

Thursday, March 23, 2023

Devil's food cake végétalien


J’ai essayé quelques recettes de Ricardo qui n’ont pas bien fonctionné. Comme ce pouding aux framboises, à la mangue et aux amandes qui avait pourtant l’air si bon, ces légumes et boulettes de saucisse à la mijoteuse, ou encore ces magnifiques dumplings au porc effiloché barbecue (enfin, le porc était génial, mais pour les dumplings, on repassera). 

Mais quand j’ai vu passer ce devil’s food cake végétalien sur les réseaux sociaux, je n’ai pas pu résister! Et il était absolument délicieux! Vraiment, ça vaut la peine de faire cette recette. 

Le devil’s food cake est le contraire du gâteau des anges en ce sens qu’au lieu d’être blanc, léger, et sans matière grasse, il est foncé, riche, et… pas sans matière grasse, disons? Selon Termium, le terme français pour « devil’s food cake » serait « gâteau du diable », mais malgré la logique évidente, la source citée est nettement douteuse, et Google ne montre pas beaucoup d’occurrences de ce terme. Je l’ai donc laissé le terme en anglais, tout comme l’a fait Ricardo avant moi. 


Pour le gâteau 
300 g (2 tasses) de farine tout usage non blanchie 
210 g (1 tasse) de sucre 
160 g (¾ tasse) de cassonade 
2 c. à thé de poudre à pâte 
1 c. à thé de bicarbonate de soude 
½ c. à thé de sel 
1 ½ tasse de boisson végétale 
2 c. à thé de vinaigre de cidre 
1 c. à thé d’extrait de vanille 
½ tasse d’huile végétale 
50 g (½ tasse) de cacao, tamisé, et plus pour saupoudrer 

Pour la ganache 
115 g (4 oz) de chocolat noir végétalien, haché finement 
½ tasse de boisson végétale 
1 c. à soupe de sirop de maïs clair 


Pour le gâteau 
Placer la grille au centre du four. Préchauffer le four à 350 °F. Bien huiler un moule Bundt d’une contenance de 2,5 litres (10 tasses). Saupoudrer de cacao. 

Dans un bol, mélanger la farine, le sucre, la cassonade, la poudre à pâte, le bicarbonate et le sel. Réserver. 

Dans une petite casserole, porter à ébullition la boisson végétale. Retirer du feu. Ajouter le vinaigre et la vanille. 

Dans un autre bol, mélanger l’huile et le cacao au batteur électrique. À basse vitesse, incorporer les ingrédients secs en alternant avec le mélange de boisson chaude jusqu’à ce que la pâte soit homogène. Répartir la pâte dans le moule. 

Cuire au four 40 minutes ou jusqu’à ce qu’un cure-dents inséré au centre du gâteau en ressorte propre. 

Laisser tiédir sur une grille 15 minutes. Démouler le gâteau en le renversant sur la grille. Laisser refroidir complètement, soit environ 2 heures. 

Pour la ganache 
Dans un bol, déposer le chocolat. 

Dans la même petite casserole, porter à ébullition la boisson végétale. Verser sur le chocolat et laisser reposer 1 minute sans remuer. Mélanger au fouet jusqu’à ce que la préparation soit homogène. Ajouter le sirop de maïs et mélanger jusqu’à ce que la ganache soit lisse. Laisser tempérer 30 minutes ou jusqu’à ce que le mélange épaississe légèrement. 

Verser la ganache en filet sur le gâteau refroidi. Laisser figer avant de servir.


Wednesday, March 22, 2023

Easiest Ever Pasta Bolognese


I subscribe to Julia Turshen’s newsletter now, and she shares some great recipes in it. For example, this easiest ever pasta bolognese (video here). It took me a while to make it strictly because the yield was written down as 4 servings, and I typically make more in one go, but didn’t want to risk doubling quantities in a pressure cooker. It turns out, however, that this made plenty for two meals for the 4 of us! Also, in addition to being the easiest ever bolognese, it was delicious! 

I made this with turkey because we were already having red meat that week. Julia Turshen says cooked lentils or beans would also work, and that you could add vegetables during the sautéing part. I used regular pasta (by which I mean, not low-carb or gluten-free), and that’s what I recommend because adapting things in a pressure cooker is more complex than in a pot of boiling water. The only difference is that I used the quick release valve after cooking instead of the natural release. And I used a jar of garlic-basil tomato sauce. 

2 Tbsp. olive oil 
1 lb. lean ground meat (beef, turkey, chicken, pork, lamb, any sausage out of its casing, plant-based ground meat – whatever!) 
2 tsp. garlic powder 
2 tsp. dried oregano 
2 tsp. kosher salt (I used 1 tsp. Morton brand) 
a 24-oz. jar of tomato sauce (such as Rao’s) or 3 cups homemade tomato sauce 
3 cups boiling water 
1 lb. whole wheat pasta (any short type like penne or ziti works well) 
¼ cup lactose-free sour cream (I used it, but it’s optional) 
grated parmesan or pecorino, for serving (optional) 

Put your Instant Pot on “Sauté” and add the olive oil, ground meat, garlic powder, dried oregano, and salt. Cook, stirring to break up the meat, until the meat has just lost its rawness, about 5 minutes. Stir in the tomato sauce and boiling water (you can use the empty jar as a measuring cup, but be sure to use a towel or oven mitt to pick it up because it will be HOT!). Add the pasta and stir everything well to combine. 

Securely attach the Instant Pot lid, make sure it’s sealed, and set it for 5 minutes on high pressure. After that is done, let it naturally release for 5 minutes (unless your pasta is not whole wheat, in which case use the quick release valve like I did). Then vent whatever steam/pressure remains and unlock the lid. Stir in the sour cream. Serve immediately with lots of grated cheese on top.

Monday, March 20, 2023

Lait à la banane


Je vous donne une petite recette toute simple aujourd’hui. Enfin, j’aurais bien aimé vous parler de gnocchis à la carotte ou de pain marbré vanille-cacao avec glaçage chocolat-noisette, mais dans le premier cas, je pense que j’étais la seule à aimer ça, et dans le deuxième, ce n’était pas si spécial. 


Et là, j’ai essayé la charmante recette de lait à la banane d’Aryane Héroux-Blais (que je me trouve à connaître un peu par Facebook), et c’était délicieux. 

Pour les curieux : le lucuma est un fruit. Séché et réduit en poudre, il est un peu sucré mais, puisqu’il est composé de glucides complexes, il aiderait à améliorer la sensibilité à l’insuline et à protéger contre le diabète de type 2. Il contient des antioxydants et pourrait aider à lutter contre l’hypertension. Cliquez ici pour en savoir plus. Honnêtement, tant que votre banane est bien mûre, je suis sûre que vous pouvez vous en passer, mais moi, j’étais curieuse! 

1 grosse banane mûre 
½ tasse d’eau 
1 c. à thé de poudre de lucuma 
1 c. à soupe de graines de chanvre 
1 pincée de cannelle de Ceylan 

Mettre les ingrédients au mélangeur jusqu’à ce que le tout se réchauffe un peu. Verser sur du granola ou des céréales.


Tuesday, March 14, 2023

Spiced Chickpea Stew with Coconut and Turmeric


I was looking for a simple vegetarian dinner. I tried a new-to-me Moroccan shakshuka with bell peppers, but decided I like mine better. Enter Alison Roman’s spiced chickpea stew with coconut and turmeric, which was just the dish I was looking for! It’s very simple, yet tasty and hearty enough for dinner with rice (or Right Rice in my case) and bread on the side. I recommend this! The quantities below yield 4 adult-sized servings, or enough for two meals with kids who are as not as into it as adults. 

¼ cup olive oil, plus more for serving 
4 garlic cloves, chopped 
1 large yellow onion, chopped 
1 (2-inch) piece of ginger, finely chopped 
kosher salt and black pepper 
1 ½ tsp. ground turmeric, plus more for serving 
1 tsp. red pepper flakes, plus more for serving (I used 1 pinch Korean pepper) 
2 (15-ounce) cans chickpeas, drained and rinsed 
2 (15-ounce) cans full-fat coconut milk 
2 cups vegetable stock 
1 bunch Swiss chard, kale, or collard greens, stems removed, torn into bite-sized pieces 
1 cup mint leaves, for serving 
plain lactose-free yogurt, for serving (optional) 
toasted pita, lavash, or other flatbread, for serving (optional) 

Heat oil in a large pot over medium heat. Add garlic, onion, and ginger. Season with salt and pepper, and cook, stirring occasionally, until onion is translucent and starts to brown a little at the edges, 3 to 5 minutes. 

Add turmeric, red pepper flakes, and chickpeas, and season with salt and pepper. Cook, stirring frequently, so the chickpeas sizzle and fry a bit in the spices and oil, until they’ve started to break down and get a little browned and crisp, 8 to 10 minutes. Remove about a cup of chickpeas and set aside for garnish. 

Using a wooden spoon or spatula, further crush the remaining chickpeas slightly to release their starchy insides and help thicken the stew. Add coconut milk and stock, and season with salt and pepper. 

Bring a pot to a simmer, scraping up any bits that have formed on the bottom of the pot. Cook, stirring occasionally, until the stew has thickened, 30 to 35 minutes. (Alison Roman recommends that you taste a chickpea or two, not just the liquid, to make sure they have simmered long enough to be as delicious as possible. If, after 30 to 35 minutes, you want the stew a bit thicker, just keep simmering until you’ve reached your desired consistency.) Add greens and stir, making sure they’re submerged in the liquid. Cook until they wilt and soften, 3 to 7 minutes, depending on what you’re using (spinach will soften much faster than kale or collard greens). Season again with salt and pepper. Divide among bowls and top with mint, reserved chickpeas, a sprinkle of red pepper flakes, and a good drizzle of olive oil. Serve alongside yogurt and toasted pita, if using; dust the yogurt with turmeric of you’d like.

Thursday, March 09, 2023

Almond Cashew Butter with Cocoa Nibs

I had tried a low-carb chocolate chip scone, but this is the only picture I have left – my iPhone ate the rest. I noted that I had to double the amount of yogurt to make it work, but the resulting baked goods had the right consistency. The kids didn’t like them as much as I would have hoped. However, more importantly, I think this helped me clarify something about protein powder for me. You see, I can’t have the whey-based ones (because of lactose), so I keep trying vegan ones. They always have an aftertaste that I dislike, and I had associated that with the artificial sweeteners, so this time I went for Vega brand protein powder sweetened with cane sugar, and… It turns out it’s the pea. I just don’t like pea protein! And since that flavor carries through to anything you make with it, these scones were not my favorite.


 Anyway, then I turned to a more natural way to get protein, with this almond cashew butter with cocoa nibs. It ends up being very thick and has been compared to cookie dough, which I have to say is pretty close! (Full disclosure: I have since learned that one really cannot count on nuts for a serving of protein, because you’d have to eat something like 1,000 calories of almonds just to get your 20 grams of protein. I mean, it’s better than nothing, but should not be the main source of protein in a meal.) I’m rally enjoying this, and the Little Prince likes it too (the Fox hasn’t tried it, despite the cocoa nibs). I got 3 jars from these quantities. 

2 cups raw cashews 
2 cups raw almonds 
1-2 tsp. coconut oil (I used a bit more) 
½ tsp. vanilla extract 
1 tsp. coconut sugar 
¼ tsp. sea salt 
2 Tbsp. cacao nibs 

Preheat oven to 350 °F. On a large baking sheet, spread out almonds and cashews and roast in oven for 10 minutes until slightly brown. Be very careful not to burn the nuts! Cool for 10 minutes. 

Transfer nuts to the bowl of a food processor (I used my Vitamix and really pushed it to its limits – the original post says it might take 20 minutes total with a food processor) and process for 10-15 minutes, scraping down the sides as necessary (about every 2 minutes). At this point the nuts should start to clump together. Add in a teaspoon of coconut oil and continue to process until you reach the desired consistency; add another teaspoon of coconut oil if you'd like it creamier. 

Next, add in vanilla extract, coconut sugar and sea salt. Process again for 30 seconds. Taste and add more salt or coconut sugar if necessary. 

Add in cacao nibs and pulse a few times to incorporate nibs into the nut butter. Transfer to jars (this will keep for about a week at room temperature, longer in the fridge).


Wednesday, March 08, 2023

Crêpes aux champignons et au gruyère

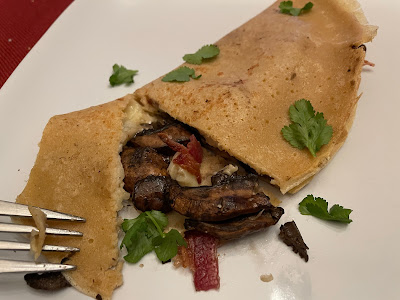
Bien en retard, voici la recette que j’ai faite pour la Chandeleur cette année. Le Renard aime les champignons, alors même s’il aime moins le fromage Suisse, il a trouvé son compte là-dedans. Le reste de la famille a bien apprécié aussi! 

J’ai fait mes crêpes avec cette recette, mais sans sucre ni vanille et avec de la farine de blé blond. J’ai aussi utilisé moins de champignons – je pense que j’en avais 1 livre. 

4-6 crêpes minces, maison ou du commerce, réservées au chaud 
1 échalote, émincée 
2 c. à soupe de beurre sans lactose 
1 c. à soupe d'huile 
6 tasses de champignons mélangés (3 barquettes), par exemple pleurote, shiitake et crimini, tranchés 
¼ tasse de vin blanc (ou de bouillon), pour déglacer 
4 tranches de bacon 
2 tasses de gruyère sans lactose râpé 
herbes fraiches et pousses, au goût, pour garnir 
sel et poivre 

Faire cuire le bacon dans un poêle à feu moyen-fort jusqu'à ce qu'il soit croustillant. L'égoutter puis le défaire en gros morceaux et le réserver. 

Dans une autre poêle, faire revenir le beurre et l'huile à feu moyen. Ajouter l'échalote française et les champignons tranchés, puis faire revenir en mélangeant souvent, pendant environ 5 à 7 minutes. 

Monter le feu, puis ajouter le vin ou le bouillon. Mélanger jusqu'à ce que le liquide soit évaporé. Saler et poivrer puis réserver. 

Une par une, étendre les crêpes chaudes, puis parsemer de fromage gruyère râpé. Ajouter les champignons puis quelques morceaux de bacon. Compléter avec des fines herbes ou des pousses. Plier ou rouler les crêpes et servir!


Monday, March 06, 2023

JUST Egg


This post wasn’t really planned, but I decided to tell you about JUST Egg. I first had it at a local vegan restaurant called Plantology, where I was really pleasantly surprised. It was a vegan substitute for eggs prepared omelet-style, and I couldn’t tell it wasn’t actually eggs. It looked the same, had the same texture, and tasted the same. 

JUST Egg is vegan, made from plants (mostly mung beans); it contains no saturated fat or cholesterol, and has an amount of protein comparable to eggs. It contains natural color (carrot and turmeric) and the one I bought was free of major allergens (check the label for different products by the brand, as that can change). I assume the “just” comes from “justice,” as it would be cruelty-free and probably more sustainable than real eggs. 

I ended up buying a container of JUST Egg at the store and had some for lunch. I cooked them simply, like I would scrambled eggs, though there are also recipes on their website. It basically cooks up like real eggs and can be used in baked goods as well. 

When I ate the scrambled “eggs” plain, they had a faint vegetal taste that was not unpleasant, but if you’re trying to really fool yourself, add seasonings or lactose-free shredded cheese. I think this is a great alternative for vegans, flexitarians, and curious foodies alike.


Triple Ginger Chocolate Chunk Cookies


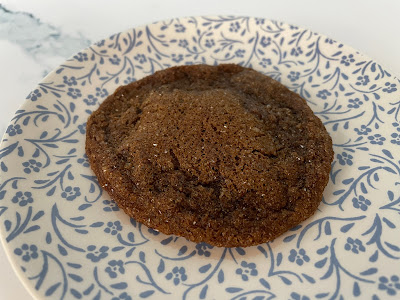
Apparently I posted six recipes in a row that were main dishes – we’re due for a dessert here! I’m still trying to catch up on which pictures I lost when my iPhone was malfunctioning; I tried that tip for replacing the salt with double the amount of soy sauce in chocolate baked goods, for an umami je-ne-sais-quoi, but it was a big let-down: I used it in my regular brownie recipe, and not only could I not taste anything different even after using 2 teaspoons, but the brownies themselves completely fell apart, even though logic dictates that in such a small amount, this substitution should not make a difference. Too bad. 

I want to give you a good recipe, though, so here’s one for triple-ginger chocolate chunk cookies. These were moist and delicious; the ginger and chocolate really play well together! For the chocolate chunks, I chopped two bars of Ghiradelli bittersweet chocolate. 

The quantities below yield about 24 cookies. 

2 cups + 1 Tbsp. all-purpose flour 
2 tsp. baking soda 
½ tsp. coarse salt 
1 tsp. ground cinnamon 
1 ½ tsp. ground ginger
¼ tsp. ground cloves 
1 Tbsp. cocoa powder, sifted 
¾ cup (1 ½ sticks) lactose-free butter, at room temperature 
2/3 cup light or dark brown sugar, packed 
1 Tbsp. grated fresh ginger 
2 large egg yolks 
½ cup unsulphured molasses 
1 tsp. vanilla extract 
1/3 cup candied ginger, coarsely chopped 
8 ounces dark chocolate chunks 
granulated sugar, for rolling 

Whisk together flour, baking soda, salt, cinnamon, ground ginger, ground cloves, and cocoa in a large bowl. Set aside. 

With a stand or hand mixer, cream together butter and brown sugar until light and fluffy, 2-3 minutes. Add fresh ginger and egg yolks and beat briefly to combine. 

Add molasses and vanilla. Beat briefly to combine. Add flour mixture. Mix until combined and no flour pockets remain. Stir in chocolate chunks and candied ginger. 

Chill dough until firm, at least 3 hours or overnight. 

Place about ½ cup granulated sugar in a small bowl (it’s fine to start with less and add any as needed). 

Roll 1.5-ounce pieces (about the size of a golf ball) of cookie dough into balls and roll in the sugar. (Mine were a bit bigger.) Place on a lined cookie sheet 2 inches apart. Freeze for about 10 minutes while you preheat the oven to 350 °F. 

Bake for 10 to 12 minutes, rotating after 5 minutes (I did not bother), until beginning to crack and edges are just set. Do not overbake. 

Let cookies cool briefly on baking sheet, then transfer to a cooling rack and cool completely.


Saturday, March 04, 2023

Bacon and Egg Jumbo Muffins

I tried two very similar recipes for what are essentially jumbo muffins with an egg baked in the center. Sadly, I seem to have lost the bookmark to that first recipe – it called for hard-boiling the eggs first, then the dough was wrapped around them. They were good, but not great. (I reserve the right to edit this post if I find that recipe again.) 


The second recipe is from BuzzFeed. These muffins are not as pretty, but I preferred them. They have a proper batter instead of dough, and the eggs were cooked right in the center at the same time as the batter. I’m not sure how these would fare in a lunchbox, but when served warm, they were fantastic! My husband and I loved these, but my kids (who ate them warm, at home, on a severe weather day) were not fans. I can’t understand why, so I’m still recommending them! 

3 cups flour (I used white whole wheat flour) 
1 Tbsp. sugar 
1 Tbsp. baking powder 
1 tsp. salt 
7 eggs, divided (1 + 6) 
1 ¼ cup lactose-free buttermilk substitute 
3 Tbsp. lactose-free butter, melted 
1 cup lactose-free sour cream 
1 cup cooked and chopped bacon 
1 cup chopped green onions 
1 ½ cup shredded lactose-free cheddar cheese, divided (1 ¼ cup + ¼ cup) 

Preheat oven to 350 ˚F. Grease a 6-cup jumbo muffin tin. 

In a large mixing bowl, whisk together flour, sugar, baking powder and salt. Set aside. 

In a medium mixing bowl, whisk together 1 egg, buttermilk, melted butter, and sour cream. 

To the dry ingredients, add and fold in the wet ingredients, cooked bacon, green onions and 1 ¼ cup of the cheddar cheese until just incorporated. 

Using an ice cream scoop, fill each cup of a prepared large muffin tin with one large scoop. 

Using a spoon, create a well in each of the scoops, pressing the batter up against the side of the pan, making sure it is deep enough to hold an egg. 

Crack an egg into each of the wells of batter. 

Using two spoons, drop small scoops of batter, first around the outside of the egg, building up the outer edge of the muffin and sealing in the egg whites and yolk, and finally over the top to cover the yolk. Be careful not to apply too much pressure while dropping above the yolk or it may break. 

Top each muffin with remaining ¼ cup of cheddar cheese (I had a bit more). 

Bake in preheated oven for 25-30 minutes. 

Remove from oven and allow to set 5 minutes before removing from pan. These are best served warm; leftovers should be refrigerated and warmed up before serving.