Thursday, September 30, 2021

Chocolate Protein Muffins


My friend Jen shared this muffin recipe with me, and I’m SO glad she did! They are flourless chocolate muffins, sweetened with honey and packed full of nutrients. I mean, there are green vegetables in there and you’d never guess! I loved these muffins, and so did both of my kids. 

The first time I made them, I used a regular metal muffin pan that I had greased. I found that the bottom of the muffins still stuck to the pan a bit, so the second time around, I made them in my silicone pan (also greased), and it was absolutely perfect! These muffins don’t rise much, so you can fill each cavity almost to the top (I would have had enough for 13 muffins the first time, and filled the pan slightly more the second time for 12 muffins with no spillage). I had used half peanut butter and half almond butter that time; you could use sunbutter if you want them nut-free. And the Little Prince walked in the kitchen in time to see the contents of the blender before I activated it, and he still liked these muffins – win! 

You can easily store them at room temperature for a day or two, or store them in the fridge or freezer for longer. I think I’ll need to make these often! 

1 cup peanut butter or sunbutter 
1 cup roughly chopped very ripe banana 
1 cup roughly chopped raw zucchini (or summer squash) 
1 cup kale leaves, lightly packed (or spinach) 
3 eggs 
¼ cup cocoa powder 
2 Tbsp. ground flaxseeds 
1 tsp. baking powder 
1 pinch of salt 
¼ cup honey (or maple syrup) 
1 tsp. vanilla extract 
chocolate chips 

Preheat oven to 350°F and grease a mini or standard size muffin tin (ideally silicone). 

Place all ingredients into a blender. Blend until very smooth, stopping to scrape down the sides of the blender and/or using the stick that came with it to move the ingredients around if needed. 

Fill muffin cups about ½ full using (mine were much fuller). Top with chocolate chips. 

Bake 22-24 minutes (14-16 minutes for mini muffins) or until a cake tester inserted into the center comes out cleanly. 

Let cool for 5-10 minutes in the pan, run a knife around the edges, and carefully transfer to a wire rack to cool.


Monday, September 27, 2021

Vegan Chocolate Black Bean Puddings


It felt like forever ago that I’d made Minimalist Baker’s chocolate protein puddings with cashews, but apparently it was at the beginning of the pandemic. Which feels both recent and like a lifetime ago. Anyway, this time, I made the black bean version, since it has less fat and more protein than the cashew version. These puddings were really good! All quantities below are to my liking for 8 servings, but feel free to adapt to your taste and circumstances. 

2 15-oz. cans (about 3 cups) black beans, rinsed and drained 
¾ cup cocoa 
¾ cup maple syrup 
¼ tsp. kosher salt 
10 Tbsp. unsweetened vanilla almond milk 
3 Tbsp. coconut oil 
1 Tbsp. vanilla 

Simply put all ingredients in a blender; blend until creamy and smooth, scraping down the sides as needed. (Taste and adjust sweetness as needed.) If there are little bits of bean that really bother you, you can pass the mixture through a fine mesh strainer, but I didn’t bother. 

Scoop pudding into serving containers and cover with plastic wrap. Chill in the refrigerator until cold and thickened, at least 2 or 3 hours. Serve as is, or topped with fruit or coconut whipped cream.

Friday, September 24, 2021

Poires grillées et croustillant au chocolat


Ma mère m’a recommandé ce dessert de K pour Katrine: des poires coupées en deux, recouvertes d’un croustillant au chocolat, puis cuites au four. Je ne l’ai pas faite tout de suite, parce que je venais de faire une croustade au cacao et aux petits fruits et je trouvais que ça se ressemblait beaucoup. Mais en fin de compte, dans ce cas-ci, le croustillant ne contient pas d’avoine ni d’autres céréales, les remplaçant plutôt par des noix. Et c’était tellement, tellement bon! Vraiment meilleur que ça en a l’air (et pourtant, ça a l’air pas pire pantoute!), et bien mieux reçu par ma famille que la croustade au cacao. À refaire, donc! 

4 grosses poires mûres mais encore fermes, coupées en deux 
1 tasse de pacanes, hachées 
2 c. à soupe de cacao 
¼ c. à thé de sel 
1 c. à thé de cannelle 
1/3 tasse de cassonade 
¼ tasse de margarine sans lactose, fondue 
3 c. à soupe de pépites de chocolat noir 

Placer la grille au centre du four et préchauffer à 375 °F. Tapisser une plaque à biscuits de papier parchemin. 

À l’aide d’une petite cuillère, prélever le cœur des poires et un peu plus afin de faire de la place pour y déposer le mélange de croustillant. Afin que les poires tiennent bien sur la plaque, couper une fine tranche du côté arrondi au besoin. 

Dans un petit bol, mélanger les pacanes, le cacao, le sel, la cannelle, la cassonade et la margarine. Répartir le mélange dans les cavités des poires et cuire environ 45 minutes ou jusqu’à ce que les poires soient bien grillées. 

Dans un petit bol, faire fondre le chocolat au micro-ondes quelques secondes et en arroser les poires. Servir tiède.


Thursday, September 23, 2021

Batch of links

 - I *finally* got around to watching The Search for General Tso, a documentary by Jennifer 8 Lee. General Tso’s chicken is the most popular Chinese dish in the United States, and yet if you go to mainland China, very few people have ever heard of it. So where does it come from? Who was General Tso and what does he have to do with this dish? This film gets to the bottom of it (like, I was really pleasantly surprised by these answers), and it also explains much of the context (immigration, racism, adaptation, fusion cuisine, etc.). I don’t want to give too much away, but if you don’t mind spoilers, you can read reviews in Slate and The Kitchn. As for me, I really enjoyed this film and strongly recommend it! 

- I don’t think I’ve talked about it before, but I’m really enjoying lokokitchen and Julie_jonesuk, Instagram accounts with gorgeous pies. 

- I keep meaning to share this great interview with Jamie Lee Curtis. Did you know that she can’t stand to watch horror movies? I can’t say enough good things about that iconic photo shoot she did almost 20 years ago! Also, and I know this goes back to pre-pandemic times, but if you haven’t seen Knives Out, it was really good! 

- I recently read Enough by Shauna Ahern (formerly known as Gluten-Free Girl). It’s a memoir in the form of a series of essays, which she wrote after suffering a stroke. Her traumatic childhood left her with thought patterns of not feeling like she was enough, and she chose to find joy in her life until she finally felt like enough. I really enjoyed it! 

Here’s an excerpt titled Online, no one knows you’re poor, from when the author was working in a grocery store. I remember reading about this job on her blog, and thinking about both how unexpected and how oddly fitting it was that a James-Beard-winning cookbook author was now working in a grocery store to support her family (it should be said that this store paid living wages and provided health insurance). 

It also touched on something else I’m experiencing with my PCOS, namely the link between weight and health. While it’s true that being obese is correlated with negative health outcomes, the data tends to show that both the morbidly obese AND the hard-core athletes are at risk of an early death, but the correlation is less clear for those between the two extremes. And that losing weight does not actually predict better health. There are better predictors of an early death than weight: “smoking, high blood pressure, not exercising, drinking too much alcohol, living under the stress of not enough money, and social isolation are better predictors of early death than being overweight.”


We tend to think of the BMI (body mass index) as a measure of health, and that’s certainly how it’s been applied to me. But it turns out that it was originally meant as a tool to measure data on the scale of a population and it was not intended to be applied to individuals. It doesn’t take into consideration age, gender, ethnicity, or muscle mass. I listened to a very informative podcast on the subject that I recommend. 

The Engineer insisted that I present the “other” side of the fatphobia argument, i.e. the science that shows that fat is bad. He wants me to add two links: this one from the CDC, which essentially repeats things that were said on the podcast, and this one from Harvard, which at least does explain that there is a correlation on average between high BMIs and certain health conditions and negative outcomes, though it gives the same cautions as the podcast I referred to. 

TL;DR: Being overweight, especially being severely overweight, is correlated to negative health outcomes, but weight in and of itself is not a good measure or predictor of health.

Friday, September 17, 2021

Truffle Chocolate Cream Pie


According to Blogger, this is my 2200th post! I’ve always liked the number 22, so to celebrate, here’s a chocolate pie – you can thank me later for this one. 

I believe I haven’t talked about it yet, but the recent discovery of Silk heavy whipping cream alternative has opened a bunch of doors for me. Previously, I could only get lactose-free whipping cream in Canada, but now I have a vegan version here! 


I decided to make the truffle chocolate cream pie from Joanne Chang’s Baking with Less Sugar (I’ve talked about it on the blog before, most recently here, and you can read a review here). 

I had a premade pie crust in the freezer, so I used that instead of making my own pâte brisée, and I imagine you could use the low-carb pie crust of your choice. What I really liked here is that there is no added sugar in the recipe, only what is already present in your chocolate. I used Trader Joe’s dark baking chocolate for this one. 

I loved this pie! The Engineer made appreciative noises as he was eating it; the Little Prince said, “That’s the best pie I’ve ever eaten!” And the Fox actually said, “This tastes delicious!” and ate it, even though he usually turns up his nose at pie. So, 4 thumbs up for this awesome chocolate pie! 

For the dark chocolate mousse 
1 ½ cups heavy whipping cream alternative (or lactose-free cream) 
3 ½ oz. bittersweet chocolate, finely chopped 
1 pinch kosher salt 

1 pâte brisée crust or equivalent 

For the chocolate truffle filling 
¾ cup heavy whipping cream alternative (or lactose-free cream) 
½ cup lactose-free milk 
9 oz. bittersweet chocolate, finely chopped 
2 egg yolks 
2 Tbsp. lactose-free butter 
½ tsp. kosher salt 
some bittersweet chocolate at warm room temperature, for garnish 

For the mousse 
Heat the cream in a small saucepan over medium heat until it is scalded—that is, small bubbles form on the edges of the cream and it almost, but not quite, comes to a boil. Place the chocolate in a medium bowl and pour the hot cream on top. Add the salt and whisk until the chocolate is completely melted. With a rubber spatula, scrape the chocolate mixture into an airtight container and refrigerate overnight. 

For the crust 
Place the pie crust in a 9-inch aluminum or glass pie plate. Refrigerate for at least 30 minutes. 

Place a rack in the center of the oven and preheat to 350 °F. Prick the pie dough with a fork. Spray one side of a sheet of aluminum foil with oil, then place that side down on the dough; evenly fill the clean side with pie weights. Bake for 30 to 35 minutes, or until the shell is brown on the edges pale and matte when you lift the foil and peek at the surface of the shell. (If the edges brown too quickly, cover the shell loosely with foil. In my case, since I was using a storebought dough, I followed the instructions on the package and baked it on the middle rack for 20 minutes at 425 °F.) When the pie shell is done blind baking, remove it from the oven and let cool on a wire rack. When the pie shell has cooled, remove the foil and pie weights. 

For the chocolate truffle filling 
Heat the cream and milk in a small saucepan over medium heat until scalded—that is, small bubbles form on the edges of the mixture and it almost, but not quite, comes to a boil. Place the chopped chocolate in a medium bowl and pour the hot cream mixture on top. Whisk until the chocolate is completely melted. Whisk in the egg yolks, butter, and salt until completely mixed. Pour into the baked pie shell and bake for 25 to 35 minutes, or until the filling is set and jiggles slowly like Jell-O when you wiggle it (I covered the edge with a pie crust shield for extra safety). Remove the pie from the oven and let cool on a wire rack to room temperature for about 2 hours or until completely cooled. 

Remove the mousse from the refrigerator and, using a stand mixer fitted with the whisk attachment (or an electric hand mixer or by hand with a whisk), whip the mousse on medium speed for 2 to 3 minutes, or until it holds stiff peaks—that is, when you lift the whisk out of the mousse, the mousse stands tall and hold its shape. Scrape the whipped mousse on top of the cooled truffle filing and spread evenly with a rubber spatula or a wooden spoon. 

Using the back of a paring knife or a vegetable peeler, scrape the chocolate block to make chocolate shavings and scatter them evenly on top of the pie. Slice the pie with a thin knife dipped in hot water and serve immediately. The pie can be stored, in an airtight container or covered loosely with plastic wrap, in the refrigerator for up to 4 days.


Thursday, September 16, 2021

Sweet Potato Lasagna


I decided to try this sweet potato lasagna, since it has fewer carbs than a regular lasagna. I mean, sweet potatoes are a starchy vegetable, but at least they’re a vegetable, right? Well, the kids weren’t big on it, and the Engineer said he liked everything except the sweet potatoes. So even though I liked it (not as much as regular lasagna, but still), I don’t think I’ll make it again, and I’m going to toss the recipe I had for a similar vegetarian lasagna. Only try this if the people at your table like sweet potatoes as much as I do! 

3 large sweet potatoes, peeled and sliced 1/8"-thick (about 2 lb.; I only needed 2 potatoes) 
2 Tbsp. extra-virgin olive oil 
1 large onion, chopped 
2 cloves garlic, minced 
1 lb. sweet Italian sausage, casings removed 
kosher salt 
freshly ground black pepper 
2 cups marinara 
1 (5-oz.) package baby spinach 
1 large egg, beaten 
¾ cup freshly grated lactose-free parmesan, divided 
1 tsp. dried oregano 
1 ½ cup shredded lactose-free mozzarella 
freshly chopped parsley, for serving 

Preheat oven to 375 °F and grease a 9”-x-13” baking pan with cooking spray. In a large skillet over medium heat, heat oil. Add onion and cook until soft, 5 minutes then add garlic and cook until fragrant, 1 minute more. Add sausage and cook, breaking up meat with a wooden spoon, until no longer pink, about 6 minutes. Season with salt and pepper. 

Pour in marinara sauce and bring to a simmer. Cook until sauce thickens slightly, 5 minutes. Add spinach and cook until spinach is wilted. Remove from heat. 

In a large bowl, stir together ricotta, egg, ½ cup parmesan, and oregano. Season with salt and pepper. 

Spread a thin layer of marinara mixture evenly across the bottom of prepared dish. Layer sweet potatoes on top of sauce, slightly overlapping. Spread about ⅓ of ricotta mixture over sweet potatoes then pour ⅓ of remaining meat sauce on top. Repeat to make two more layers. Top lasagna with mozzarella and remaining ¼ cup Parmesan. 

Cover with aluminum foil and bake until sweet potatoes are almost cooked through, about 45 minutes, then remove foil and bake until sweet potatoes are fork tender and cheese is lightly golden, 15 minutes more. 

Let rest 10 minutes, then garnish with parsley before serving.


Tuesday, September 14, 2021

Chocolates of the moment

I still like the Godiva dark chocolate with sea salt I used to buy, but I was curious to try something new, especially given that I’m trying to cut carbs. I kept seeing ads for Hu chocolate, which is fair trade and has no refined sugars – it is sweetened with coconut sugar instead of cane sugar, the former having a lower glycemic index. I decided to try some, and I’m glad I did! My favorite is their salty dark chocolate (70%), but I also like other flavors (the hazelnut butter, cashew butter + raspberry, and cashew butter + vanilla bean come to mind). I’ve also used Hu Gems instead of chocolate chips when baking. I’ve seen these in person at Target, but for a more reliable source, I have been known to order a box of them straight from the website with free shipping. 

Hu chocolate tastes noticeably less sweet than the Godiva (and definitely has fewer carbs), BUT it is still delicious and very satisfying to me, so it’s now my go-to! 


If you are looking for something possibly more widely available, I strongly recommend Divine chocolate. This is the 70% dark chocolate (which, liked Hu, has 13 g of carbs per serving), and I enjoy the 60% dark chocolate with pink Himalayan sea salt as well. 


I had talked about Alter Eco here, and yes, I still buy it on occasion 5 years later. The sea salt is my favorite! It has 14 g of carbs per serving. 


Finally, there’s Theo 70% dark chocolate with sea salt that is also along the same lines. Intense, no bitterness, and 14 g of carbs per serving.


Monday, September 13, 2021

Crunchy Thai Chicken Salad

I made some Asian-inspired salads with chicken and lots of vegetables. It’s not a very popular choice around here (one of my kids doesn’t like chicken OR vegetables), but they tend to be flavorful and mostly healthy, so I really enjoy them. There was a chicken satay salad that was good, but I resented the fact that it called for storebought Thai peanut sauce, and I don’t have a go-to brand that I love.
Then I made this crunchy Thai chicken salad, with a homemade ginger-sesame dressing that was delicious! My only warning here is that you definitely shouldn’t use a whole head of cabbage like I did (even a small one), because otherwise you’ll have enough to feed an army. Just plan for something to do with the leftover cabbage. I used peanuts instead of the wonton strips. For the salad 4 cups shredded napa cabbage (see note above) 3 cups cooked shredded chicken (I used a rotisserie chicken) 2 cups grated or matchstick carrots 1 red bell pepper, julienned 1 cup fresh cilantro, chopped ½ cup green onions, chopped ½ cup wonton crisps (I used peanuts) For the ginger-sesame dressing 3 Tbsp. rice vinegar 2 Tbsp. reduced sodium soy sauce 2 cloves garlic, minced 2 Tbsp. honey 1 Tbsp. fresh ginger, peeled and minced 2 tsp. toasted sesame oil 3 Tbsp. olive oil To make the dressing, combine all ingredients in a small jar with a sealed lid and shake well until combined. I also use this jar to store any extra dressing to use for the week – I prefer to dress the salad only before serving it, but that being said, everything in there is relatively sturdy and dressed leftovers will keep well for a few days in the fridge. To make the salad, combine all the ingredients except the wonton strips in a large bowl and toss to combine. Drizzle salad with ginger-sesame dressing and mix until fully coated. Garnish with wonton crisps (or peanuts), serve and enjoy!

Thursday, September 09, 2021

More egg muffins


I like the concept of egg muffins, so I decided to try another kind. This one has turkey bacon and even more vegetables than the last ones I tried; there’s less egg to compensate. I really enjoyed them! So much so that I didn’t get around to freezing them. I served them with a green salad drizzled with strawberry-basil dressing (1 cup strawberries, ¼ cup olive oil, 2 Tbsp. white wine vinegar, salt, and pepper processed, and add 2 Tbsp. basil chiffonade). 

I also tried making ham and cheese omelet pinwheels from a recipe published in the May issue of Parents (sadly, not online), but I don’t actually recommend it because it looked like the flour in it oxidized, so leftovers were less than appetizing. It looked pretty when it was fresh, though! 


3 slices turkey bacon 
1 small yellow onion, chopped 
1 red bell pepper, chopped 
2 cups chopped baby spinach 
6 large eggs 
3 Tbsp. lactose-free milk 
¼ tsp. paprika 
½ tsp. garlic powder 
kosher salt 
freshly ground black pepper 
½ cup lactose-free shredded mozzarella 

Preheat oven to 350 °F and grease a 12-cup muffin tin. 

In a large nonstick skillet over medium heat, cook turkey bacon until crispy, 6 to 8 minutes. Drain on a paper towel-lined plate, then crumble. 

Add onion and bell pepper to skillet and cook until soft, 5 minutes. Add spinach and cook until wilted, 2 minutes more. 

In a small bowl, whisk eggs, milk, paprika, and garlic powder and season with salt and pepper. Fold in cooked vegetable mixture, turkey bacon, and mozzarella. Pour mixture into prepared muffin tin. 

Bake until cooked through and golden, 30 to 35 minutes. 

Let cool, then store in the fridge in an airtight container until ready to eat.


Stuffed Peppers (take 2)

I know I made stuffed peppers recently, but I really like them, so I tried another recipe. This one is from Well Plated. In an effort to reduce carbs without resorting to sad cauliflower rice, I tried some cilantro-lime Right Rice

Right Rice is a relatively new product; it’s a blend of legume, rice and vegetable powders that is shaped like grains of rice. It tastes good and has a pleasant texture; and it contains fewer carbs, more fiber and more protein than plain rice. I enjoyed it and will buy it again! Another option to lower carbs would be to replace the rice with quinoa or beans. 

These stuffed peppers were delicious! I love them topped with cheese, as per the original recipe, but the Little Prince has declared that he doesn’t like melted cheese (unless it’s on pizza), so I left half of them with only the cheese mixed in the stuffing, no topping. 

4 large bell peppers (any mix of colors you like) 
1 lb. lean ground beef 
1 small yellow onion diced 
2 tsp. Italian seasoning (I used 1 tsp. basil + 1 tsp. oregano) 
1 tsp. ground cumin 
1 tsp. garlic powder 
¾ tsp. kosher salt 
¼ tsp. ground black pepper 
2 cups roughly torn fresh spinach 
1 15-oz. can fire roasted diced tomatoes with juices 
1 cup cooked brown rice (see note above) 
1 cup shredded lactose-free sharp cheddar cheese 
chopped fresh parsley or cilantro (optional; for serving) 

Preheat your oven to 375 °F. Lightly coat a 9×13-inch baking dish with nonstick spray. 

Slice the bell peppers in half from top to bottom down through the stem. Remove the seeds and membranes then arrange cut side up in the prepared baking dish. 

Heat a Dutch oven or similar deep, wide skillet over medium high. Add the beef and onion. With a wooden spoon or spatula, break the meat into small pieces. Cook and stir until the meat is browned and fully cooked through and the onion is tender, about 7 minutes. Drain of any excess fat. 

Stir in the Italian seasoning, cumin, garlic powder, salt, and pepper. Let cook 30 seconds. 

Stir in the spinach a few handfuls at a time, cooking until it wilts down; this will take between 1 and 2 minutes. Pour in the can of diced tomatoes along with the juices. Let simmer for 1 minute. 

Remove the pan from the heat. Stir in the rice (or your grain of choice) and ½ cup of the cheddar. Taste and add additional salt and/or pepper as desired. 

With a spoon, mound the filling inside of the peppers, then top with the remaining cheeses. The peppers will be very full. 

Pour a bit of water into the pan with the peppers—just enough to scantly cover the bottom of the pan. (I skipped this step.) 

Bake the stuffed peppers uncovered for 30 to 35 minutes, until the peppers are tender and the cheese is melted. Top with parsley or cilantro. Serve hot.


Sunday, September 05, 2021

Two kid sweaters

I took a little break in knitting from the stash to make two sweaters. The first was a sort of commission: a friend of mine who lives in Canada was lamenting the fact that she couldn’t find a 100% wool sweater for her daughter, and she offered to pay me to make one. So I decided to make Flax, which I’d been eyeing for years! It’s been knit a whopping 21,000 times on Ravelry alone. Incredibly, it’s a free download, and it comes in a variety of sizes from 0-6 months all the way to an adult 6XL! It’s also a unisex sweater, so I figured that my friend’s infant son can wear it someday too. I ended up only charging her for the yarn, which was 4 skeins of Plymouth Yarn Worsted Merino Superwash in Red (I made the 10yo size). 

It was an easy pattern to follow, even with the optional short row shaping for the back of the neck. It’s a typical top-down with raglan sleeves, and there’s a band of purl stitches all the way down each sleeve. Since all the rest is in stockinette stitch, it would also make a good canvas for a design or cable pattern on the front, if you are so inclined. (For what it’s worth, my friend liked it so much that now she’d like one in her size, so I’ll put that in the queue!) 


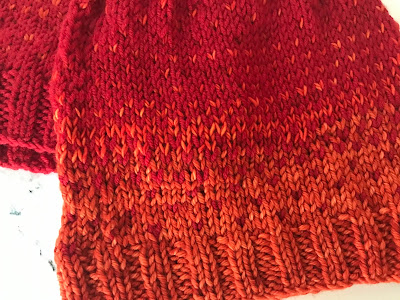
When I was done, I still had most of a skein left, so I decided to throw in a few hats. I chose this Quick Ombré Hat because it looked both cute and easy. I made the first hat by pairing the red Plymouth yarn withMalabrigo Rios Yarn in Glazed Carrot from my stash, and then I made a slightly smaller hat in which I finished the orange Malabrigo so switched to leftover Dragonfly Fibers Pixie in Airport Hotsauce (they no longer carry that colorway, but I think Molten would be close), by using two strands to knit. You can see the difference if you pay attention, but this hat pattern is very forgiving of a yarn change! It’s also very satisfying to make something this nice so quickly. 


The other sweater I made was for my niece. I decided this was the perfect opportunity to make the Starboard sweater, which has pockets (!) and is made more for cool days than cold winter ones. She asked for yellow, so I used 4 skeins of Cascade 220 Superwash Yarn in Golden (also for the 10yo size). This was also an easy, top-down pattern. I had some trouble with the pockets, because they are knit right onto the shirt from the bottom, then it is folded back and the sides are sewn into place. I had to use scrap yarn in a different color to trace where I should sew them, but even then I felt like the bottom edge wasn’t clean enough. That being said, I really like the sweater overall! 


Since I had a bit od red yarn left, I made a quick Rustic Little Heart to slip in the pocket. She loved it! Apparently when she found it, she smiled and said she would keep it all her life. 😊


Friday, September 03, 2021

Muffins aux framboises


Je commençais à désespérer en me disant que ça faisait longtemps que je n’avais pas fait de muffins ou de pain aux fruits qui nous plaisait. Le pain pommes et érable d’une amie Facebook a été un flop, nous n’avons pas aimé les muffins à la fraise de Catherine McCord… Mais j’ai vu la recette de muffins santé aux framboises de Marie-Ève Laforte et je me devais de les essayer. Ils contiennent moins de sucre et de gras que la plupart des muffins, et… ça a été un succès! Bon, l’Ingénieur n’aime pas les framboises, mais les enfants et moi avons beaucoup aimé. 

2 tasses de farine, blanche ou de blé entier (j’ai pris de la farine de blé blond) 
1 c. à thé de poudre à pâte 
½ c. à thé de bicarbonate de soude 
1 pincée de sel 
1/3 tasse de beurre sans lactose, fondu et tempéré (j'arrondis à 5 c. à soupe)
½ tasse de yogourt nature sans lactose 
½ tasse de compote de pommes non-sucrée 
½ tasse de miel 
2 c. à thé de vanille 
2 œufs 
1 ½ tasse de framboises, fraîches ou surgelées 

Préchauffer le four à 400 °F. Graisser les cavités d'un moule à muffins ou y ajouter des caissettes en papier. 

Dans un bol, mélanger la farine, la poudre à pâte, le bicarbonate de soude et le sel. Réserver. 

Dans un grand bol, mélanger le beurre fondu, le yogourt nature, le miel, la compote, la vanille et les œufs. Incorporer les ingrédients secs. Mélanger jusqu'à ce que le tout soit humecté, pas plus. 

Ajouter les framboises et incorporer délicatement. 

Répartir la pâte dans 12 moules à muffins. 

Cuire au four pendant environ 20 minutes, jusqu'à ce que le dessus soit doré et qu'un cure-dent inséré au milieu en ressorte propre. 

Laisser légèrement refroidir avant de déguster.


Sheet Pan Sausages and Vegetables

I had been thinking about sheet pan gnocchi dinners (like this one and, well, basically thinking I shouldn’t make that again for a while because gnocchi are basically all carbs, right? But then I saw this version on Real Simple, which… doesn’t have gnocchi. I mean, it’s basically the same ingredients I had on the brain (sausage, bell peppers, grape tomatoes, onions), just without the gnocchi. And it was great! They do recommend serving it with a loaf of warm, crusty French bread, which obviously sounds delicious, but I omitted it. This dish was really good as is, and the Fox even said that he’s now okay with bell peppers. 

1 lb. hot or sweet Italian pork sausages (I used 2 lbs. sweet sausages) 
1 lb. multicolored baby bell peppers, halved lengthwise 
1 pint grape tomatoes 
3 shallots, cut into ½” wedges (about ¾ cup) 
3 large cloves garlic, smashed 
2 Tbsp. olive oil 
¾ tsp. kosher salt 
½ tsp. freshly ground black pepper 
fresh oregano leaves, for serving 

Preheat broiler with rack 6 inches from heat. Line a large, rimmed baking sheet with aluminum foil. 

Pierce sausages a few times with a knife (do not pierce all the way through). Toss sausages, bell peppers, tomatoes, shallots, garlic, oil, salt, and pepper on baking sheet until evenly coated; spread in an even layer. 

Broil, turning sausages and stirring vegetables halfway through, until a thermometer inserted in thickest portion of sausages registers 160 °F and vegetables are lightly charred, 12 to 15 minutes. Sprinkle with oregano and serve.


Thursday, September 02, 2021

Vegetarian Egg Muffins


In my search for lower-carb/higher-protein fare, I’ve come across egg muffins often enough that I decided to buy a silicone muffin pan. That way, the cooked egg slides right out, which is NOT the case with a regular (metal) muffin tin, even if you grease it! It works like a charm, and so far, I’d say it was definitely worth the investment for me. 

As far as terminology goes, I confess I’m not fond of “egg muffin” because even though the product is baked in a muffin tin, it doesn’t have any flour and doesn’t actually taste like a muffin. It’s more like an individually sized frittata, but that doesn’t roll off the tongue, does it? There’s also the term “egg cup” but somehow that doesn’t seem very widespread. So egg muffin it is, for now. 

I made these vegetarian egg muffins not too long ago and they were very well received! 

12 large eggs 
¼ cup lactose-free milk 
1 cup fresh spinach, chopped 
¾ cup cherry tomatoes, quartered 
½ cup onion, finely diced 
½ tsp. kosher salt 
½ tsp. freshly cracked black pepper 
sliced avocado, for serving 
salsa, for serving 
crumbled cotija or feta cheese (make sure it’s lactose-free), for serving 

Preheat the oven to 350 °F. Lightly grease a silicone muffin pan. 

In a large bowl, whisk together the eggs and milk. 

Stir in the spinach, tomatoes and onions, salt, and pepper. 

Divide the mixture evenly between the 12 muffin pan cups (a spring-form ice cream scooper helps). 

Bake the muffins for 20 to 25 minutes, or until the egg is fully cooked. 

Remove the muffins from the oven and let them cool for 5 minutes in the pan. They may be puffy and lopsided, but they will deflate evenly as they cool. Use a knife to loosen the muffins from the cups, if necessary. 

Top each muffin with sliced avocado, a dollop of salsa, and a sprinkling of cheese, then serve.


Strawberry Banana Parfait


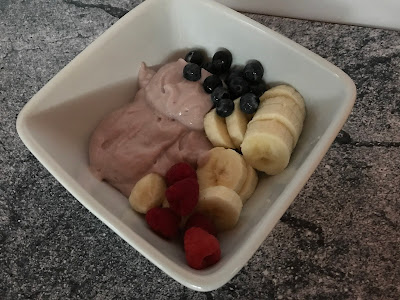
I found this recipe while looking for something different for breakfast. It fit the bill! While it was good, I have to admit that it didn’t keep me full until lunch, even when I changed up the presentation and added more fruit. Perhaps adding homemade granola would do the trick? Or using the nuts that are called for in the first place – I just didn’t have any at the time. 

1 package (12 oz.) silken tofu 
1 cup fresh or frozen strawberries 
1-2 Tbsp. agave nectar (depending on preferred sweetness; I used maple syrup) 
1 medium banana, sliced 
½ cup raw walnuts, chopped (I omitted them) 
½ cup crushed whole grain graham crackers 

Put the tofu, strawberries, and agave nectar in a food processor or blender and process/blend until a smooth pudding consistency is reached. 

In 4 small bowls or mason jars, layer 3-4 tablespoons of the strawberry tofu pudding, then layer with a few slices of banana, 2 tablespoons of walnuts (per bowl) and 2 tablespoons of graham cracker crumbs (per bowl). 

Layer in another 3-4 tablespoons of the pudding, and top with some more graham cracker to garnish!