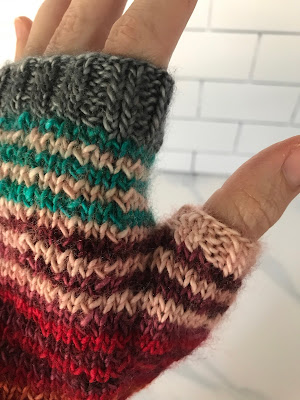
At some point last year, I decided to splurge and bought myself this kit to make wrist warmers. (It was a splurge insofar as I don’t normally drop that much money on a knitting project, but it was well within my self-imposed annual knitting budget.) The kit contained a pattern by Vickie Howell and 5 skeins of Madelinetosh Tosh Merino Light yarn in colors that she had designed (gray, turquoise, orange, purple, and pink); the color pairing just made me so happy! They were actually out of the Nassau Blue (turquoise) yarn, so I used the Nassau Blue Tweed yarn instead. And because I like red more than orange and just couldn’t help myself, I threw in a skein of red, actually called Blood Runs Cold. And then I downloaded the (free!) cowl pattern that had been in the back of my mind for a while, Inspira (which I had first seen in these colors). I love that it comes in three different patterns, based on the size of your yarn!
Saturday, July 10, 2021
Wrist warmers and a cowl
I knew that I wanted to make that cowl as well as the wrist warmers, so I bought the full-sized skeins sold in the kit. That being said, if you only want to make a pair of wrist warmers, I definitely recommend buying the small size called Unicorn Tails, which should give you just enough of each color.
So, first, the mitts. I’m not sure whether to call these “wrist warmers” or “fingerless gloves” – I reflexively used the second term, but the first seems more widespread, so that’s what I used in the title. The pattern specifies two sizes, but the colors on the photos correspond only to the smaller size – if you’re making the bigger size, like me, you’re left to your own devices regarding how to arrange the stripes. This wasn’t a big deal, especially considering that I was adding an extra color anyway! I changed the method used to increase on either side of the thumb gusset (m1l and m1r instead of ktbl twice) because it looked nicer to me. I made a beautiful pair on which the ribbed edge of the thumb is pink (both other edges are gray).
Then I made the cowl. The version I went with was Steampunk, since I had fingering-weight yarn, but I changed it a bit because I decided to use the gray as a sort of frame for every rectangle of color. After reading comments on Ravelry, I decided to cast on more stitches to begin with (294 instead of 204, based on my shoulder measurements and the gauge of my swatch). And I used these instructions from a Ravelry user for the decreases, as they work better. I made my cowl longer as well, so I used the same basic principle for another round of decreases; it just looks better to me if you keep the pattern mostly intact.
What I love here is that while this project is knit in the round, the author recommends knitting a few rows back-and-forth before joining, which greatly reduces the risk of twisting the first row. However, I would recommend starting with a smaller-size needle, which makes for a much cleaner edge. That’s what I did to finish at the top of the cowl, and since I didn’t like the wonky bottom and still had gray yarn left, I picked up stitches all around and did the edge over with my smaller needles. It looks much better!
If I ever make this cowl again, I’d love to do it with a solid color as the “frame” and then a color-gradient yarn for the rectangles. There are also beautiful color combos on Ravelry for this project!
At some point while knitting the cowl, I realized that based on the yardage in the pattern, I was going to need more gray yarn, so I bought a second skein. It turns out that I had *just* enough of the first skein to complete the project. But then, since I had the new skein just sitting there, I decided to make another pair of the fingerless mitts with a more-pleasing-to-me color arrangement. I made a sketch on paper and ended up with a pair that was a bit too long for me. I adjusted and made my perfect pair.
There were no restrictions on the pattern, and since I actually have an Etsy shop, well, I’m now selling two pairs of wrist warmers! I’m only charging for the yarn (based on the Unicorn Tail prices) and the “free” shipping (which is rolled into the price, don’t let anyone tell you otherwise), and rounding up a dollar or two to cover Etsy’s fees. Proof that you can’t really be compensated for your knitting skills, since I’m already at the top end of the price range I see for similar items. Don’t hesitate to share the listings with anyone you think might be interested! If they sell quickly, I’ll consider making more with the rest of the yarn.


No comments:
Post a Comment