Wednesday, March 31, 2021

Keto Sandwich

As I’ve said before, I’m not a fan of the ketogenic diet, because I find it way too restrictive, but I’m not above making keto recipes once in a while. I was curious about this keto “bread” recipe that cooks in 90 seconds, which then gets turned into a sandwich (or whatever else you want). It turns out it’s like a cross between bread and an omelet, but it was quite good! Based on the photos in the original post, I made it into an egg-bacon sandwich, but that may have been a bit too eggy. I think it would be great with tuna salad and lettuce or maybe avocado. Or some aioli and sliced heirloom tomato in the summer? 

1 large egg 
1 Tbsp. lactose-free milk 
1 Tbsp. olive oil 
1 Tbsp. coconut flour 
1 Tbsp. almond flour (or hazelnut flour, but I didn’t try it) 
¼ tsp. baking powder 
1 pinch salt 
¼ cup grated cheese (optional; I eyeballed that amount of parmesan) 
1 Tbsp. minced scallions or other herbs (optional; I omitted them) 

Whisk the egg, milk, oil, coconut flour, nut flour, baking powder, and salt together in a small bowl. Add the cheese and scallions or herbs, if using, and stir to combine. 

Grease a tall microwave-safe mug. Pour the mixture into it and tap the bottom firmly on the counter a few times to force any air bubbles to rise and pop. Microwave on high for 1 minute 30 seconds. 

Invert mug onto a cutting board and let the bread slide out. Cut crosswise into ½-inch-thick slices (I used a bread knife; I think a serrated edge is best here). 

To toast, heat a teaspoon of oil in a small skillet over medium-high heat until shimmering. Add the slices and toast until golden-brown, about 30 seconds per side. Garnish as you wish.


Monday, March 29, 2021

Boulettes de poulet teriyaki

 J’ai essayé une autre recette de Jessica Seinfeld, celle de son poulet crémeux avec une sauce au chou-fleur et à la patate douce – honnêtement, ce n’était pas fameux. Je me demandais quelles autres recettes du même genre je pourrais faire, et tout d’un coup, je me suis souvenue du commentaire de mon amie la Maman des Zigotos sur ce billet avec ses boulettes de bœuf contenant des pommes et des oignons, où elle me disait qui avait créé la recette… Donc je suis allée voir, et c’était Annabel Karmel, une Australienne qui se spécialise dans les recettes santé pour jeunes enfants. J’ai ensuite jeté un coup d’œil à ses livres de cuisine et, inspirée, j’ai acheté d’abord Real Food Kids Will Love. J’ai commencé par ces boulettes de poulet teriyaki

C’était simple, bourré de carottes, d’oignon et de pommes, et c’était délicieux! J’ai utilisé du poulet haché au lieu de hacher des filets de poulet dans le robot, et j’ai ajusté la recette en conséquence; la recette ci-dessous donne une trentaine de boulettes, mais j’ai doublé les quantités pour avoir davantage de restes. J’ai servi ça avec du riz à la noix de coco et au gingembre ainsi que des légumes vapeur. Délicieux! 

Pour les boulettes 
1 oignon, râpé 
½ pomme, râpée 
1 grosse carotte, râpée 
1 c. à thé de gingembre râpé 
500 g. (1 lb. 2 oz.) de poulet haché 
1/3 tasse de panko 
sel et poivre, au goût 

Pour la sauce 
5 c. à soupe de mirin 
2 c. à soupe de sauce soya 
1 c. à soupe de sucre 
1 c. à thé de vinaigre de riz 
le jus d’un quartier de citron 

Préchauffer le four à 400 °F et recouvrir une plaque à cuisson de papier parchemin. 

Mélanger les ingrédients pour les boulettes. Façonner en 30 boulettes (j’ai utilisé ma plus petite cuillère style-crème glacée pour faire des boulettes d’un peu plus de 1 cuillère à table). Placer les boulettes sur la plaque à cuisson et faire cuire 15 minutes ou jusqu’à ce qu’elles soient cuites jusqu’au milieu. 

Pendant ce temps, mettre tous les ingrédients de la sauce dans une poêle et laisser mijoter 2 minutes pour que ça réduise un peu. Ajouter les boulettes de poulet cuites à la poêle et réchauffer pendant 2 minutes, en mélangeant délicatement pour que la sauce recouvre bien les boulettes. (On peut congeler les boulettes cuites et les faire dégeler puis les réchauffer 12 minutes à 350 °F.) 

Servir avec du riz et des légumes.


Thursday, March 25, 2021

Honey Whole Wheat Chocolate Chunk Cookies


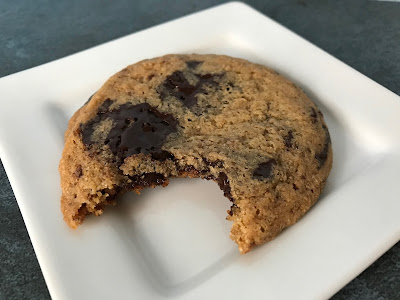
I tried another kind of chocolate chip cookie, because why not. The original recipe, honey whole wheat chocolate chunk cookies, called for whole wheat bread flour, but I’ve never been able to find it in stores. (I mean, I *could* get it online as long as I want like 20 pounds of it, but I’m not running a restaurant!) So I used white whole wheat flour instead, and Hu dark chocolate gems in lieu of chocolate chips or chopped chocolate. 

These cookies were good, but they came out flat instead of nice and plump like in the original post. It could be the honey, but I’ll take the blame because I changed the flour, and that’s essentially a load-bearing structure in a cookie. My bad! I really enjoyed these; the taste of the honey was noticeable, but still subtle. They would have been great with a sprinkle of salt flakes on top, too! 

½ cup lactose-free butter, cubed 
½ cup raw cane sugar or brown sugar (I used ¼ cup of each) 
¼ cup honey 
1 egg 
1 tsp. vanilla extract 
1 ½ cups whole wheat bread flour (see note above) 
½ tsp. salt 
½ tsp. baking soda 
½ tsp. baking powder 
160 g chopped chocolate or 1 cup chocolate chips 

In a food processor fitted with the blade attachment, mix butter, sugar and honey until smooth. 

Stop the processor and add egg and vanilla. Mix again until creamy. With the machine turned off, scrape down the sides with a spatula if needed. 

Sift the flour, salt, baking soda and baking powder into the mixer. Add the chocolate. Pulse a few times until the dough comes together in a ball. 

Shape the dough into cookies and place on a baking sheet. (The original post said that you’ll get 15 cookie balls weighing 50 g each; I used my 3-oz cookie scoop and got 14 cookies.) Flatten slightly with the palm of your hand (I didn’t). 

Preheat the oven to 350 °F. Chill the shaped cookies in the refrigerator while the oven is heating, about 10 minutes. (This helps the whole wheat flour get absorbed into the dough.) 

Bake cookies for 10 minutes (11 minutes for me), then remove from oven and let cool on the pan for 5 minutes. Transfer to a wire rack to continue to cool and enjoy.


Bacon-Cheddar Mini Frittatas


I originally made these bacon-cheddar mini frittatas for the Little Prince’s lunch box. It turns out that while he likes them, he would prefer them as a side than as a main. The Fox, however, was crazy about them! This was particularly pleasing, given that he’s been very picky lately. I increased the amounts, below, to make 24 mini frittatas; I haven’t tried it, but I believe these would freeze well. They’re good warm or cold. 

Also, if you’re looking for more lunch ideas that your kids might like: if you ever make corn dog muffins and have a few leftover sausages, consider making hot dog fried rice, like this one or that one


4 bacon slices 
8 large eggs 
½ tsp. kosher salt 
¼ tsp. ground pepper 
3 oz. lactose-free sharp cheddar, grated (about 1 cup), divided 

Preheat oven to 350 °F. Grease a 24-cup silicone miniature-muffin tin and place it on a large rimmed baking sheet. 

Cook bacon in a large skillet over medium heat, turning occasionally, until crisp, 8 to 10 minutes. Transfer to a plate lined with paper towels to cool, about 5 minutes. Crumble into small pieces. 

Whisk together eggs, salt, and pepper in a large bowl until combined. Stir in half the cheese. Divide bacon pieces evenly among the muffin cups, and spoon egg mixture over bacon, filling cups to the top. Top with remaining cheese. Bake until puffed and just golden, 15 to 18 minutes.


Tuesday, March 23, 2021

Chocolate Buckwheat Cake


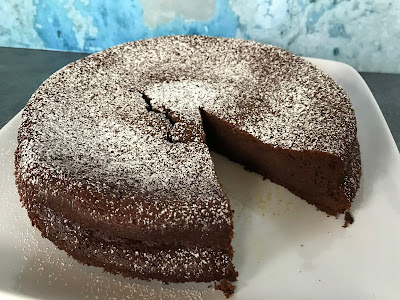
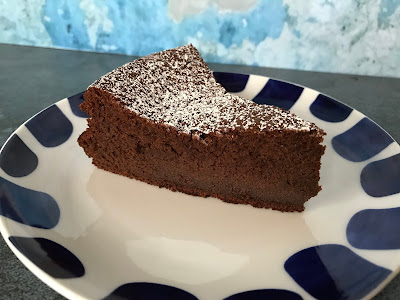
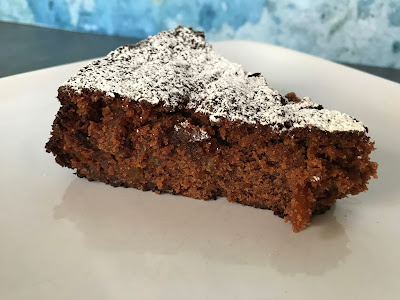
I found this chocolate buckwheat cake quite unusual in that it is made with a yeast sponge. In fact, the sponge and whipped egg whites are what hold it together, as it is gluten-free. It is pleasantly dense, and I think there’s a range of “ready” textures – from slightly fudgy for a lesser baking time to more crumbly for a longer one. This was a hit with my family! 

For the sponge 
1 tsp. instant yeast 
½ cup (63 g.) dark buckwheat flour 
1 Tbsp. honey (buckwheat if you have it) 

For the cake 
4 large eggs 
¾ cup (135 g) bittersweet chocolate chips 
½ cup (1 stick) lactose-free butter, cut into pieces 
¼ cup (25 g) Dutch-processed cocoa powder, sifted 
1 Tbsp. vanilla extract 
1 pinch of kosher salt 
½ cup (100 g) granulated sugar, divided 
2 Tbsp. powdered sugar 

For the sponge 
Place ¾ cup lukewarm (98 °F–105 °F) water in a medium bowl and sprinkle yeast over. Whisk in buckwheat flour and honey. Cover with a kitchen towel or plate. Let sit at room temperature until surface of sponge looks frothy with big and small bubbles across the top, about 1 hour. 

For the cake 
Place a rack in middle of oven; preheat to 350 °F. Coat a 9” springform pan with nonstick spray; line it with paper, and coat again. 

Separate yolks from eggs over a large bowl to catch egg whites. Place yolks in another small bowl; set egg whites aside. 

Combine chocolate and butter in a medium heatproof bowl and set over a medium saucepan of simmering water (do not let bowl touch water). Melt chocolate, stirring occasionally, until smooth. Remove from heat and whisk in cocoa powder, vanilla, salt, and ¼ cup (50 g) granulated sugar. Add egg yolks one at a time, whisking until smooth after each addition. Stir in sponge. 

Add remaining ¼ cup (50 g) granulated sugar to bowl with reserved egg whites. Using an electric mixer on medium-high speed, beat until soft peaks form, about 4 minutes. Fold half of egg whites into batter until smooth, then fold in remaining egg whites until just combined. Scrape batter into prepared pan and smooth surface. 

Bake cake, rotating pan halfway through, until a tester inserted into the center comes out clean, 40–45 minutes. Let cake cool in pan. Run a paring knife around edges of cake, then unmold and place on a plate. Dust with powdered sugar just before serving.


Monday, March 22, 2021

Moroccan-Style Beef with Couscous


My friend Jen shared this recipe on Facebook, and it REALLY hit the spot for me. I changed it a bit by increasing the amount of carrots and couscous and doubling the amount of meat, because I didn’t think that 1 pound of meat could really feed 6 people – I ended up with too many leftovers, but I regret nothing! Next time, I would use 1 pound of meat, but still increase the amount of carrots, and double the couscous to make two meals for our family. I’m definitely making this again, it was delicious! 

1 lb. lean ground beef (see note above) 
1 whole yellow onion, thinly sliced 
½ cup sliced carrots, in ¼” slices (I used more) 
¾ tsp. ground cumin 
¾ tsp. ground cinnamon 
½ tsp. ground coriander 
¼ tsp. ground cayenne pepper (I used less) 
2 cups low-sodium chicken broth 
¼ cups raisins (I used golden raisins) 
1 whole lemon, zested 
3 Tbsp. tomato paste 
¼ tsp. salt 
15-oz. can of chickpeas, drained and rinsed 
½ cup fresh cilantro, chopped 
1 Tbsp. lemon juice 
1 ½ cups cooked couscous (I made twice as much in all, but only made enough for one evening at a time) 

Heat a large skillet/pan over medium-high heat with a tablespoon of oil and swirl to coat. Add the ground beef to the pan, stirring to crumble, and cook until no longer pink. Remove the beef from the skillet into a bowl and drain away the fat. Set the beef aside. 

Add another tablespoon of oil to the skillet if needed and swirl to coat. Add the sliced onion and cut carrots, and sauté for 4 minutes. Add the spices (cumin, cinnamon, coriander and cayenne) and sauté for 30 seconds while stirring constantly. 

Add the ground beef back into the skillet along with the chicken broth, raisins, lemon zest, tomato paste, salt and chickpeas. Bring to a boil and then reduce the heat to a simmer (medium-low) for 5-10 minutes or until the mixture has thickened. Remove the skillet from the heat and stir in the fresh cilantro and lemon juice. Serve with couscous.


Sunday, March 21, 2021

Marmalade Cookies

 When I made Meyer lemon marmalade, I hadn’t sterilized my jars, so I knew I had to use it up relatively quickly. I used some to top very good buttermilk waffles, so with that and regular use (topping toast), plus topping yogurt once, almost a jar was accounted for. 


Since I still had a second jar hanging around, I asked my friends if they had any suggestions. They sent a lot of recipes my way! I started with Nigella Lawson’s store-cupboard chocolate-orange cake from How To Be A Domestic Goddess (available here as well). I thought it was good, but I was the only one to enjoy it; the Engineer and the Little Prince had a few bites and then declared they were done, while the Fox refused to touch it. So it’s a bummer that I used up the whole second jar on it, especially since it was only at that point that the Engineer confessed that he wasn’t fond of marmalade in general. 


However, there was a marmalade cookie recipe that had caught my eye as well, so I decided to buy more of our regular orange marmalade to make it. It’s an old-fashioned recipe that calls for shortening, melted and cooled, and I decided to replace that with coconut oil. They were really good! These cookies are thick and chewy, and everyone liked them, even the Engineer this time (he actually couldn’t figure out what the flavor was, but kept coming back for more). I would warn you, however, that they are definitely best the day they are made; the dough doesn’t keep well in the fridge (it gets all sticky and unwieldy), but you could try freezing it on parchment paper and baking it on demand, adding a few minutes to the baking time. I got 21 cookies. 

2 eggs 
1 ½ cups sugar 
1 tsp. salt 
1/3 cup coconut oil, melted and cooled
¾ cup orange marmalade 
grated zest of 1 lemon 
3 Tbsp. freshly squeezed lemon juice 
3 cups all-purpose flour 
2 tsp. baking powder 

Preheat the oven to 375 °F. Line a baking sheet or to with parchment paper or a silpat. 

Put the eggs and sugar in a mixing bowl and beat until blended. Add the salt, coconut oil, orange marmalade, lemon zest, and lemon juice. Beat until the dough is thoroughly mixed. Add the flour and baking powder and beat well (this is a stiff dough). 

Drop the cookies by spoonfuls (I used my 3-oz cookie scoop) on the baking sheet(s) about 1-2 inches apart. Bake for 12-14 minutes or until the edges of the cookies are golden. Remove from the oven and cool.


Saturday, March 20, 2021

Brioche étoilée à la cannelle


Cette recette de Coup de Pouce n’est malheureusement pas en ligne, mais j’ai trouvé que ça valait la peine d’être partagé! C’était la page couverture de leur numéro de Noël 2020. Elle était plus simple à préparer qu’elle en a l’air et elle a fait fureur. Le Petit Prince trouvait que ça avait plus l’air d’une fleur que d’une étoile, et pourquoi pas? Nous avons tous beaucoup aimé. Je pense que ce serait également délicieux avec une tartinade au chocolat à la place de la garniture à la cannelle – j’dis ça, j’dis rien… 

Pour la pâte à brioche 
4 tasses de farine (environ) 
2 ¼ c. à thé de levure active 
1 tasse de lait sans lactose 
5 c. à soupe de beurre sans lactose, coupé en cubes 
¼ tasse de sucre 
½ c. à thé de sel 
2 gros œufs, battus 

Pour la garniture à la cannelle 
1 tasse de cassonade 
5 c. à soupe de beurre sans lactose ramolli, coupé en cubes 
1 c. à soupe de cannelle moulue 
6 c. à soupe de pacanes hachées finement 
1 œuf battu 
sucre glace, tamisé (facultatif) 

Pour la pâte à brioche 
Dans un grand bol, mélanger 3 ¾ tasses de la farine avec la levure. Réserver. 

Dans une casserole, chauffer à feu moyen le lait, le beurre, le sucre et le sel, en brassant souvent, 3 minutes ou jusqu’à ce que le beurre commence à fondre (ne pas faire bouillir). Retirer la casserole du feu et remuer jusqu’à ce que le beurre ait fondu. 

Ajouter la préparation tiède et les œufs aux ingrédients secs réservés. À l’aide d’un batteur sur socle ou d’un batteur électrique muni de crochets pétrisseurs, battre la préparation à vitesse moyenne jusqu’à ce que la pâte soit lisse et molle. 

Sur une surface légèrement farinée, pétrir la pâte jusqu’à ce qu’elle soit lisse et élastique (au besoin, ajouter de la farine pour l’empêcher de coller). Façonner la pâte en boule, la mettre dans un bol huilé et la retourner pour bien l’enrober. Couvrir le bol d’un linge humide et laisser lever la pâte dans un endroit chaud, à l’abri des courants d’air, pendant 1 heure ou jusqu’à ce qu’elle ait doublé de volume. 

Pour la garniture 
Entre-temps, dans un bol, mélanger la cassonade, le beurre et la cannelle du bout des doigts jusqu’à l’obtention d’une pâte homogène. Réserver. (Dans mon cas, c’est resté un peu sableux.) 

Pour façonner la brioche 
Dégonfler la pâte à brioche avec le poing. Sur une surface légèrement farinée, diviser la pâte en 4 portions, puis façonner chacune en un disque de 10 pouces (25 cm) de diamètre. (J’ai trouvé ça difficile à faire sans gaspiller trop de pâte; j’ai utilisé l’armature d’un moule à ressort pour tailler mes cercles.) 

Mettre un disque de pâte sur une plaque de cuisson tapissée de papier parchemin. Étendre (ou, dans mon cas, plutôt émietter) un tiers de la garniture à la cannelle sur le disque en laissant un pourtour libre de ¼ pouce (5 mm). Parsemer de 2 c. à soupe des pacanes. Déposer un disque de pâte par-dessus, de manière à recouvrir la garniture. Étendre la moitié du reste de la garniture et parsemer de 2 c. à soupe de pacanes. Procéder de la même manière avec un troisième disque de pâte, puis le reste de la garniture et des noix. Terminer par le dernier disque de pâte. 

Déposer un verre de 2 pouces (5 cm) de diamètre au centre de la pâte à brioche. À l’aide d’un couteau bien aiguisé, couper la pâte en quatre, du verre vers l’extérieur (en gros, imaginez une horloge, et faites vos coupures à 12h, 3h, 6h et 9h). Couper chaque quart en deux, puis chaque huitième en deux de nouveau de la même manière. On obtient ainsi 16 triangles. Retirer le verre.


Soulever 2 triangles contigus (un dans chaque main) et les entortiller sur eux-mêmes deux fois, en sens contraire. Pincer ensemble les extrémités des deux tortillons. Procéder de la même manière avec les autres triangles, de manière à obtenir 8 branches en tout et une brioche aux allures d’étoile. Pratiquer de petites incisions au centre de la brioche, si désiré. Couvrir la brioche d’une pellicule plastique et laisser lever de 45 minutes à 1 heure ou jusqu’à ce qu’elle ait doublé de volume. (La brioche se conservera toute la nuit au réfrigérateur.) 


Préchauffer le four à 350 °F. 

Badigeonner la brioche de l’œuf battu. Cuire la brioche au four de 25 à 30 minutes ou jusqu’à ce qu’elle soit dorée. Déposer la plaque sur une grille et laisser refroidir 15 minutes. Déposer la brioche sur la grille et la saupoudrer de sucre glace, si désiré. (La brioche se conservera jusqu’au lendemain à la température ambiante. On peut également la faire congeler; pour servir, il faut alors la laisser décongeler, puis la réchauffer au four 10 minutes à 350 °F.)


Friday, March 19, 2021

Mini-pâtés au porc effiloché et à la patate douce

Qu’est-ce qu’on fait avec des restes de porc effiloché? Eh bien, j’ai enfin ressorti ma recette de mini-pâtés, découpée dans un Coup de Pouce en 2014 et pour laquelle j’avais acheté des ramequins d’une capacité de 1 tasse. (Si j’ai attendu si longtemps avant de la faire, c’est en partie à cause des enfants, parce que je ne voulais pas qu’ils cassent mes ramequins; en fin de compte, j’ai simplement vidé le contenu de leur ramequin dans leur assiette à l’aide d’une grosse cuillère.) J’ai quand même changé quelques petites choses, parce que d’une part, mon porc était davantage aromatisé que celui de Coup de Pouce en partant et, d’autre part, ils avaient clairement ambitionné sur la quantité d’ingrédients qu’on peut mettre dans un ramequin d’une capacité de 1 tasse (je vous vends le punch : c’est UNE tasse). C’était TRÈS bon! 

Les quantités dessous sont donc les miennes, du moment que vous utilisez ma recette de porc effiloché (sinon, vous pouvez assaisonner davantage, par exemple avec de la sauce Worcestershire, du vinaigre de cidre de pomme, du ketchup, de la cassonade, de la moutarde, du paprika…). Il me restait un peu de porc que j’avais fait décongeler et que je n’avais pas utilisé, alors j’ai fait des croquettes de porc effiloché et de patates douces


Il faisait noir quand j’ai servi les mini-pâtés, donc les photos ne sont pas très belles, désolée! Mais c’était délicieux! 

3 petites patates douces (1 ½ lb) 
1 oignon vert, coupé en tranches 
4 c. à thé de beurre sans lactose 
2 tasses de porc effiloché 
1 tasse de coulis de tomates (de type passata) 
1 carotte râpée 
½ tasse de petits pois surgelés 
¼ tasse de cheddar sans lactose râpé 
sel et poivre, au goût 

Préchauffer le four à 350 °F. 

À l'aide d'une fourchette, piquer les patates sur toute leur surface. Cuire au micro-ondes, à intensité maximum, pendant environ 5 minutes ou jusqu'à ce qu'elles soient tendres à la fourchette (on peut les faire cuire au four si on préfère, bien entendu). Les laisser refroidir suffisamment pour qu'elles puissent être manipulées, les peler, les mettre dans un bol, puis les réduire en purée lisse avec l'oignon vert et le beurre. Saler, poivrer et réserver. 

Dans un bol, mélanger le porc effiloché, le coulis de tomate, la carotte et les petits pois. Saler et poivrer. 

Répartir la garniture au porc dans 4 ramequins d'une capacité de 1 tasse chacun et couvrir de la purée de patates douces réservée. Parsemer du cheddar râpé. Déposer les ramequins sur une plaque de cuisson et cuire au four pendant environ 40 minutes ou jusqu'à ce que la garniture soit chaude et bouillonnante (moins si c’est pour un jeune enfant et que vous voulez une garniture plutôt tiède et un ramequin pas brûlant trop longtemps).


Saturday, March 13, 2021

Batch of links

- Today is the anniversary of when the world as we knew it changed (or, as one of my contacts on Twitter put it, the “pandammit”). I really enjoyed this article by Mackenzie Chung Fegan, a skeptic Brooklynite looking to mysticism to help her find some certainty (and it was published in Bon Appétit, if that wasn’t enough paradoxes for you). 

- An article by Julia Turshen (of Small Victories), titled How Writing a Cookbook Helped Me Break Free From Diet Culture

- Around the World in Rare and Beautiful Apples. This makes me miss living someplace where apples grow well… 


- There are people who will absolutely insist on using the Oxford comma, but others actually make a case against it. Since one must not put a comma before “et” in French, it wasn’t my reflex to use the Oxford comma; these days, I lean towards simply making sure the sentence is clear. Here are some examples

- My youngest, who just turned four, has the habit of licking the skin around his lips, which ends up giving him a rash, especially in the winter. I had been using Glaxal Base to soothe the area at night, but he eventually put up a fight and wouldn’t let me use it anymore. So I switched to Earth Mama’s Face, Nose & Cheek Balm, and it’s going really well! My kid is fine putting it on (perhaps because there are ingredients like coconut oil in there?), and it’s working wonders for that rash – things are literally better overnight, and with the warmer weather now, the rash has healed completely.

Friday, March 12, 2021

Cranberry Curd Bars


I made cranberry curd bars not long ago. Even though it’s a dish that feels more wintery, we have frozen cranberries year-round, so there’s really no good reason not to make this anytime! I’ll admit it wasn’t quite as good as the cranberry lime pie, but since my kids rarely like pies or tarts, I thought that bars would be a better bet. (Sadly, I was wrong.) The cranberry curd was fine, but the crust was too hard for us, even though I actually baked it less than called for – I’d make a regular shortbread crust next time, but I can’t think of a good sample recipe off the top of my head. At least it helped me use up the walnuts in my pantry! 

I simplified the recipe a bit by puréeing the cooked cranberries with an immersion blender, using the sieve only once (to strain the cooked curd, not the cranberry purée, which is useless, so I’ve updated the recipe below), and cooking the curd enough that I didn’t need to bake it too. 

For the crust (see note above) 
1 cup walnut pieces 
1 cup all-purpose flour 
½ cup powdered sugar 
½ tsp. cinnamon 
½ tsp. salt 
½ cup (1 stick) lactose-free butter or margarine, cut into 8 pieces and at room temperature 

For the cranberry curd 
12 oz fresh or frozen cranberries (about 3 cups) 
½ cup water 
1 cup granulated sugar (you could reduce this to perhaps ¾ cup if you want a tarter curd) 
4 large eggs 
4 large egg yolks 
2 Tbsp. freshly squeezed lemon juice (I suggest zesting it first and using the zest as decoration) 
¼ tsp. salt 
½ cup (1 stick) lactose-free butter or margarine, cut into 8 pieces and at room temperature 
powdered sugar, for dusting 

For the crust 
Line a 9”x13” baking pan with parchment paper so that there is extra paper hanging off the two long sides like a sling. Coat the paper and exposed sides of the pan with cooking spray; set aside. 

Place the nuts in the bowl of a food processor fitted with the blade attachment and pulse until coarsely ground, about 15 (1-second) pulses. Add the flour, sugar, cinnamon, and salt, and pulse until finely ground, about 10 (1-second) pulses. Scatter the butter over the top of the flour-nut mix and pulse until the mixture forms moist clumps, 20 to 25 (1-second) pulses. 

Transfer the mixture into the baking dish and press into the dish with your hands or the bottom of a floured measuring cup, making it as even as possible. Refrigerate at least 30 minutes. Twenty minutes before the crust is ready, arrange a rack in the middle of the oven and heat to 350 °F. 

Bake the crust until beginning to brown around the edges, 20 to 25 minutes (I baked it 25 minutes, since I did not return it to the oven in the next part of the recipe). Meanwhile, prepare the cranberry curd. 

For the cranberry curd 
Place the cranberries and water in a medium saucepan over medium heat and bring to a boil over medium-high heat. Continue to cook, stirring occasionally, until all the cranberries have burst open and are mushy, about 5 minutes. 

Set the purée aside to cool to room temperature, about 10 minutes. (I puréed the mixture with my immersion blender.) Meanwhile, fit a fine-mesh strainer over a large bowl and set aside. 

Add the sugar, eggs, egg yolks, lemon juice, and salt to the cranberry purée and whisk until smooth. Return the saucepan to medium heat. Stir the curd continuously, making sure to scrape the bottom and corners of the pan, until it comes to a simmer and thickens slightly, coats the back of a spoon, and registers about 150 °F on an instant-read thermometer (there's some wiggle-room), 5 to 11 minutes. (I aimed more for 170 °F, for a slightly thicker curd, and skipped the baking that follows.) 

Remove the pan from the heat, add the butter all at once, and stir until completely melted. Pour the curd through the strainer to remove any small chunks of cooked egg or cranberry skin. Pour the warm cranberry curd onto the crust and spread into an even layer. 

Bake until the curd is set but still jiggles slightly in the center, 10 to 15 minutes (see note above). Place the pan on a wire rack and cool for 1 hour. Refrigerate until chilled through, at least 2 hours and up to 1 day. 

When ready to serve, run a thin knife around the edge of the pan to loosen the cranberry bar slab. Use the parchment paper as handles to lift the slab from the pan onto a cutting board. Trim off the sides to make even edges if desired. Cut into 24 pieces. Dust the tops of the bars with powdered sugar, which will melt into the cranberry curd and make a sweet glaze. Garnish each square with the lemon zest if desired.

Saturday, March 06, 2021

Risotto dessert poire et chocolat blanc


Cette recette vient de Coup de Pouce. Je pense qu’ils utilisent le terme « risotto » plutôt que « pouding au riz » pour faire plus chic, mais on s’entend que ça s’équivaut! L’Ingénieur et moi avons beaucoup aimé, mais j’ai trouvé que la muscade prenait le dessus et qu’on ne goûtait pas du tout le chocolat blanc, ce qui était dommage. La prochaine fois, je vais essayer ¼ c. à thé de muscade pour 4 oz de chocolat blanc. Les quantités ci-dessous donnent 4 portions. 

½ tasse de riz arborio 
1 ½ tasse d’eau 
2 c. à soupe de beurre sans lactose 
1 poire Anjou ou Bartlett, coupée en dés (environ ½ tasse) 
2 c. à soupe de sirop d’érable 
1 pincée de sel 
2 tasses de lait entier sans lactose 
¼ tasse de miel liquide 
1 c. à thé de vanille (ou ½ gousse de vanille, fendue en deux et grattée) 
½ c. à thé de muscade moulue (voir note plus haut) 
½ tasse de chocolat blanc haché (voir note plus haut; j’en avais utilisé 2 ½ oz) 
2 c. à thé de zeste de citron râpé 
1 c. à soupe d’amaretto (facultatif; je ne l’ai pas utilisé) 
amandes grillées hachées, pour décorer (facultatif; j’ai pris du sucre d’érable) 

Dans une casserole, mélanger le riz et l’eau. Porter à ébullition et cuire 10 minutes. Égoutter le riz et réserver au réfrigérateur. 

Dans un petit poêlon, faire fondre 1 c. à soupe du beurre à feu moyen. Ajouter les dés de poire et cuire, en brassant régulièrement, 4 minutes ou jusqu’à ce qu’ils soient dorés. Ajouter le sirop d’érable et le sel, et poursuivre la cuisson 1 minute ou jusqu’à ce que les dés de poire soient caramélisés. Réserver. 

Dans une casserole, mélanger le riz refroidi, le lait, le reste du beurre, le miel, la vanille et la muscade. Cuire à feu moyen, en brassant régulièrement, de 20 à 25 minutes. Ajouter le chocolat blanc, la moitié du zeste de citron et l'amaretto, si désiré. Poursuivre la cuisson, en brassant, jusqu’à ce que le chocolat ait fondu. 

Répartir le risotto tiède dans 4 bols de service. Garnir des dés de poire caramélisés réservés. Parsemer du reste du zeste de citron et d’amandes, si désiré. Arroser d’un filet de sirop d’érable, si désiré. (L’Ingénieur préfère le pouding au riz froid, et soyez assurés que ça se conserve très bien au réfrigérateur, couvert. Ajoutez les garnitures au moment de servir.)


Thursday, March 04, 2021

Thai meatballs


I saw this recipe for Thai beef skewers with basil salad in a magazine and decided to adapt it a little. I made meatballs instead of skewers and cooked them in the oven instead of grilling them; I used more beef; I used less basil in the salad because it would have been overpowering to me; and I served it with rice with gomashio. I would recommend using only 3 teaspoons of fish sauce for 2 pounds of meat, because fish sauce is very pungent and I notice that most recipes call for slightly too much for my taste. As it was, though, the Little Prince had seconds, the Fox eventually agreed to taste them and then ate some, and The Engineer and I really liked it too! 

1 ½ lb. ground beef (80% lean; I used 2 lbs.) 
½ cup plain breadcrumbs 
¼ cup chopped fresh basil, plus 3 cups (loosely packed) whole leaves (I had less) 
1 large egg 
2 Tbsp. finely chopped peeled fresh ginger 
4 tsp. fish sauce (I would use 3 tsp. for 2 lbs. of meat) 
1 clove garlic, finely chopped 
2 medium carrots, cut into matchsticks or shredded 
2 scallions, thinly sliced 
2 Tbsp. lime juice, plus lime wedges for serving 
cooked white rice, for serving (optional; I made jasmati rice with gomashio) 

In a medium bowl, gently mix the beef, breadcrumbs, chopped basil, egg, ginger, fish sauce, and garlic. Using damp hands, form the meat into 24 balls that are 1 ¼ inches in size (I made mine smaller, with about 1 heaping tablespoon of mixture each, and got a total of maybe 55). Using your palms, flatten the balls into 1-inch-thick disks. Thread the disks onto 8 skewers. (If using bamboo skewers, soak them in warm water for 30 minutes before grilling.) 

Heat a grill pan over medium-high. Grease the pan. Grill the skewers, turning occasionally, until the meat is cooked through, 9 to 11 minutes. (Instead, I cooked them for 15 minutes at 375 °F.) 

Meanwhile, in another medium bowl, toss the carrots, scallions, lime juice, and basil leaves (I prefer more carrots than basil); season the salad with salt and pepper. 

Serve the skewers with the salad, lime wedges, and rice (if using).

Wednesday, March 03, 2021

Chocolate Pancakes


I made a few dishes that were close to pancakes: serabi (which I found delicious with a non-traditional raspberry sauce), then on Candlemas I made buckwheat crepes (which, sadly, I don’t recommend) along with a double batch of my uncle’s crepes for dessert, but decided that it won’t be my go-to crepe recipe after all. (For more about Candlemas and its link to crepes, see here or here; it turns out that Groundhog Day has its origins in Candlemas, though why the Americans left behind the crepes for dinner is beyond me – that’s the best part!) And there’s the pandekager I never wrote about – they’re essentially Danish pancakes with cardamom and lemon zest. Really good! 


I thought about making chocolate crepes for Valentine’s Day, but decided to try chocolate pancakes from Weelicious instead. These were an easy sell with the kids, obviously, and in hindsight I wish I had served them with some sort of whipped topping and fresh fruit. Because pancakes are not very sweet in and of themselves, I wouldn’t hesitate to throw in some chocolate chips. Good with maple syrup, too, and the heart sprinkles were very seasonal. Of course, now that the Little Prince knows that there is such a thing as chocolate crepes, I’m pretty much obligated to make those too for him at some point in the near future! 

1 cup white whole wheat flour 
2 Tbsp. unsweetened cocoa powder 
2 tsp. baking powder 
½ tsp. kosher salt 
1 Tbsp. sugar 
1 large egg, whisked 
1 cup lactose-free milk 
1 Tbsp. coconut oil 

In a bowl, whisk together the flour, cocoa powder, baking powder, salt and sugar. 

In a separate bowl, whisk together the egg, milk and oil. 

Stir the dry ingredients into the wet ingredients until just combined. 

Heat a large skillet or griddle over medium heat and lightly coat with butter or coconut oil. 

Pour about 1 tablespoon of the pancake mixture onto the griddle (I used more, these sound like silver dollar pancakes), making as many pancakes as will fit, cook for 2 minutes or until you see bubbles forming. 

Flip the pancakes and cook for one minute longer.