Sunday, November 29, 2020

Chocolate and Peanut Butter Chia Seed Puddings


I decided to make something fun but still healthy-ish for breakfast: these peanut butter chocolate chia puddings. I doubled the original recipe to have enough for a few days (quantities below are mine) and separated the ingredients for each part of the pudding because it was clearer for me, but keep in mind that the ingredients will be repeated. The Little Prince thought it was okay, the Fox refused to taste it despite the chocolate, and I liked it but thought there’s room for improvement. I felt like the peanut butter didn’t mix well with the pudding, so maybe I’d use a natural nut butter (or sun butter) instead of regular peanut butter next time, or I’d make the whole thing chocolate. I would also use less milk – you can always add more later if you want, but I’d prefer a thicker consistency, so I’d start with maybe 2 cups for the chocolate pudding and 1 cup for the peanut butter pudding. 

For the chocolate pudding 
11 Tbsp. chia seeds (= ½ cup + 3 Tbsp.) 
½ cup cocoa, sifted 
2 2/3 almond milk or lactose-free milk of choice (see note above) 
½ cup maple syrup 
2 tsp. vanilla 
½ tsp. salt 

For the peanut butter pudding 
5 Tbsp. chia seeds 
1 1/3 cup almond milk or lactose-free milk of choice (see note above) 
¼ cup peanut butter (see note above) 
2 Tbsp. maple syrup 
1 tsp. vanilla 
¼ tsp. salt 
¼ tsp. cinnamon (optional) 

To garnish (optional) 
vegan whipped cream (I liked both almond and coconut from a pressurized can) 
fruit, such as sliced bananas or raspberries 
chocolate shavings or sprinkles 
chocolate syrup 

In a medium bowl, mix the ingredients for the chocolate pudding until combined. 

In a small bowl, mix the ingredients for the peanut butter pudding until combined. 

Place both bowls in the fridge and let them sit overnight, or at least 3 hours. 

To arrange, scoop desired amount of chocolate pudding into a cup or bowl, top with a scoop of peanut butter pudding, then add another chocolate layer. Top with whatever you’d like!

Friday, November 27, 2020

Apple Cider Doughnut Cake


Here’s something that says “fall” to me: apple cider doughnut cake. It’s a typical loaf cake in that it’s easy to bake and keeps really well, but the apple cider reduction makes it particularly flavorful and moist. The original recipe says that you can use buttermilk instead of sour cream, and any neutral vegetable oil instead of the butter. I made this with white whole wheat flour, as always, and it was great. Note that, as evidenced by the photos, if you serve it right away, the sugar will fall off the slices a bit, but if you have the patience to wait a day, it’ll stay put. 

9 Tbsp. lactose-free butter, divided, plus more for pan 
1 ½ cups apple cider 
½ cup lactose-free sour cream 
1 tsp. vanilla extract 
1 ¼ cups plus 2 Tbsp. (172 g) all-purpose flour 
2 Tbsp. (15 g) cornstarch 
1 ¼ tsp. baking powder 
½ tsp. baking soda 
1 tsp. Diamond Crystal or ½ tsp. Morton kosher salt, plus more 
1 tsp. ground cinnamon, divided 
½ tsp. freshly grated nutmeg, divided 
2 large eggs, room temperature 
1 cup (200 g) sugar, divided 

Place a rack in middle of oven; preheat to 325 °F. Lightly butter an 8½"x4½" or 9"x5" loaf pan. Line with parchment paper, leaving overhang on both long sides. 

Bring cider to a boil in a medium saucepan over medium-high heat. Reduce heat and simmer until cider is reduced to ¾ cup, 8–10 minutes. Pour ¼ cup reduced cider into a small measuring glass or bowl and set aside. Transfer remaining reduced cider to a small bowl and let cool 5 minutes. Stir in sour cream and vanilla and set aside. 

Melt 8 Tbsp. butter in same saucepan (no need to clean) over low heat. Let cool slightly. 

Whisk flour, cornstarch, baking powder, baking soda, 1 tsp. Diamond Crystal or ½ tsp. Morton kosher salt, ½ tsp. cinnamon, and ¼ tsp. nutmeg in a medium bowl to combine. 

Vigorously whisk eggs and ¾ cup (150 g) sugar in a large bowl until pale, voluminous, and frothy, about 2 minutes. Whisking constantly, gradually add melted butter in a steady stream; continue to whisk until fully combined and emulsified (no spots of fat should remain). Reserve saucepan. 

Whisk dry ingredients into egg mixture in 3 additions, alternating with reserved sour cream mixture in 2 additions; whisk just until no lumps remain. Batter will be thin. 

Scrape into pan and set on a rimmed baking sheet. Bake cake, rotating halfway through, until deep golden brown and a tester inserted into the center comes out clean, 60–80 minutes. Transfer pan to a wire rack and poke top of cake all over with a toothpick. Spoon 3 Tbsp. reserved reduced cider over; let cool 10 minutes. 

Meanwhile, mix a big pinch of salt, remaining ¼ cup (50 g) sugar, ½ tsp. cinnamon, and ¼ tsp. nutmeg in a small bowl. Melt remaining 1 Tbsp. butter in reserved saucepan and mix into remaining 1 Tbsp. reduced cider. 

Using parchment paper, lift cake onto rack and set rack inside rimmed baking sheet. Peel away parchment from sides. Brush warm butter mixture over top and sides of cake. Sprinkle generously with sugar mixture to coat every surface (use parchment to help rotate cake and collect any excess sugar). Remove parchment and let cool completely before slicing.


Monday, November 23, 2020

Turkey Meatballs with Coconut and Lemongrass


Meatballs are usually a good bet with my kids. The Fox has a 50% chance of liking them, which is more than with most types of food right now, and the rest of us are typically big fans. So I made these turkey meatballs with coconut lemongrass sauce one night when I wanted something with Asian flavors that wasn’t quite an Asian dish. 

I reordered the ingredients below to match the order of the steps, because at times I wanted to pull out my hair when making this dish based on the original recipe! I increased the amount of turkey to 2 pounds to make more meatballs, and omitted the 1 ½ tablespoons of sambal olek in favor of a pinch of Korean pepper. That being said, from the way the ingredients were listed, it wasn’t obvious to me how much lemongrass and ginger were needed in total, and since the store sold lemongrass in a package of a single stalk and I figured the knob of ginger I had at home would be enough, well, I ended up not having enough. Be aware that there are similar ingredients in both the meatballs and the sauce, and make sure to write down a precise (total) amount on your grocery list! I put most of my aromatics in the meatballs and eyeballed the amounts. 

This dish was truly delicious! I served it with rice and carrot tzimmes

For the meatballs 
1 Tbsp. + 2 Tbsp. vegetable oil, divided 
1/3 cup chopped shallots 
2 cloves garlic, minced 
1 stalk of lemongrass, white part only, finely chopped 
2 lbs. ground turkey 
1 ½ Tbsp. grated ginger 
1 Tbsp. soy sauce 
2 Tbsp. fish sauce (I use Red Boat) 
1 pinch Korean pepper (see note above) 
½ cup panko breadcrumbs 
3 Tbsp. chopped cilantro 
1 tsp. salt pepper, to taste 

For the coconut sauce 
2 stalks lemongrass, trimmed and bruised 
3 cardamom pods, lightly cracked 
3” cinnamon stick 
1 tsp. turmeric 
1 ½” piece of ginger, peeled and cut into 3 pieces 
1 ½ tsp. coriander seeds 
1 star anise pod 
1 14.5-oz. can of coconut milk 
1 cup chicken stock 
juice of ½ lime 
salt and pepper, to taste 
lime zest and cilantro, to serve (optional) 

For the meatballs 
Line a baking sheet with parchment paper and set aside. 

Heat 1 tablespoon of oil in a large skillet over medium-high heat. Add the shallots and cook until softened, about 4 minutes. Add the garlic and lemongrass and cook for 1 minutes longer. Take the pan off the heat and set aside so that the shallot mixture can cool down a little. 

In a large bowl, put the ground turkey, ginger, soy sauce, fish sauce, Korean pepper, breadcrumbs, cilantro, salt, and pepper, along with the reserved shallot mixture. Mix with your hands or a fork or spoon until just combined. Dampen your hands and shape the mixture into meatballs. I made my meatballs roughly 1” in diameter and got a total of 48 meatballs. 

Place the meatballs on the prepared baking sheet and refrigerate for about 1 hour. This will give time for the flavors to meld and help the meatballs hold their shape as you cook them. 

Heat the remaining 2 tablespoons of oil over medium-high in a large, deep skillet. When the pan is hot, add the meatballs and brown on all sides. (I did this in 2 batches and put in all the meatballs for the next step.) 

For the coconut sauce 
Add the lemongrass, cardamom pods, cinnamon stick, turmeric, ginger pieces, coriander seeds, star anise, and coconut milk to the skillet; bring to a simmer. 

Slowly add the chicken stock and simmer the meatballs over medium heat for 10-12 minutes (I used a thermometer to check that they were cooked all the way through). Add the lime juice and salt and pepper, to taste. 

Garnish with lime zest and cilantro. Serve with rice or rice noodles.


Saturday, November 21, 2020

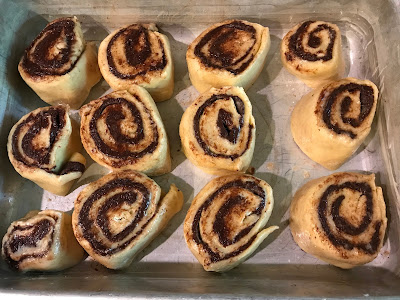
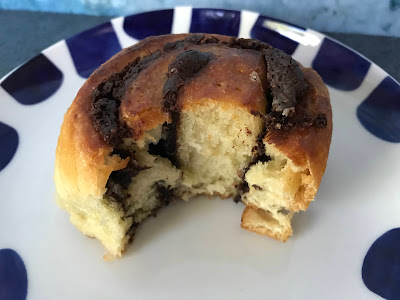
Chocolate Tahini Challah Buns


I often like the idea of breakfast buns or rolls more than the actual execution. For example, I usually find cinnamon rolls too sweet, especially with the frosting. But I’m still trying new recipes because sometimes, it’s totally worth it. Not in the case of these raspberry rolls with maple frosting – they were too dry and dark and didn’t have enough filling, though the maple frosting was great. But then I saw these chocolate tahini challah buns on Smitten Kitchen and I was, well, smitten. 

I’m sure you could take a shortcut and use chocolate tahini instead of making a filling, but it was really delicious as is. Note also that you could make a glaze with 2 cups of powdered sugar and 3 or 4 tablespoons of orange juice, but I omitted it. There is an option to make these dairy-free, but I opted to use lactose-free dairy. They were delicious! 

For the dough 
2 large eggs 
1 large egg yolk 
¼ cup (50 g) granulated sugar 
½ cup vegetable oil or melted lactose-free butter 
2/3 cup lactose-free milk or water, plus an additional tablespoon if needed 
3 ¾ cup (490 g) all-purpose flour, plus more for counter 
1 packet (7 g or 2 ¼ tsp.) instant yeast 
1 ¼ tsp. coarse or kosher salt 

For the filling and assembly 
4 oz (115 g) dark chocolate (or about ¾ cup chocolate chips) 
½ cup (1 stick) lactose-free butter or margarine 
scant ½ cup (50 g) powdered sugar, sifted 
¼ cup (20 g) cocoa powder, sifted 
¼ cup (30 g) tahini, well-stirred 
1 large egg, beaten sesame seeds (optional, I forgot them) 

For the dough 
Whisk eggs, yolk, sugar, oil and milk or water in the bottom of a stand mixer bowl. Add flour, yeast and salt and combine with dough hook until it comes together, then let machine knead it for 5 to 7 minutes. Oil a large bowl and let dough rise in it at room temperature for 2 to 2 ½ hours, until slightly shy of doubled. (If your milk and eggs were really cold, it might take 30 minutes longer.) 

Grease a 9”×13” or equivalent size baking dish, or coat it with nonstick spray. 

For the filling 
Melt butter and chocolate together until smooth. Stir in powdered sugar, cocoa and tahini; mixture should be a spreadable consistency. (This was not an issue for me, but if your filling is very thin, you can pop it in the fridge to let it thicken a bit.) 

For assembly 
On a well-floured counter, roll out dough into a rectangle about 18 inches wide (side facing you) and as far away from you (i.e. length) as it comfortably goes, usually 12 to 15 inches. Dollop chocolate mixture over and spread it smooth – this is more satisfying than you would think. Roll dough in a tight spiral. 

Cut the log very gently — it’s going to be a soft mess, so use a sharp serrated knife, or unflavored floss — into 1 ½-inch to 2-inch segments. Arrange cut side up in prepared pan. Beat egg in small bowl. Brush tops of buns and tops of sides with egg and cover with plastic wrap. You can either refrigerate overnight, along with leftover egg wash, or leave it at room temperature to proof for another 60 to 90 minutes, until puffed a bit. (If you refrigerate the buns, be sure to let them come to room temperature for about 30 minutes before baking.) 

Preheat oven to 350 °F. Brush the tops and sides with egg with egg wash again and sprinkle with sesame seeds, if using. Bake for 30 minutes, until bronzed all over and buns have an internal temperature of 190 °F. Let cool slightly before serving.


Friday, November 20, 2020

Cardigan

After I had set aside my Malabrigo Rios Yarn in Plomo while making the Adam’s Rib pattern, I decided to make another cardigan before getting back to it. I chose the Curtain Call Shrug, which is a free pattern by Lion Brand Yarn. I used Malabrigo Rios Yarn in Teal Feather and set to work. 

In the end, however, I wasn’t crazy about it. It’s knit in two identical parts sewn together vertically, so there are visible seams running down the back and on the sides, and the sleeve edges curl under because the body is in stockinette stitch. Plus, the folded-over ribbed edge doesn’t really stay in place, and yet you can’t just leave it unfolded because it wouldn’t stay in place either, so some of the sewing is visible either way. So even though I loved the color, I wasn’t sure I’d wear it. 


Then I got back to the Plomo yarn and used it for Suvi Simola’s Fold and Turn Cardigan. Here it is being transformed from rib into stockinette. 


This pattern was also very simple, but it didn’t have the problems the previous one had. It’s knit in one piece, from side to side, has some detailing down the back as well as ribbed edges that stay put, plus ribbed sleeves that fit snuggly and won’t roll over. Since I knew I might not have quite enough yarn, I decided to knit the smaller size, and I think that the fit is forgiving enough to get away with it. And still, still (woe is me!), I ran out of yarn before finishing the sleeves. The photos show it unfinished. 


So I did the only sensible thing: I frogged the teal Curtain Call cardigan that I didn’t like and used that yarn to make the Fold and Turn again, this time in the proper size. I love the result! The only downside is that I have a bit more than a skein left to feed my stash, instead of using it all up like I had hoped. (First world problems, eh?) 


At this point, I’m thinking that the only thing to do with the Plomo yarn is something sleeveless, like a vest, and I’m thinking specifically of something inspired by The Hunger Games. But that’s back at the end of the queue again while I make a few fun things.

Tuesday, November 17, 2020

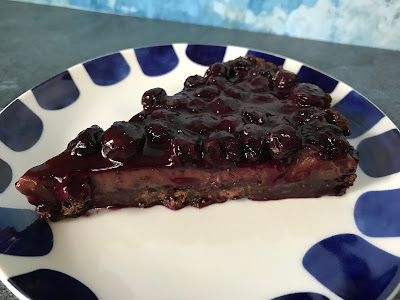
Tarte bleuets et chocolat


Parfois, il y a de ces recettes qui ont l’air toutes simples, mais dont le résultat est décevant (comme ce gâteau au chocolat et à l’huile d’olive). Et il y en a d’autres qui ont l’air compliquées (comme une tarte aux bleuets, au chocolat noir et au sarrasin, avec en plus une épice inattendue), mais qui, en fait, ne le sont pas tant que ça, et sont délicieuses de surcroît. 

C’est une recette qui vient du site Épices de cru. L’épice « inattendue » ici est la coriandre, qui se mariait à merveille avec les bleuets! Je ne pouvais pas vraiment la distinguer en goûtant la tarte, mais selon la recette d’origine, c’est son goût acidulé qui rehausse celui des fruits. Je me demande maintenant ce que ce serait avec de la cardamome… 

La croûte est faite de farine de sarrasin. J’ai utilisé la farine de sarrasin blanche de Bouchard Family Farms, mais j’aurais sans doute dû en prendre une plus foncée et plus goûteuse. Honnêtement, je n’ai pas trouvé mon bonheur avec cette croûte, car j’ai dû y ajouter 1 c. à soupe d’eau pour qu’elle tienne, mais la croûte a ensuite fondu au four. Peut-être qu’il aurait fallu la réfrigérer avant de la faire cuire? Je pense qu’une croûte chocolatée faire avec de la farine de blé conviendrait. Je réécris les instructions pour que ce soit un peu plus clair. 

Ai-je besoin de préciser que c’était absolument délicieux? 

Pour la croûte 
1 tasse de farine de sarrasin (voir note plus haut) 
¼ tasse de cacao, tamisé 
¼ c. à thé de sel 
½ tasse de beurre ou de margarine sans lactose, à la température de la pièce 
¾ tasse de cassonade 

Pour la ganache 
1 tasse (175 g / 6 oz) de chocolat noir haché 
1 tasse de crème sans lactose ou de lait de coco (je l’ai faite avec du lait de coco) 

Pour la garniture aux bleuets 
½ tasse de sucre 
3 c. à soupe de fécule de maïs 
jus de ½ citron 
2 c. à thé de coriandre moulue finement 
3 tasses de bleuets 

Pour la croûte 
Préchauffer le four à 375 °F et placer la grille au centre du four. Huiler légèrement un moule à tarte à fond amovible de 9 pouces. 

Dans un bol, mélanger ensemble tous les ingrédients secs. 

Dans un bol à part, crémer ensemble le beurre et la cassonade. Incorporer les ingrédients secs au beurre et à la cassonade afin de créer une pâte homogène. 

Presser la pâte dans le moule afin de former une croûte fine et uniforme d’environ 1 cm d’épaisseur. (La mienne était bien plus fine – je n’en aurais pas eu assez pour faire 1 cm d’épaisseur!) 

Cuire de 15 à 20 minutes, puis laisser refroidir sur une grille. Réserver. 

Pour la ganache 
Placer le chocolat dans un bol résistant à la chaleur. Réserver. 

Verser la crème dans une petite casserole et la porter à ébullition. Retirer immédiatement du feu. Verser la crème sur le chocolat et laisser reposer sans mélanger une ou deux minutes. 

Fouetter la ganache jusqu’à l’obtention d’une texture lisse et homogène. Verser la ganache encore tiède et malléable dans la croûte et réfrigérer jusqu’à ce qu’elle se solidifie (environ 1 heure). 

Pour la garniture aux bleuets 
Dans une casserole, mélanger le sucre, la fécule de maïs, la coriandre et le jus de citron. 

Ajouter les bleuets et cuire à feu vif en mélangeant sans arrêt (délicatement afin de ne pas écraser les bleuets) jusqu’à ce que la préparation épaississe et nappe le dos d’une cuillère. (On peut la couvrir et la réserver à la température de la pièce jusqu’à ce que la ganache soit prête.) 

Verser la garniture aux bleuets sur la tarte et l’étendre à l’aide d’une spatule. Réfrigérer la tarte environ 1 heure avant de servir, afin que la garniture ait le temps de se solidifier.


Sunday, November 15, 2020

Baked Gnocchi with Spinach and Sausage

This baked gnocchi dish is near perfect: simple to make, comforting, and a relatively easy sell with the kids, despite the spinach. The white beans actually blend in with the gnocchi pretty well, so there’s a chance your kids will eat some by mistake. You can even replace the sausage with a vegetarian version if you want. And you can use half a 10-oz. package of frozen spinach instead of fresh, but make sure it is thawed and squeeze out all excess water. This was really good! 

1 Tbsp. olive oil, plus more for coating the baking dish 
1 lb. uncooked sweet or hot Italian sausages 
1 medium yellow onion, diced 
4 cloves garlic, minced 
kosher salt 
freshly ground black pepper 
2 Tbsp. tomato paste 
1 (28-oz) can whole peeled tomatoes 
1 (14-oz) can tomato sauce 
8 oz lactose-free fresh mozzarella cheese 
¼ cup grated parmesan cheese 
2 (15.5-oz) cans white beans, drained and rinsed 
5 oz baby spinach (about 5 packed cups) 
1 lb. refrigerated, shelf stable, or frozen gnocchi 
 fresh basil leaves, for garnish 

Arrange a rack in the middle of the oven and heat the oven to 425 °F. Lightly coat a lasagna pan (a 9x13-inch pan that’s at least 3 inches deep) or 3-quart baking dish with olive oil. Alternatively, you can use a 9x13-inch baking dish that's 2 inches deep, but it will be very full. (That’s what I did, and it honestly wasn’t a problem.) 

Heat olive oil in a large heavy-bottomed pot or Dutch oven over medium heat until shimmering. Remove the casings from sausages, add to the pan, and cook, breaking up the meat into smaller pieces with a wooden spoon, until browned, beginning to crisp, and cooked through, 6 to 8 minutes. 

Add the onion, garlic, ½ teaspoon kosher salt, and several grinds black pepper to the pot and cook until the onion is softened, 6 to 8 minutes. Add tomato paste and cook, stirring, until well-incorporated and darkened slightly in color, 1 to 2 minutes. Add whole peeled tomatoes and their juices, breaking up the tomatoes with your hands as you add them to the pot, and tomato sauce. Taste and season with salt and pepper as needed. 

Bring the sauce to a simmer and cook until thickened slightly and the flavors have developed, about 15 minutes. Meanwhile, drain mozzarella cheese if needed, then grate on the large holes of a box grater. (Pro tip: Use non-stick spray on the grater to prevent the fresh mozzarella from sticking to it too much.) Also grate the parmesan if you haven’t done so already. 

Remove the pot from the heat. Add spinach to the sauce one handful at a time, stirring as you go. Stir in the white beans and gnocchi. Transfer the mixture to the prepared baking dish. Top with the mozzarella, followed by the parmesan cheese. 

Bake until the casserole is bubbling and the cheese is browned, 30 to 35 minutes. Let cool for at least 10 minutes. Top with fresh basil leaves just before serving.


Saturday, November 14, 2020

Gardener's Raw Vegetable Salad


I thought I’d write this post to share this easy barbecue chicken en papillote from Weelicious, which I made with the maple barbecue sauce from Keepers. It was a fine chicken recipe, though the sauce was just okay. But it was the side dish that really wowed me: this gardener’s raw salad from The Kitchn. I adapted it slightly, reducing the amount of oil and omitting the finely chopped red bell pepper in the dressing, since there’s already red bell pepper in the salad itself. The amounts below are mine. 

I really, really loved this, much more than I thought I would. I think I’ll make it every summer! Sadly, the rest of my family wasn’t keen on it, so I had lots and lots of leftovers. 

For the dressing 
¼ cup red wine vinegar 
1 clove garlic, sliced 
1 tsp. Dijon mustard 
½ tsp. sugar 
½ tsp. salt 
¼ cup olive oil 
additional salt and pepper, to taste 

For the salad 
yellow squash and zucchini, thinly sliced 
sugar snap peas, cut if big 
shelled edamame and/or field peas (I used edamame) 
red bell pepper, thinly sliced, cut if big 
fresh salad greens (I’m always partial to arugula) 

For the dressing, combine the red wine vinegar, garlic, Dijon, sugar, and salt in a blender (I did this with my immersion blender) and purée until the garlic is minced. With the blender running, very slowly add the oil in a thin stream and blend until creamy. Season with additional salt and pepper, to taste. 

For the salad, toss the vegetables (without the greens) in the dressing and marinate for about 15 minutes. Pile the vegetables onto the salad greens and serve. (The vegetables will keep well in the fridge with the dressing. You can also add only part of the dressing at first, depending on how many vegetables you are using.)


Friday, November 13, 2020

Double Chocolate Tahini Banana Muffins


I was trying to get more fiber into the Fox’s diet, so I made blueberry flax muffins and oatmeal blueberry flax muffins, neither of which were very good. I made apple applesauce muffins, only to realize that the kids eschewed the apple chunks. (I also tried another recipe for lactation cookies, omitting the brewers’ yeast, but those were a flop – my “regular” ones are better and were heartily consumed.) 

Then I decided to go in another direction and make chocolate muffins. But as it turns out, the recipe I picked, double chocolate tahini banana muffins, was relatively healthy and actually had flax seed and oats as well! It’s made using Soom Chocolate Sweet Tahini, of which I’ve been a big fan for years now (I first talked about it here). Note that the original instructions say that if you don’t have Soom Chocolate Sweet Tahini, you can replace it in this recipe with 1/3 cup + 2 Tbsp. tahini plus 2 Tbsp. maple syrup plus 2 Tbsp. cocoa powder, in addition to the ingredients already called for (meaning, still use the maple syrup and cocoa powder that are already written down below). 

These muffins were a hit with everyone! The exterior was slightly crisp, the crumb was fluffy, they all rose enough that the top cracked and made them look like they were wearing little top hats. They were delicious and will keep well at room temperature for a few days in an airtight container, though you could also keep them in the fridge or freeze them for later. 

3 medium-large overripe bananas 
1 large egg 
½ cup Soom Chocolate Sweet Tahini 
1/3 cup maple syrup 
½ cup unsweetened vanilla almond milk 
2 Tbsp. melted and cooled coconut oil 
2 tsp. vanilla extract 
2 cups rolled oats 
2/3 cup unsweetened natural cocoa powder 
2 Tbsp. flaxseed 
1 tsp. baking soda 
1 tsp. cinnamon 
½ tsp. salt 
¾ cup semi-sweet chocolate chips 

Preheat oven to 425 °F. Line a standard 12-cup muffin tin with liners and spray lightly with nonstick spray (I only greased a muffin tin instead of using liners, and got a total of 14 muffins). 

In a high-speed blender, combine bananas, egg, Soom Chocolate Sweet Tahini, maple syrup, unsweetened vanilla almond milk, coconut oil, vanilla extract, oats, cocoa powder, flaxseed, baking soda, cinnamon, and salt. Blend until smooth – about 30 seconds to 1 minute at the most (over-blending will make them tough). 

Add chocolate chips to the batter and stir to combine with a spoon. 

Fill muffin tins about ¾ of the way full. Sprinkle the tops with extra chocolate chips, if desired. 

Bake for 5 minutes, then lower heat to 350 °F (leaving the muffins in the oven). Bake for an additional 10-12 minutes or until muffins are set and spring back when you press on the tops. 

Let muffins cool in the tins for 10 minutes, then let cool for an additional 10 to 15 minutes on a cooling rack.


Tuesday, November 10, 2020

Hummus with Spiced Summer Squash and Ground Meat


This simple dish, created by Deb Perelman for Bon Appétit, was a surprise hit. I obviously thought I would like it (otherwise I wouldn’t have made it), but the fact that the Little Prince not only ate it heartily, but asked for seconds, was unexpected! It would have been even better with warm pita. 

For the hummus 
2 15-oz. cans chickpeas, rinsed and drained 
1 garlic clove, coarsely shopped 
½ cup tahini 
3 Tbsp. fresh lemon juice 
1 ¼ tsp. kosher salt 
½ cup warm water 

For the meat and assembly 
2 tsp. kosher salt 
1 ½ tsp. ground coriander 
1 ½ tsp. ground cumin 
¼ tsp. crushed red pepper flakes (optional) 
2 Tbsp. extra-virgin olive oil, divided, plus more for drizzling 
1 lb. ground lamb or beef (I used the latter) 
3 garlic cloves, thinly sliced, divided 
1 lb. summer squash or zucchini, cut into ¾” pieces (I peeled mine) 
¼ cup chopped parsley or cilantro 

For the hummus 
Process chickpeas in a food processor until powdery clumps form, about 30 seconds. Add garlic, tahini, lemon juice, and salt and process until smooth. With motor running, drizzle in water and process until hummus is very smooth, light, and creamy. Spoon onto a large plate. 

For the meat and assembly 
Mix together salt, coriander, cumin, and red pepper flakes (if using) in a small bowl. Heat 1 Tbsp. oil in a large skillet over medium-high. Add lamb and press into a large 1¼"-thick patty; sprinkle with half of spice mixture and half of garlic. Cook, without moving, until browned and crisp, about 5 minutes. Turn over in pieces and cook until other side is browned and crisp, about 3 minutes. Continue to cook, breaking up and stirring, until cooked through, about 2 minutes longer. Using a slotted spoon, scoop lamb over hummus. 

Pour out and discard fat and wipe out skillet. Heat 1 Tbsp. oil over high. Cook squash in a single layer, undisturbed, until browned, about 4 minutes. Sprinkle with remaining spice mixture and garlic and cook, stirring, until squash is coated and cooked through, about 3 minutes. Spoon squash over lamb. Drizzle with more oil and top with herbs. Serve with pita.

Sunday, November 08, 2020

Gluten-Free Carrot Cake

I recently picked up my copy of Gluten-Free Girl and the Chef and realized that I still had two dessert recipes I had flagged and not tried yet. The situation was easy to rectify: I made the peanut butter brownies, which were fine, and the carrot cake with ginger frosting, which was great! 

I think I had put off this recipe because the list of ingredients is long and, therefore, intimidating, but once I decided to just do it, it was pretty painless. I happened to have all the dry ingredients in my pantry, including all the rice flours. Note however that I couldn’t find carrot juice in the store that day, so I pulled out my juicer (which I seldom use at this point, but am reluctant to get rid off because, as you can see, it *was* useful!) and 2 pounds of carrots and made my own. I’ll totally understand if you wait until you can buy some, though! I measured all the flours by weight and think that you could replace the flours and gums with all-purpose wheat flour if gluten is not an issue for you, though I haven’t tried. 

Also, I halved the frosting because I’m assuming that “enough” here means enough to cover the top of the cake and leave the sides bare, as I did. I found the frosting too soft to cover the sides of the cake properly anyway, as is often the case with cream cheese frosting as opposed to a buttercream. The amounts below are mine, but feel free to double them if you want to try your luck. 

For the cake 
2 cups fresh carrot juice 
⅔ cup (75 g/2.6 oz.) almond flour 
½ cup (60 g/2 oz.) tapioca flour 
¼ cup (30 g/1 oz.) sweet rice flour 
¼ cup (30 g/1 oz.) superfine brown rice flour 
1 tsp. xanthan gum 
¾ tsp. guar gum 
¾ tsp. baking powder 
1 tsp. salt 
1 tsp. ground cinnamon 
½ tsp. ground nutmeg 
½ tsp. ground ginger 
¼ tsp. ground cloves 
1 cup (2 sticks) lactose-free butter, at room temperature 
½ cup granulated sugar 
½ cup dark brown sugar 
4 eggs + 2 separated eggs, divided 
grated zest of 1 orange 
1 tsp. vanilla extract 
1 cup peeled and grated carrots 
⅓ cup chopped walnuts (optional; the Engineer and I prefer our cake without them) 
⅓ cup golden raisins (optional; our kids vetoed them) 
1 pinch cream of tartar 

For the frosting 
4 oz. lactose-free cream cheese 
½ cup (1 stick) lactose-free butter, at room temperature 
1 ½ tsp. ground ginger (I used half that) 
1 pinch ground cardamom 
1 ½ to 2 cups powdered sugar, sifted 

For the cake 
In a small saucepan over medium heat, bring the carrot juice to a boil, then reduce the heat to low. Slowly reduce the juice, stirring occasionally, until it is reduced to ¼ cup and is darkened in color, about 20 minutes. Remove from heat and set aside to cool. 

Preheat the oven to 350 °F. Cut a circle of parchment paper to fit the base of a 9-inch cake pan. Grease both sides of the paper and place it in the pan. Set aside. 

Into a large bowl, sift together the almond flour, tapioca flour, sweet rice flour and brown rice flour. Sift in the xanthan gum, guar gum, baking powder, salt, cinnamon, nutmeg, ginger, and cloves. Stir together the flour-and-spice mixture to make sure the ingredients are evenly distributed and set aside. 

In the bowl of a stand mixer, or in a large bowl using a hand mixer, beat butter with the white and brown sugars until creamy and fluffy, 3 to 5 minutes. Add the 4 whole eggs and 2 egg yolks, one at a time, until fully incorporated. Beat in the orange zest and vanilla, then the reduced carrot juice. 

Slowly add the flour-and-spice mixture to the liquid until combined. Gently stir in the carrots, and walnuts and raisins (if using). The cake batter should be quite thick, but you should still be able to work a rubber spatula through it easily. 

In a clean, dry mixing bowl, beat the 2 remaining egg whites with the cream of tartar with the hand mixer until they form stiff peaks. Gently fold the stiff egg whites into the cake batter until they are entirely incorporated. 

Pour the batter into the prepared cake pan. Slide the pan into the oven and bake until a knife inserted into the center of the cake comes out clean and the top is golden brown, about 45 minutes. Transfer the pan to a wire rack and set aside for 15 minutes before removing it from the pan. Turn the cake out onto the rack, turn it right side up, and cool completely before frosting it. 

For the frosting 
In a mixing bowl, beat together the cream cheese, butter, ginger and cardamom with the hand mixer until smooth. Gently beat in 1 ½ cups powdered sugar, then beat in more if you prefer the frosting thicker and sweeter. Spread the frosting on the top of the cake before slicing and serving.


Friday, November 06, 2020

Bacon Corn Hash


This dish from Smitten Kitchen was a big hit! It took a while to prepare, but was entirely worth it. The Little Prince now likes potatoes, but only as long as they are prepared this way (my mother also sometimes made pan-roasted small-dice potatoes like these when I was a kid and I *loved* them, so I guess he does take after me sometimes). 

½ lb. thick-cut bacon, cut into small dice 
1 lb. red potatoes, scrubbed clean and diced into ¼- to ½-inch cubes (about 3 to 3 ¼ cups) 
salt and freshly ground black pepper 
4 medium-large ears corn, kernels cut from the cob (2 ½ to 3 cups) 
1 bundle scallions, thinly sliced
fried egg (optional)  

Toss bacon into a large skillet over medium heat; no need to heat the pan first. Let rest for a few minutes until it starts sizzling, then move the bits around so that they begin to brown evenly. Again, wait a couple minutes before shuffling the pieces around; you’re looking for them to get evenly golden and crisp. This should take about 10 minutes. Remove the bacon bits with a slotted spoon, leaving the drippings in the pan and transferring the bacon to paper towels to drain. 

Heat the pan to medium/medium-high, making sure the bacon fat is sizzling, then add your potatoes all at once in a single layer. Sprinkle them with ½ teaspoon table salt and several grinds of black pepper. Let them cook for a few minutes in one place and get a bit golden underneath before turning them over and moving them around. Repeat this process until the potatoes are browned on all sides; this takes about 20 minutes. (At this point, you can push aside the potatoes and pour or spoon off all but a small amount of the fat and reserve for the egg.) 

Bump up the heat a little and add the corn to the skillet. Sauté the potatoes and corn together until the corn gets a bit brown but stays fairly crisp, about 4 to 5 minutes. Add the drained bacon, and stir the mixture together until it’s evenly warm, about 1 more minute. Remove the skillet from the burner and sprinkle the scallions (reserving a few spoonfuls if you’d like to use them as garnish) over the hash. In 2 minutes, they should be warm and mellowed. Season with more salt or pepper to taste, if needed. 

If you choose to fry an egg or two, I recommend doing so in the bacon fat. Fry and season to your liking – I made mine still a bit runny in the middle, but both my kids prefer a solid yolk. Serve on top of a pile of bacon hash and garnish with reserved green onions.


Tuesday, November 03, 2020

Beignes au chocolat


Ça faisait longtemps que je voulais faire des beignes au four. C’est plus santé que les beignes frits, donc ça me permet d’en offrir plus souvent aux enfants, qui en réclament fréquemment! J’ai donc acheté des moules et j’ai ressorti la recette de beignes au chocolat de Coup de Pouce pour commencer. 

Tout d’abord, on va se le dire : les beignes au four, c’est un peu moins beau que les beignes frits. Du côté moins dodu, en tout cas! Je vous mets pour référence des photos de la pâte dans le moule avant cuisson et du résultat après cuisson ainsi qu’une comparaison du dessus et du dessous des beignes. C’est le dessous qui est le plus beau, même une fois décoré. J’ai glacé la plupart des beignes (mais pas tous, parce que le Renard était d’abord d’avis qu’il ne voulait pas de glaçage, même s’il a changé d’idée après quelques jours) et j’ai utilisé trois sortes de bonbons décoratifs parce que c’est ce que j’avais sous la main. 


Si jamais vous n’avez qu’un total de 12 ou même de 6 moules, pas de panique! Vous n’avez qu’à faire cuire les beignes en 2 ou 3 fois. 

Nous avons vraiment aimé ces beignes! Les enfants étaient aux anges, et nous aussi. J’ai essayé aussi leur recette de beignes à l’érable, mais je les ai trouvés moins bons – ils étaient un peu secs, et ce glaçage aurait été meilleur. 


Pour les beignes 
1 ¼ tasse de farine 
1/3 tasse de poudre de cacao 
½ c. à thé de bicarbonate de sodium 
½ c. à thé de poudre à pâte 
¼ c. à thé de sel 
1 œuf 
½ tasse de lait sans lactose 
½ tasse (1 bâton) de margarine ou de beurre sans lactose fondu(e) 
½ tasse de cassonade 
¼ tasse de sucre 
1 tasse de pépites de chocolat miniatures 

Pour la glace au chocolat 
4 oz de chocolat mi-amer haché 
¼ tasse de beurre sans lactose 
4 c. à thé de sirop de maïs 
bonbons décoratifs, au choix (facultatif) 

Préchauffer le four à 350 °F. Vaporiser 18 moules à beignes de 2 ½ po (6 cm) ou 8 moules à beignes de 3 ½ po (8 cm) de diamètre d'un enduit végétal antiadhésif (les miens font 3 ¼ po de diamètre, selon la description officielle, mais j’en ai eu besoin de 18; voyez sur les photos comme ils étaient remplis). Réserver.  

Dans un bol, mélanger la farine, le cacao, le bicarbonate de sodium, la poudre à pâte et le sel. 

Dans un autre bol, à l'aide d'un batteur électrique, bien mélanger l'œuf, le lait, le beurre, la cassonade et le sucre. Incorporer les ingrédients secs en battant à faible vitesse jusqu'à ce que la pâte soit homogène, sans plus. Ajouter les brisures de chocolat et mélanger à l'aide d'une cuillère. 

À l'aide d'une grosse cuillère, mettre la pâte à beignes dans une poche à douille munie d'un embout rond de ½ po (1 cm) de diamètre. Remplir les moules réservés aux deux tiers. Cuire pendant 12 minutes ou jusqu'à ce que les beignes soient légèrement dorés et que le dessus reprenne sa forme après une légère pression du doigt. (Je vais vous dire tout de suite que je n’aime pas cette description, parce que des beignes au chocolat, ce n’est pas doré! Mais le dessus avait l’air bien sec, voilà.) Retirer du four et laisser refroidir 5 minutes avant de démouler les beignes sur une grille. Laisser refroidir. 

Pendant ce temps, faire la glace au chocolat. Dans un bol à l’épreuve de la chaleur placé sur une casserole d’eau chaude, mais non bouillante, faire fondre le chocolat et le beurre avec le sirop de maïs, en brassant, jusqu’à ce que la préparation soit lisse. Retirer la casserole du feu (laisser le bol sur la casserole pour garder la glace chaude). 

Tremper les beignes refroidis dans la glace désirée, en laissant égoutter l'excédent, puis les déposer sur une grille déposée sur une plaque à biscuits tapissée de papier parchemin. Parsemer de bonbons décoratifs, si désiré. Laisser reposer jusqu'à ce que la glace ait pris. (Les beignes se conserveront quelques jours dans un contenant hermétique à la température ambiante ou jusqu'à 1 mois au congélateur.)