Thursday, October 29, 2020

Hummus au chocolat


J’ai fait des recettes que je pensais que les enfants aimeraient. Poulet et carottes avec confiture d’abricot de Parents, ça avait l’air vraiment vendeur, mais ils n’ont pas trippé. Pommes de terre et raisins rôtis au romarin de Coup de Pouce, vu que mes enfants adorent les raisins… et je me suis fait dire qu’ils n’aimaient pas du tout ceux-là. Bon. 

Alors j’ai décidé de faire de l’hummus au chocolat, parce que ça, je sais qu’ils aiment. (Soit dit en passant, la graphie « hummus » est acceptée par l’OQLF, tout comme « houmous », mais je préfère la première.) J’ai donc comparé les trois recettes que j’avais afin d’en garder les meilleurs éléments; voici la 1ère, la 2e et la 3e. La recette ci-dessous est ma version, qui est en fait adaptée du site A Couple Cooks. J’ai servi mon hummus avec des biscuits graham, mais bien sûr des fruits seraient tout aussi délicieux! 

15 oz (1 ½ tasse) de pois chiches, drainés et rincés 
¼ tasse de tahini 
6 c. à soupe de sirop d’érable, ou au goût 
½ tasse de cacao 
1 c. à thé de vanille 
¼ c. à thé de sel cachère 
2-4 c. à soupe d’eau chaude 

Dans un mélangeur (ou un robot culinaire), mettre les pois chiches, le tahini, le sirop d’érable, le cacao, la vanille, le sel et 2 c. à soupe d’eau chaude. Actionner pendant 30 secondes, puis râcler les parois. Goûter pour voir s’il faut ajouter du sirop d’érable. Ajouter 1 ou 2 c. à soupe d’eau, au besoin, et actionner de nouveau jusqu’à l’obtention d’une consistance crémeuse. 

Les restes se garderont au réfrigérateur pendant une semaine (mais je doute qu’il en reste si longtemps!).

Sunday, October 25, 2020

Toasted-Coconut Key Lime Pie


This coconut key lime pie from Real Simple was delicious, and gorgeous to boot! I love that it was conceived to be vegan (depending on what brand of cookies you use for the crust), so I didn’t even have to adapt it to be lactose-free! I used CocoWhip for the coconut topping, as usual. 

I’m pretty sure I misread the directions and actually refrigerated the pie instead of freezing it. This would explain why the filling was still too soft after 4 hours; that being said, it was much better the next day, after over 24 hours in the fridge. Also, the original recipe notes say that the pie can be frozen ahead of time – just garnish it when you’re ready to serve it. 

I haven’t looked into this too deeply, but it feels like I’ve been making coconut-lime desserts more often than usual these past several months. So when I saw the new Listerine flavor in the store, I almost burst out laughing under my mask! (I haven’t bought it, but I *am* curious.) 


1 12.3-oz. package coconut cookies, finely crushed 
¼ cup coconut oil, melted 
2 Tbsp. granulated sugar 
2 9-oz. containers thawed frozen coconut whipped topping, divided 
1 14-oz. can sweetened condensed almond milk 
1 Tbsp. lime zest + ½ cup fresh lime juice (from 4 limes or 12 key limes), plus slices for serving 
toasted coconut flakes, for serving 

Preheat oven to 350 °F. Stir cookie crumbs, oil, and sugar in a large bowl. Press crumb mixture firmly into bottom and 1 ½ inches up sides of a 9-inch springform pan or deep-dish pie plate. Bake until edges are golden, about 10 minutes. Let cool completely on a wire rack, about 20 minutes. 

Meanwhile, stir 1 container whipped topping, coconut milk, and lime zest and juice in a large bowl until blended. Pour mixture into cooled crust, cover with plastic wrap, and freeze until firm, at least 4 hours. 

Top with remaining container of whipped topping. Top with lime slices and toasted coconut.


Thursday, October 22, 2020

Oreo Frosting


The Engineer turned 40 recently and asked for a chocolate cake with Oreo frosting. I of course decided to make my definitive chocolate recipe (in hindsight, perhaps I should have added some active charcoal in there to make it darker!), then I set out looking for a frosting recipe. I settled on this one from House of Nash Eats and… it was mind-blowing. It pushed some of the same buttons that an Oreo shake does, though obviously sweeter and not as cold. It was so good that the Little Prince decided that’s what he wants on one of his next birthdays (he is so specific and orderly that he’s placed his orders for his next 2 birthday cakes already and won’t budge, but he’s got this one lined up for his 10th birthday). The problem is, though, that I don’t think I can wait that long to make it again! This is a really great frosting. 

You can also pipe some mounds of frosting and plop an Oreo down on each one to decorate, but only do so shortly before serving, because the Oreos will go soft quickly. Note also that while you could buy Oreo crumbs, I just put some in a food processor to crush them. You could also put them in a plastic bag and go over them with a rolling pin. 

1 cup lactose-free butter, at room temperature 
4 cups powdered sugar, sifted 
1 tsp. vanilla 
1 pinch of salt 
2-3 Tbsp. lactose-free cream or whole milk 
12-14 Oreos, finely crushed, or about 1 ¼ cups of cookie crumbs 

 In a large bowl, beat the butter using a stand or electric mixer until smooth, creamy, and light, about 4 minutes. 

Add the 2 cups of the powdered sugar, beating until combined. Beat in the remaining powdered sugar, vanilla, and salt, then add just enough cream or milk to get the frosting to a nice pipeable consistency. 

Stir in the Oreos, then use to frost a cake or cupcakes.

Pandemic ramblings

The Little Prince started in-person schooling again yesterday. We’re in the green zone, there haven’t been any cases of covid transmission on campus in the past 9 weeks, and his remote-learning teacher was the one who would transition to in-person for returning kids, so it seemed like a good time to make the switch. We’re not fully confident that this is the safest thing to do, but we’ve calculated it to be safe enough at the moment, and probably best for now (considering that a vaccine for the general population still seems to be at least a year away). I already feel more relaxed during the day with only the Fox around. This had me taking stock of the past 8 months or so, even though the pandemic is not over by any means. 

I realize that what I’m about to say is based on the fact that before and throughout this confinement, 1) I’ve been a stay-at-home mom (even though I started my own business, SAHM was definitely my primary occupation in terms of hours worked), and 2) I am privileged because my husband is classified as an essential worker, so he got to keep his job, and his salary is enough for us to live comfortably. But there are still things that make me feel out of step with many people, even though we’re all going through the same thing. 

It seems that everyone I see on social media, and even almost everyone I speak to personally, has “learned” from this experience that they had a lot of unnecessary activities in their day. They now realize they were overbooked, spending too much time commuting, had their kids signed up for too many activities, etc. But those are things I learned early on. I chose to be a freelancer, about 15 years ago, in large part because it left me more control over my schedule. My kids both had swimming lessons (they love swimming, and I think it’s an important life skill), and my oldest had just started drumming lessons (because he’s talented and also because he really, really likes drumming), and that’s it. We made it a conscious decision to have enough free time that we could relax and, ideally, not have commitments on weekends. We always have dinner as a family (except on maybe at most a dozen nights a year when work or an outing prevents one parent from making it). 

The main way that the Little Prince being out of school had eased up our schedule is that we no longer had to get up at 6:00 am on weekdays – but that wakeup time wasn’t by choice, it was because our public elementary school (4 minutes away by car) starts so early that we just have to get up at 6. I mean, to the extent that you have a say in your schedule… I just don’t understand why it would take a worldwide pandemic for you to realize how busy you are and to decide to drop a few things to be less busy? Or to spend more time as a family? 

People say they’ll save money, buy local, travel less. Well, I was already putting energy in the first two, and if anything, this makes me want to travel even more. I was already doing most of my shopping online (the big-box stores that took the worst hit over the past months were already in the red before 2020, mostly for that precise reason – they weren’t competing well enough with online retailers). I already thought that essential workers like teachers, waiters, nurses, mail carriers and waste collectors were underappreciated. I already thought that the minimum wage should be higher and that people should have free health care – I am from Canada, after all. But based on public discourse, it’s like a lot of people just now came to that conclusion. 

People who were child-free and still had a decent income suddenly had a lot more time to themselves, and many got to check major things off their to-do lists – catch up on all those movies and tv series, read all those books, learn new hobbies, complete projects that had long been set aside. So even if their viewpoints are the same, they may feel more evolved just because of how much they got done for themselves. But most of us with kids (definitely myself included) had way less free time than usual and got even less done than we would have otherwise. 

The Little Prince has to do MAP testing each year for school. MAP stands for Measure of Academic Progress; it’s not graded per se, but is meant to position him in relation to his peers in math and reading (there will be more subjects as he gets older). As the name implies, though, he has to progress in order to get a “good” score, meaning that even assuming he scores above his peers, if he didn’t progress much compared to the last time he took the test, he would score poorly. And I couldn’t help but think of this when I compare my viewpoints today with everyone else’s. Not that I’m “better” than anyone, of course, just that I feel like I’m standing still. 

So here I am, admittedly possibly on the verge of a midlife crisis (what with two months left in my thirties), feeling like I haven’t accomplished anything beyond day-to-day treading water and haven’t evolved mentally either. Is anyone else in the same boat?

Monday, October 19, 2020

Corn and Chickpea Bowl with Miso Tahini Dressing

I’m still into bowls for lunch, but it can be challenging to put in stuff that the kids will like. In this case, I had one kid who really liked the corn and another who really liked the avocados, while I ate the whole thing. I *loved* the dressing and might make it again to eat with salads or grilled chicken. 

This recipe is adapted from Bon Appétit; I made the dressing my way and didn’t use as much za’atar as they did. I also only warmed up the corn and chickpeas instead of getting them seared and crispy, but that’s up to you. 

Leftovers from this dish made a great salad as a side to quiche later on in the week. 

For the dressing 
¾-inch piece of ginger, peeled and grated 
1 small garlic clove, peeled and grated 
1 cup (packed) cilantro leaves with tender stems 
¼ cup fresh lime juice 
¼ cup tahini 
1 ½ Tbsp. miso 
kosher salt, to taste 
3 Tbsp. warm water 

For the bowl and assembly 
3 Tbsp. olive oil, divided, plus more for drizzling (optional) 
2 garlic cloves, lightly crushed 
1 14-oz can chickpeas, rinsed and drained 
3 ears of corn, shucked, kernels removed 
1 Tbsp. za’atar (or to taste; feel free to use another spice blend, like curry) 
kosher salt, to taste 
4 cups Little Gems or other small lettuce leaves, torn if large 
crumbled lactose-free feta, lime wedges, and cilantro, for serving (optional) 

Purée ginger, garlic, cilantro, lime juice, tahini, miso, and water in a blender until smooth (I used my immersion blender). Season with salt. 

Heat 2 Tbsp. oil in a large skillet over medium. Add garlic and cook, turning occasionally, until golden brown, about 4 minutes. Mash garlic with a spoon and stir into oil. Add chickpeas and increase heat to medium-high. Cook, undisturbed, until golden brown and beginning to crisp underneath, about 3 minutes. Toss and continue to cook, tossing occasionally, until golden brown all over, 2–3 minutes more. Add corn along with 1 Tbsp. oil and cook, tossing, until corn kernels are golden around the edges and tender, 5–7 minutes. Sprinkle za’atar over and toss to coat. Season with salt. 

Lightly drizzle lettuce with oil in a large bowl and toss to combine; season with salt. 

Divide tahini among bowls and top with lettuce and corn and chickpea mixture. Sprinkle with feta. Serve with lime wedges and cilantro alongside.


Sunday, October 18, 2020

Saucy Baked Ziti

This is another recipe from Jessica Fechtor’s excellent memoir Stir, which I talked about here. It’s a bit involved, what with two different sauces, but the result is well worth it! This dish was very well received. 


I’ve included a picture of the fresh mozzarella I used – notice how the label clearly says it contains 0 grams of sugar. This certainly isn’t the case for all brands of mozzarella, especially fresh, but it’s totally possible to find some. 


For the tomato sauce 
4 Tbsp. olive oil 
3 garlic cloves, minced 
1 tsp. crushed red pepper, plus more to taste (1 pinch is plenty for me!) 
2 x 28-oz. cans whole peeled tomatoes 
1 tsp. fine sea salt, plus more to taste 

For the béchamel 
2 Tbsp. unsalted butter 
2 Tbsp. plain flour 
2 cups lactose-free whole milk, warmed (but not boiled) 
½ tsp. fine sea salt, plus more to taste 
¼ tsp. ground nutmeg, plus more to taste 

For the rest of the dish 
16 oz. dry ziti or rigatoni (or even penne) 
8 oz. lactose-free fresh mozzarella cheese, cut into ½-inch cubes 
1 cup (50 g) freshly grated parmesan 
1 cup (50 g) panko bread crumbs 
1-2 pinches of nutmeg 
½ tsp. crushed red pepper (optional - I left it out) 
2 Tbsp. olive oil 
1 handful of fresh basil leaves, sliced or torn into small pieces 

Position a rack in the top third of the oven, preheat it to 375 °F, and brush a 9”x13” ceramic or glass baking dish with olive oil. 

Make the tomato sauce 
Pour the olive oil into a 3- or 4-quart saucepan and warm over medium-high heat. Stir in the garlic and crushed red pepper and cook for about 1 minute or so, until fragrant. Add the tomatoes, smooshing them up in your hands as you drop them in the pot along with all the juices. Stir in the salt, turn the heat up to high, and bring to a boil. Lower the heat and simmer for about 10 minutes, stirring occasionally, until slightly thickened. Taste and add more salt if you'd like. Remove the pot from the heat and set aside. 

Meanwhile, make the béchamel 
Melt butter in a clean 3- or 4-quart saucepan over medium heat. Add the flour and stir for a couple of minutes to form a pale brown paste. Very slowly add the warmed milk while whisking continuously. Bring the sauce to a boil and cook for about 5 minutes, whisking the whole time, until it thickens. Remove pot from the heat, stir in the salt and nutmeg, then taste to see if you need any more of either. Set aside. 

Make the pasta and assemble the dish 
Bring a large pot of salted water to a boil and add the pasta. Cook until it's 3 to 4 minutes short of being done (it will finish cooking in the oven). Drain and transfer to your largest bowl. 

Add the tomato sauce, béchamel, mozzarella and about three-quarters of the parmesan and mix well. Transfer mix into prepared baking dish and scatter the ziti with the remaining parmesan. 

In a small bowl, toss the bread crumbs with a pinch of nutmeg, some extra red pepper if you want a little extra heat (I did not), and 2 tablespoons of olive oil and sprinkle over the top. 

Bake until the ziti is bubbling and the top is brown, about 15 minutes. Remove from the oven and let rest for 10 minutes, then scatter the sliced basil over the top and serve.


Monday, October 12, 2020

Still knitting from the stash

I spent much of the spring knitting two sweaters for myself, which I have now decided to frog, so more on that later. Meanwhile, there was a fresh batch of babies due in late August-early September (5 in all, including a set of twins), so I took a break from my adult-size sweaters and knit some baby-sized ones, using some yarn from my stash. 


First, I made this Poppy hat, which I embellished with a button (also from my stash). It was a bit weird to knit, as it’s essentially knit from front to back, then you pick up stitches to make the band that brings it all together. The yarn I used was leftover from this robot sweater – I believe it’s Phildar Pronostic +, in Bois de Rose colorway. I had barely used any of the skein, and needed all of the remainder to make this hat for a little girl, so it was perfect. If I’d had any more, I might have knit a flower as an embellishment instead of a button, but it was not to be. I still like the result! It could easily be adapted to an adult size, too (actually, I think it’s included in the pattern). 


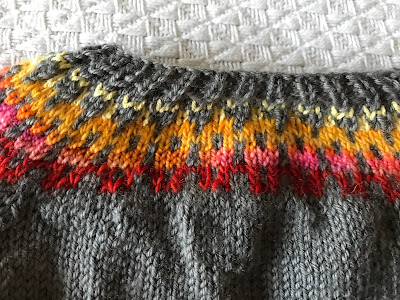
Then, I was looking for a baby sweater pattern that I could make with scrap yarn, so I went with Purl Soho’s Baby Fair Isle Cardigan. I didn’t have enough of any yarn to be the main color, so I bought 3 skeins of Cascade Heritage in Smoked Pearl at 100 grams each. To knit the 6-month-sized cardigan, I needed about 70 grams of it, so the 3 skeins gave me enough for 4 cardigans, with a bit left over (using up the yarn stash is a Sisyphean task, isn’t it?). I did get to finish off a few of my scrap yarns, but hardly made a dent in others, because you really only need a few yards of each color, if that. I got to practice my stranding on the back of the knit, and I am so pleased with how neat it is! 


So I ended up with one in warm shades and one in cool shades for twins who ended up being girls (I chose buttons that I thought were appropriate), one in shades of blue for a little boy, and then a fourth cardigan plus a hat in shades of red for a baby who ended up being a girl. 


The hat pattern is Giacomo’s Baby Hat, which I made with only yarn from my stash (but I didn’t have enough to make a pompom). The fair isle pattern was easy to follow; the only thing I changed in the pattern was to make the ribbed edge of the hat longer. I really loved this one! 

Finally, I learned a new skill: felting! I had received this black sheep felting kit from the Engineer, after putting it on my wish list last Christmas (it also comes in white). It’s from Bear Creek Felting, and they sell lots of other cute kits on their Etsy page. This was a great introduction to the how-to of felting, and the finished result is really great for a first attempt!


Sunday, October 11, 2020

Swirly Pound Cake


I tried these chocolate-vanilla marbled madeleines, but they turned out to be a big disappointment. They didn’t look good, they were dry and a bit bland… So that left me with a bit of a craving for a good chocolate-vanilla marbled confection. Enter this swirly pound cake that hit all the right notes! 


It’s served with whipped cream mixed with sweetened condensed milk. I’ve found two kinds of vegan sweetened condensed milk here, as you can see on the photo – the coconut kind comes in 7-oz. cans, while the soy kind comes in 11-oz. containers, which are not convenient for this recipe. That being said, the point is a bit moot if you don’t have lactose-free whipping cream, which I’ve never seen in the States. You are free to use a vegan whipped topping, but those come already sweetened; or you could just omit it. I do recommend the lactose-free sweetened condensed milk in the cake, though! I’m sure you could google your way to a homemade version, but since it’s become readily available for me, I didn’t bother. 

1 ½ cups cake flour (or 3 Tbsp. corn starch, topped up with all-purpose flour) 
1 tsp. baking powder 
½ tsp. kosher salt 
2 sticks (1 cup) lactose-free butter, at room temperature 
½ cup sugar 
1 ½ tsp. vanilla 
3 large eggs, at room temperature 
1 14-oz. can of lactose-free sweetened condensed milk, divided (see note above) 
1 Tbsp. Dutch-processed cocoa powder 
2 Tbsp. hot water 
1 cup lactose-free whipping cream (see note above) 

Preheat oven to 350 °F. Grease a 9-inch loaf pan and line with parchment paper. 

Sift together cake flour, baking powder, and salt. 

Using an electric mixer on medium-to-high speed, cream butter, sugar and vanilla for about 4 minutes, or until light in color and fluffy. 

Add eggs, one at a time, mixing after each addition. Scrape down the sides and continue to beat for a minute. On low speed, gradually add flour mixture. Then pour in ¾ cup sweetened condensed milk and beat until the batter just becomes smooth. 

In a small bowl, add cocoa and hot water and stir until dissolved. 

Place 1 cup batter into a small mixing bowl. Stir in cocoa mixture. 

Spoon batters into the prepared pan, alternating. Use a butter knife to make a zigzag pattern; avoid overdoing it (so colors stay distinct). 

Bake in the center of the oven for 55 to 65 minutes, or until a skewer inserted in the middle comes out clean (you can tent the pan with foil if your cake gets too dark, but that wasn’t an issue for me). Remove from oven. Immediately invert, remove sheet of parchment, and transfer to a wire rack to cool for about 90 minutes (I admit I hadn’t read this properly and let it cool mostly in the pan). 

Up to an hour before serving, make whipped cream: Pour remaining condensed milk and cream into a cold large metal bowl. Using a whisk, begin to whisk until it has doubled in volume, has pillowy soft peaks, and dollops easily off a spoon. Top each slice with whipped cream. Store extra cake in an airtight container at room temperature up to 4 days.


Saturday, October 10, 2020

Lasagne aux saucisses et au pesto

J’essaie de ne faire des pâtes qu’aux deux semaines, de peur d’en manger trop (ou trop souvent!). C’est sûr que je tombe parfois sur une recette qui ne fonctionne pas à mon goût, comme ce bolognese au chou-fleur de Bon Appétit. Ça avait pourtant bien commencé, avec des champignons hachés menu qui me rappelaient mes pâtes du commerce préférées, mais l’ajout du chou-fleur a tout gâché, goût et texture (parce qu’il ne s’est pas attendri)… Dommage! J’ai ensuite essayé une recette de lasagne tirée du numéro de novembre 2016 du magazine Tellement Bon! L’image portait la mention « Fait en 10 minutes! » et… c’était *complètement* faux! Et j’avais pris des raccourcis, en plus! Mais j’ai beaucoup aimé le résultat, et les enfants ont vraiment adoré – même si c’était vert et pas photogénique! Le Petite Prince m’a demandé d’en refaire à quelques reprises déjà. Il y a du brocoli ici qui est passé complètement inaperçu, soit dit en passant. Par contre, j’ai mis moins de petits pois qu’il en fallait, et je pense que je les laisserai tomber la prochaine fois. 

La recette d’origine demandait du fromage mascarpone, mais je n’en ai pas vu sans lactose; j’ai remplacé par du fromage à la crème sans lactose, mais on pourrait envisager aussi du fromage ricotta maison (sans lactose également, bien sûr). Au lieu de faire des boulettes avec de la chair à saucisse pour ensuite les faire cuire, j’ai acheté des saucisses émiettées déjà cuites (comme celles-ci) et c’est ce que je recommande, mais je mets les instructions d’origine ci-dessous au cas où vous n’en trouviez pas. Et bien sûr, j’achète des pâtes à lasagne qui sont prêtes à aller au four au lieu de devoir les faire cuire moi-même en plus de tout le reste. La recette demandait un plat 10"x14"; je n’en ai pas, alors j’ai pris mon 9"x13", et même à ça, le plat était trop grand. Je prendrai un plat 8"x11" la prochaine fois. J’imagine que ça dépend de la largeur des pâtes, mais je pensais que c’était assez standardisé, ça, non? 

Vous pouvez servir le tout avec une salade verte. 

4 c. à soupe d’huile d’olive, en tout 
6 saucisses italiennes douces, chair retirée des boyaux, puis roulée en petits boulettes (voir plus haut) 
1 petit brocoli (400 g), coupé en petits fleurons 
1 tasse (250 g) de tomates cerises, coupées en deux 
sel et poivre, au goût 
1 1/3 tasse (200 g) de petits pois surgelés (voir note plus haut) 
1 ¾ tasse de fromage à la crème sans lactose (voir note plus haut; j’en avais un peu moins) 
1 tasse (150 g) de pesto maison ou du commerce 
1 grosse botte de basilic, hachée 12 pâtes de lasagne, cuites et égouttées (j’ai pris des pâtes prêtes à aller au four) 
¼ tasse de lait sans lactose 
1 tasse (100 g) de fromage mozzarella sans lactose râpé 
3 c. à soupe de parmesan râpé 
2 c. à soupe de pignons (facultatif) 

Dans une grande casserole, à feu moyen-vif, chauffer la moitié de l’huile et y faire revenir les boulettes de viande en les faisant rouler, de 5 à 10 minutes ou jusqu’à ce qu’elles soient dorées. (Mes saucisses émiettées étaient déjà cuites, alors j’ai sauté cette étape.) 

Entretemps, porter une grande casserole d’eau salée à ébullition à feu vif et y cuire le brocoli 3 minutes ou jusqu’à ce qu’il soit très tendre. Bien égoutter. 

Préchauffer le four à 400 °F. Dans un petit plat de cuisson, mettre les tomates et les arroser du reste de l’huile. Saler et poivrer généreusement les tomates, puis les faire rôtir au four 10 minutes, jusqu’à ce qu’elles ramollissent légèrement. 

Dans la casserole, ajouter aux boulettes le brocoli cuit, les petits pois, la moitié du fromage à la crème, le pesto et le basilic. Laisser mijoter 2 minutes ou jusqu’à ce que la sauce épaississe. Saler et poivrer. 

Dans un plat de cuisson de 9"x13" (ou 8"x11") huilé, étendre le tiers de la sauce. Couvrir du tiers des tomates, puis de 3 lasagnes. Répéter l’opération, en réservant quelques tomates pour en garnir la lasagne, et en terminant par un rang de pâtes. Dans un petit bol, mélanger le reste du fromage à la crème avec du lait pour en faire une sauce. La verser sur la lasagne, en l’étalant uniformément. Parsemer de mozzarella, de parmesan, de pignons et des tomates réservées. Cuire la lasagne jusqu’à ce qu’elle soit dorée et que la sauce bouillonne, de 35 à 40 minutes.


Friday, October 09, 2020

Cheddar Swirl Buns


This recipe, from Deb Perelman’s excellent Smitten Kitchen Cookbook, was originally called Cheddar Swirl Breakfast Buns. You can think of it as a savory version of a breakfast bun, but to me, it’s more of a dish I would eat at brunch (at the earliest) or as a side to lunch or dinner. (If you’re going for straight breakfast, I’m a bigger fan of her plum poppy seed muffins.) This was absolutely delicious, and a big hit with my family! I served it as a lunch along with corn on the cob and everyone was happy. 

For the dough 
3 cups (375 g) all-purpose flour 
1 tsp. table salt 
a few grinds of black pepper 
1 Tbsp. sugar 
2 ¼ tsp. (1 packet) active dry yeast 
1 cup lactose-free milk 
4 Tbsp. (½ stick) lactose-free butter, melted and cooled to lukewarm + 1 Tbsp. for brushing 

For the filling 
½ cup grated white onion 
1 ½ cup (6 oz.) grated sharp cheddar cheese 
2 tsp. fresh minced dill (I’m not a huge fan of dill so I omitted it) 
½ tsp. table salt 
a few grinds of black pepper 

Combine the flour, salt, pepper, and sugar in the bottom of a large bowl. In a small bowl, whisk the yeast into the milk until it dissolves, then pour the yeast-milk mixture and the 4 tablespoons melted butter into the flour, and mix them together with the paddle of an electric mixer or a wooden spoon until a shaggy ball forms. 

If you are using a mixer, switch to the dough hook, and knead on low about 6 minutes, or until a smooth and slightly sticky ball has formed. If you are making these be hand, turn out the dough onto a lightly floured surface and knead for about 8 minutes, until smooth. 

Place the dough in a lightly oiled bowl and cover with plastic wrap. Let it rest until doubled in size, about 2 hours. Alternatively, you could chill the dough at this point over night, or for up to 3 days, then bring it back to room temperature and pick up where you left off. 

Scoop the dough out of the bowl onto a well-floured counter and roll into a 12”×16” rectangle. Mix remaining filling ingredients and spread over the rectangle, leaving a ½-inch border at the short ends. Roll tightly and from one short end to another, making a 12” log. With a sharp serrated knife, carefully cut the log into 12 1-inch rounds. 

Using parchment paper, line the bottom of two small pans (9” round or 8” square) or one 9”×13” baking pan, and arrange 6 rolls in each of the smaller pans or all 12 in the larger, with an even amount of space in between. Brush tops with remaining 1 tablespoon melted butter, cover the pan(s) with plastic wrap, and let rise at room temp until doubled again, about 2 hours. When almost doubled, preheat oven to 350 °F. 

Once the rolls have fully doubled, baked for 20 – 25 minutes, until the tops are golden and the cheese is bubbling from the center. Serve immediately.


Tuesday, October 06, 2020

Cold Summer Noodles with Sesame Vegetables

I know what you’re going to say. “It’s fall! We want something warm and comforting, like a cheese omelette soufflé!” Well, over here we’ve still got a daily high of about 90 °F, so this is still seasonal. The recipe is from the July 2012 issue of Bon Appétit, and it’s been taunting me since then. It originally calls for vegetables cut the size of matchsticks, and I think that was the mental block for me – it’s just so fussy! I mean, yes, it would look better, but this was delicious too. I stored the noodles and dressed vegetables separately in the fridge; I ended up with more of the latter, but they made a great salad on their own! 

1/3 cup unseasoned rice vinegar 
1/3 cup vegetable oil 
1 Tbsp. sriracha (I used 1 pinch Korean pepper) 
1 Tbsp. toasted sesame oil 
8 cups (1 ¼ lbs.) matchstick-sized pieces mixed vegetables (carrots, radishes, cucumbers, bell peppers) 
kosher salt, freshly ground black pepper 
8 oz. buckwheat soba noodles (or rice vermicelli) 
1 cup (loosely packed) cilantro leaves with tender stems 
3 scallions, thinly sliced 
1 Tbsp. white or black sesame seeds 

Whisk rice vinegar, vegetable oil, sriracha (if using) and sesame oil in a large bowl. Add vegetables; toss to coat. Season with salt and pepper. 

Cook noodles in a large pot of boiling salted water, stirring occasionally, until al dente; drain. Run noodles under cold water to cool them; drain well and add to the bowl with the vegetables. Add cilantro and scallions; season to taste with salt and pepper. Sprinkle sesame seeds over and serve.


Saturday, October 03, 2020

Brown Butter Chocolate Chunk Ice Cream


I found some Green Valley Creamery lactose-free butter again and, to celebrate, I made brown butter ice cream with chocolate chunks. And it was fantastic! I only adapted it slightly to make it lactose-free and easier to follow. 

If you can’t find butter that is specifically labeled “lactose-free”, just make sure that the nutrition label says “0 g sugar” and you’ll be fine. 

The yield of this recipe is about 1 quart of ice cream, which will go fast! 

9 Tbsp. (1 stick + 1 Tbsp.) lactose-free butter, cut into cubes 
1 ¾ cups (1 14-oz. can) coconut milk (or lactose-free cream if you have it) 
1 ¼ cups lactose-free whole milk 
¾ cup sugar 8 large egg yolks 
1 pinch salt (omit if your butter is salted) 
¾ cup (3 oz.) chocolate chunks (or chips) 

Add the butter to a medium saucepan set over medium-low heat (make sure to use a light-colored saucepan, so that you can see the color of the butter). The butter will melt, then begin to bubble and foam. Continue cooking, whisking frequently, until the butter starts to brown and smell nutty – be patient and watch carefully, it can go from brown to burned quickly. Remove the pan from the heat and set aside to cool. 

Add the coconut milk, milk, and sugar to a medium saucepan set over medium heat. Bring to a boil, then turn off the heat. Add the eggs and salt to the bowl of a stand mixer fitted with the whisk attachment (you could use a hand mixer too) and begin beating on medium-high speed. Slowly drizzle the cooled, browned butter into the mixer bowl – the eggs and butter will thicken as you combine them. With the mixer on low, slowly add the hot milk mixture to the bowl, just a little at a time. Continue until it’s completely combined. 

Strain the ice cream base through a fine mesh strainer into a large bowl. Cover and refrigerate until thoroughly chilled (overnight is good, but at least 4 hours). Freeze in your ice cream maker according to the manufacturer’s instructions. In the last minute of churning, add the chocolate chunks. Transfer to an airtight container and store in your freezer.