Thursday, July 30, 2009

How I conquered my nemesis (or: Broccoli slaw, and a frittata)


I had mentioned before my aversion to broccoli. I’ve referred to it as my nemesis on several occasions. However, I must admit that perhaps I hadn’t been introduced to it properly. When I was a child, my mother served it cooked (boiled or steamed), on the side of a plate. It was bitter, and I always hated it. My mother, in a misguided effort to help me (hi, Mom!), always said, “At least eat the stem.” So I grew up believing that the stem was the most tolerable part of the broccoli – but really, it’s the toughest and most bitter, right? Aren’t the florets easier to eat, and isn’t that where all the nutrition is anyway?

When I saw on Smitten Kitchen a recipe for broccoli slaw, I decided I would be brave and try it. I finally did, and was very pleasantly surprised. Raw broccoli is not as offensive to me as cooked, and the florets are better than the stem. I must admit I had doubts at first, because the smell as I was cutting it was reminding me of the Brussel sprout fiasco, and the taste wasn’t what I would call pleasant. But I persevered, and with the dressing and other ingredients, this slaw was actually quite good! So here is the recipe thanks to which I have declared a truce with broccoli (but only as long as it’s served like this). It still contains more vitamins and antioxidants in its raw form, as far as I know.


2 heads of broccoli
1 handful of chopped almonds
1 big handful of dried cranberries
3-4 stems of celery, chopped
½ small red onion, chopped

Trim the broccoli and keep the florets. Cut them into small pieces. Put them in a bowl, add the other ingredients and mix.


Dressing
½ cup buttermilk or lactose-free milk with lemon juice, well stirred
1/3 cup low-fat mayonnaise
2 Tbsp cider vinegar
1 dash of sugar
salt and pepper, to taste
herbs and seasoning, to taste (I used basil, oregano and roasted garlic powder)


Mix all the ingredients. You can either pour the dressing on the salad, mix and serve, or only dress individual servings right in the plate.


I served it here with a frittata. It’s funny, because I had largely forgotten about the existence of this dish. But I was reminded of it again recently, and I realized that not only is it good, it is also easy – AND a great way to use up whatever is lying around in the fridge. I threw in the rest of the red onion from the slaw, the Swiss chard from this recipe, the grated carrots from that recipe, some green onions, as well as the fontina, mozzarella and parmesan left over from the Engineer’s last pizzas. And eggs, of course. I cooked the red onion in the pan first, added the other vegetables and cooked them until the Swiss chard was starting to wilt. I added the eggs and cheese and put the pan in the oven at 350 °F until the frittata was set, then I broiled it for a few minutes until the top was brown. It was delicious!

Un petit mot sur les boutons

Je tiens à prendre deux minutes pour vous parler de mon fibulanomiste. Un fibulanomiste, c’est quelqu’un qui collectionne des boutons. Vous me direz qu’il ne les collectionne pas pour moi, les boutons, et que ce n’est donc pas MON fibulanomiste. Mais je vous arrête tout de suite, parce que Richard Letendre a toujours eu dans son magasin LE bouton que je cherchais, même quand j’ignorais de quoi il aurait l’air. C’est que je tricote relativement souvent de petits chandails pour bébés (les bébés des autres pour l’instant). Mais puisque je choisis toujours la laine sur le coup de l’inspiration (chez Mouliné) et que le patron du chandail varie, on pourrait penser que ce serait difficile de trouver des boutons de la bonne couleur et de la bonne grosseur pour aller avec ledit chandail.

En fait, ce qui fait la force de Rubans, Boutons..., c’est non seulement la taille de l’inventaire (impressionnant tout de même), mais surtout la manière dont les boutons sont classés. Tous par couleur et taille semblables, parfaitement ordonnés dans des tubes en plastique. Vraiment, c’est un plaisir d’entrer dans ce magasin et d’y flâner, mais c’est encore plus plaisant en sachant qu’on y trouvera le bouton qu’on cherche! Il y a aussi de très beaux bijoux faits à partir de boutons (je suis la fière propriétaire d’un bracelet, et je compte y acheter une grosse bague éventuellement) ainsi qu’un grand choix de rubans.

Le magasin a déménagé : il est passé du Plateau, sur Saint-Denis, à la section de Saint-Hubert où sont situés les magasins de tissus. C’est sûrement logique, car il y a beaucoup de gens dans le coin qui doivent chercher des boutons. Moi, je trouve l’emplacement moins pratique, mais c’est bien sûr relatif. Je le recommande tout de même fortement, c’est un magasin vraiment génial!

Wednesday, July 29, 2009

Strawberry Sorbet with Rosewater


I mentioned before that my anniversary gift from the Engineer was an ice cream maker. I’ve started experimenting with sorbets and lactose-free ice cream, with wonderful results. Before I had this wonderful machine, I made sorbets on occasion, but they were more like granités, really. They were good, but they didn’t have the consistency I was looking for. But with an ice cream maker, this problem has been solved! I can also make artisanal lactose-free ice cream, which had never been an option before (most stores that do sell artisanal flavours, which I much prefer to most of what grocery stores offer, never bother making any of it lactose free). Now, though, I can just add lactase drops in the cream, or use lactose-free milk, and I’m all set. I’ll be sharing recipes as I perfect them.

On a side note, I really think that the single best purchase the Engineer and I have made in the past year was the KitchenAid stand mixer, and the ice cream maker attachment was the best gift I could have asked for.

I got the idea for this delicious sorbet from Dessert First. It’s still strawberry season here, and I have plenty of rosewater left over from this recipe, so it seemed a natural fit.

4 cups strawberries, washed and hulled
2/3 cup sugar (less if the strawberries are very ripe)
3 Tbsp rosewater
1 Tbsp lemon juice
1 pinch of salt

In a food processor, purée the strawberries until smooth. Strain through a mesh sieve to remove the seeds and extra pulp.


In a bowl, combine the puréed strawberries with the sugar, then add the rosewater, lemon juice and salt. Refrigerate the mixture until it is cold.

Freeze in an ice cream maker as per manufacturer’s instructions, then store in freezer for about an hour before eating.


In this picture, the sorbet is served alongside Edna Lewis’ Busy-Day Cake. The Engineer referred to this sorbet as “freakin’ delicious”, which is saying a lot, since he usually only tolerates strawberries.

Busy-Day Cake


I found this recipe on Orangette, but it’s actually one of Edna Lewis’ recipes. Honestly, just one look at that woman’s face and I can already tell that I would probably love anything she put on the table! This cake, though simple, was absolutely delicious. You should make it even if you’re not busy!

1 stick unsalted butter or margarine
1 1/3 cups granulated sugar
3 large eggs
2 tsp vanilla extract
2 cups all-purpose flour
2 tsp baking powder
¼ tsp. salt
1 good pinch freshly grated nutmeg, or more
½ cup milk, at room temperature

Preheat the oven to 375°F. Grease a 9” springform pan.

With an electric mixer, cream the butter and the sugar until light and fluffy. One by one, add the eggs, beating well after each addition. Add the vanilla extract, and beat to blend.

In a medium bowl, whisk together the flour, baking powder, salt, and nutmeg.

Add about ¼ of the flour mixture to the butter mixture, and beat on low speed to incorporate. Add 1/3 of the milk, and beat again. Add the remaining flour mixture in three more doses, alternating each time with a bit of milk, and beating to just combine. Do not overmix. Using a rubber spatula, scrape down the sides of the bowl and stir to incorporate any flour not yet absorbed.

Scrape the batter into the prepared pan, spreading it evenly across the top. Bake for 35 to 40 minutes, or until a toothpick inserted in the center comes out clean. This cake has a tendency to brown quickly on top, so after about 20 minutes, you might want to peek into the oven and tent the cake with aluminum foil if necessary.


In the picture here, the cake is served alongside two small scoops of strawberry sorbet with rosewater.

Tuesday, July 28, 2009

Burgers au poulet avec sauce soja et gingembre


J’avais dit que je vous donnerai cette recette un beau jour, quand j’ai parlé de mes hamburgers à la dinde. La voici!

1 carotte râpée (½ tasse), égouttée
1 blanc d’œuf
2 oignons verts, finement hachés
2 gousses d’ail, finement hachées
½ tasse de panko (chapelure japonaise) ou de chapelure ordinaire
2 c. à soupe de sauce de soja
1 c. à soupe de racine de gingembre râpée
1 c. à soupe de cassonade
1 c. à thé d’huile de sésame
1 lb de poulet haché
6 pains à hamburger
Garniture : concombre, luzerne et laitue

Dans un bol, fouetter le blanc d’œuf; ajouter la carotte râpée, les oignons, l’ail, le panko, la sauce de soja, le gingembre, la cassonade et l’huile. Ajouter le poulet et mélanger.

Former 6 galettes de ½ pouce d’épaisseur.

Cuire à feu moyen dans une poêle, en les retournant une fois, pendant 15 minutes (ou jusqu’à ce que la température interne soit de 165 °F / 74 °C).


Servir sur les pains et garnir de concombre, de luzerne et de laitue. Et si possible, utiliser des pains Thintinis, ils sont parfaits pour la recette.

Monday, July 27, 2009

Curried Lentils with Sweet Potatoes


I had seen this recipe on Smitten Kitchen a while back and had bookmarked it, but it took us until now to find garam masala (the Engineer is the one who finally found it). We could have gone to a specialized store, of course, and I would have at some point, but this recipe was on the back burner (no pun intended). It turned out to be absolutely delicious! And it’s simple to make, too.

2 Tbsp extra virgin olive oil
1 medium onion, chopped
4 garlic cloves, minced
a 1-inch piece of fresh ginger root, peeled and grated
1 ½ tsp garam masala
1 ½ tsp curry powder
4 to 5 cups vegetable or chicken broth, as needed
2 lbs orange-fleshed sweet potatoes, peeled and cut into ½-inch cubes (about 4 cups)
1 ½ cups dried lentils
1 bay leaf
1 lb Swiss chard, center ribs removed, leaves thinly sliced
1 tsp kosher salt, more to taste
½ tsp ground black pepper
1/3 cup chopped fresh cilantro
finely grated zest of 1 lime
juice of 1 lime
¼ cup chopped scallions, for garnish.

In a large saucepan, heat oil over medium heat. Add onion and sauté until translucent, 5 to 7 minutes. Add garlic, ginger, garam masala and curry powder. Cook, stirring, for 1 minute.


Stir in 4 cups broth, sweet potatoes, lentils and bay leaf.


Increase heat to high and bring to a boil; reduce heat to medium, partially cover, and simmer for 25 minutes. (If lentils seem dry, add up to 1 cup stock, as needed.) Stir in chard and salt and pepper, and continue cooking until lentils are tender and chard is cooked, about 30 to 45 minutes total.


Just before serving, stir in cilantro, lime zest and juice. Spoon into a large, shallow serving dish. Garnish with scallions.

Sunday, July 26, 2009

Fruit tidbits


Here’s a nice little side-dish that I made a while back. I figured it wasn’t worthy of a post in and of itself, but it’s certainly good enough to be shared, even if there’s no precise recipe for it. It’s a mango compte (though I don’t really stew the fruit that long). I start by browning some onions, then I add chopped mango (and sometimes tomato), then I cook the mixture just a bit and serve it with fresh cilantro (if you’re not using tomato, you could add fresh mint, too). Here, it is paired with a pork chop and some rice cooked in chicken broth.


I also got a cantaloupe and made two simple dishes with it. I started by making skewers with cantaloupe balls, mini bocconcini balls and prosciutto. Next time, though, I’ll add some fresh basil leaves – maybe even cherry tomatoes. Then, with the second half of the cantaloupe, a made a wonderful salad (though if the pieces are small enough, it’s technically more of a salsa). Just add a red bell pepper, some red onion, lime juice and cilantro. Delicious!

Saffron Cupcakes with Rosewater Frosting


I’ve got a good one for you. I actually made up a recipe, for the first time ever. Well, I based it on an existing recipe (white cupcakes and frosting from Martha Stewart’s Cupcakes), but I flavoured it differently. I made saffron cupcakes, then topped them with rosewater frosting – and man, were they ever delicious! So here they are, in all their glory.

Cupcakes

1 ½ cups all-purpose flour
1 Tbsp baking powder
1 pinch of salt
2 pinches of saffron
½ cup milk
7 Tbsp unsalted butter or margarine
Scant 1 cup sugar
3 egg whites

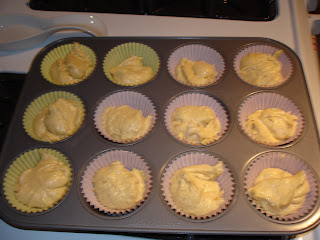
Preheat oven to 350 °F. Line a muffin tin with 12 paper liners.

Sift together the flour, baking powder and salt; mix well.

With a mortar and pestle (or equivalent), grind the saffron to make it into a powder. Put it in a small saucepan with the milk, and warm it gently over low heat, stirring. Let cool a bit.


Cream the butter until smooth, then gradually add the sugar and beat until pale and fluffy. Reduce speed to low. Add flour mixture in two batches, alternating with the milk, and beating until just combined after each addition.

In a clean bowl, with an electric mixer, whisk the egg whites until stiff peaks form (do not overmix).


Fold in one third of the egg whites into the batter to lighten. Gently fold in the remaining egg whites in two batches.

Divide batter evenly among lined cups, filling each three-quarters full.


Bake until a cake tester inserted in centers comes out clean, 18 to 20 minutes. Transfer tins to wire racks to cool 10 min; turn out cupcakes onto rack and let cool completely.


Frosting

¾ cup butter or margarine
2 cups powdered sugar
2 Tbsp rosewater
a few drops of red food coloring

With an electric mixer, beat butter on medium-high speed until pale and creamy, about 2 min.

Reduce speed to medium. Add the powdered sugar, ½ cup at a time, beating well after each addition and scraping down the sides of the bowl as needed. After two additions, raise speed to high and beat 10 seconds to aerate frosting, then return to medium.

Add rosewater, and beat until frosting is smooth. With the mixer running, add a drop of red food coloring at a time, until you get the desired shade (if you want a deep shade of pink, I recommend using food coloring gel instead of liquid).

Frost the cupcakes as you wish, and enjoy.


(Oh yes, and when the Engineer tasted the frosting, he said "That's what pink should taste like.")

Chicken Tagine


I’d been meaning for years to get a tagine (“eventually some day”), but never quite got around to it. The Engineer and I actually received one as an anniversary present – and we also got some nice placemats, which you probably saw in the previous posts. Who knew that one could get anniversary presents from people other than your spouse? This marriage thing just keeps getting better and better! :)


This recipe was originally from Oprah. We changed the quantities a bit, since we were only two for dinner (so we used 2 chicken breasts instead of the 3 pounds of chicken, and cut them into cubes). I’ll give you the recipe as it was published, though, so you can choose for yourself. Also, our tagine is not made for the stovetop, so we put it in the oven at 350 °F; I’ll write both options in the recipe.

And a word of warning about tagines, from Art Smith: Most clay pots need to be soaked and dried for several hours. This is called "seasoning" the pot. If your pot is not seasoned, plan ahead and season it. Once it is seasoned, you'll need to repeat the process about once a year.

3 lbs chicken , cut and skinned (or skinless chicken breasts, thighs, and legs)
1 medium-sized onion , chopped
4 cloves garlic , skinned and minced
2 medium-sized carrots , peeled and cut into 1-inch chunks
1 medium-sized sweet potato , skinned and cut into 1-inch chunks
6 Tbsp honey
½ tsp allspice
½ tsp cinnamon
½ tsp salt
1 Tbsp lemon juice
¼ cup chicken broth
¼ cup toasted almonds
¼ cup white raisins
sprigs of fresh cilantro (chopped or not)
4 Tbsp extra-virgin olive oil

Season the chicken with salt and pepper. Add 2 Tbsp of olive oil to a skillet, brown the chicken pieces over medium heat, and set aside.

Place a heat diffuser over your burner. The heat diffuser prevents the pot from burning or getting damaged. Place the clay pot on the diffuser and turn on the burner to medium. (If your tagine is not made for stovetop use, preheat the oven to 350 °F.)

In a large bowl, combine the chicken, carrots, sweet potato, honey, allspice, cinnamon, salt, lemon juice and chicken broth. Lightly toss to coat.

Add the remaining 2 tablespoons of olive oil to the tagine. When hot, add the onion, garlic and spices. Cook until soft, around 6 minutes. (You can also do this in a pan, then transfer to the tagine before the next step.)

Add the combined ingredients to the tagine. Cover the pot and simmer (or put in the oven) for about 40 minutes, or until done. Remove from the oven and garnish the tagine with raisins, toasted almonds and fresh cilantro. Serve with couscous.

Wednesday, July 22, 2009

Biscuits Neiman-Marcus


Chère Sœur participe, encore cette année, au week-end pour vaincre le cancer du sein. Demain, son équipe organise une vente de pâtisseries pour lever des fonds. Je contribue en cuisinant une fournée de mes biscuits Neiman-Marcus, la recette de biscuits aux pépites de chocolat qui est devenue ma recette classique. Elle tient son nom d’une légende urbaine, mais je trouve que c’est quand même une bonne façon de les nommer – surtout qu’il faut les différencier des autres bonnes recettes du genre, comme celle de mes pizookies.

Les biscuits Neiman-Marcus sont différents de la majorité des autres biscuits aux pépites de chocolat, d’une part parce qu’ils contiennent de l’avoine et d’autre part parce qu’on y incorpore une barre de chocolat râpée. Je l’avoue, c’est un peu chiant à râper, une barre de chocolat, et ça salit le comptoir en fondant vite. Mais ne vous laissez pas intimider, ça vaut la peine! Et c’est vraiment ce chocolat râpé qui donne aux biscuits leur aspect si particulier. Ce coup-ci, j’ai utilisé une barre de Lindt 70 %, vu que c’est un très bon chocolat, mais elle n’a pas la forme idéale pour être râpée (j’ai terminé en hachant les morceaux restants sur une planche avec un gros couteau). Le mieux serait une barre épaisse, mais c’est à vôtre goût. De plus, la recette peut être doublée très facilement pour les grandes occasions (celle que je partage ici donne environ 42 biscuits).

En passant, je vous encourage à faire un don à l’Hôpital général juif de Montréal pour vaincre le cancer du sein, en suivant le lien plus haut. Si vous voulez donner directement à Chère Sœur ou à son équipe, écrivez-moi et je vous donnerai les bonnes coordonnées.

2 ½ tasses d’avoine (gruau)
2 tasses de farine
1 c. à thé de poudre à pâte
1 c. à thé de bicarbonate de soude
1 pincée de sel
1 tasse de beurre non salé ou de margarine
1 tasse de sucre granulé
1 tasse de cassonade tassée
2 œufs
1 c. à thé de vanille
12 oz (environ 1 ½ tasse) de pépites de chocolat noir
1 barre de chocolat

Mettre l’avoine dans un robot et la réduire à une poudre fine.

Râper la barre de chocolat et mettre les morceaux de côté dans un endroit à l’abri de la chaleur (donc pas à côté du four).


Préchauffer le four à 350 °F et sortir deux plaques à biscuits.

Dans un bol, mélanger l’avoine avec la farine, la poudre à pâte, le bicarbonate de soude et le sel.


Dans un grand bol, mettre le beurre en crème avec le sucre granulé et la cassonade.


Y ajouter les œufs et la vanille; bien mélanger.


Incorporer les ingrédients secs et mélanger juste assez pour homogénéiser. Ajouter au mélange les pépites de chocolat et la barre de chocolat râpée; mélanger.


Faire de petites boules avec la pâte et les disposer sur les plaques à biscuits (pour une grosseur homogène, vous pouvez utiliser une petite cuillère à crème glacée). Je mets 12 biscuits par plaque, et deux plaques à la fois dans le four.


Faire cuire la première fournée pendant environ 8 à 10 minutes, pour des biscuits moelleux (c’est normal que le dessus brille encore un peu quand vous les retirez du four). Profiter de la cuisson pour faire un peu de vaisselle!


Sortir les biscuits du four et les laisser refroidir 10 minutes, puis les transférer à une grille pour qu’ils refroidissent complètement. Former les derniers biscuits, les mettre sur les plaques et enfourner pendant 8 à 10 minutes.

Tuesday, July 21, 2009

Tarte au flan au lait de coco


J’ai adapté cette tarte récemment, en utilisant le lait de coco qui trônait sur mon comptoir de cuisine (vous avez dû l’apercevoir dans des billets précédents!).


J’avais converti toutes mes mesures en système nord-américain. Malheureusement, la recette d’origine n’était pas adaptée à mon moule (ou vice-versa, comme vous voulez). Donc, même si la recette d’origine demandait 1,5 L de lait de coco, je pense que 1 L, c’est largement suffisant. Je vais donc utiliser les chiffres que j’avais obtenus en convertissant, mais en les diminuant proportionnellement. J’augmente quand même un peu la farine et les œufs. Pour la cuisson, j’avais utilisé 375 °F (parce que bon, les recettes donnent des températures Fahrenheit par multiples de 25); j’ai laissé la tarte plus longtemps que ce que la recette disait, en la recouvrant finalement de papier d’aluminium, parce que j’avais l’impression qu’elle n’avait pas pris. Cependant, il n’en était rien, et j’aurais pu la sortir du fourneau avant ça.

1 abaisse de pâte brisée (avec la moitié de la recette habituelle)
1 L de lait de coco
2 œufs
2/3 tasse de sucre
1 tasse de farine
1 c. à thé de vanille
1 bonne poignée de noix de coco râpée non sucrée
1 petite poignée de raisins secs

Préchauffer le four à 375 °F. Mettre l’abaisse de pâte dans un moule à tarte.


Faire chauffer doucement le lait de coco dans une casserole.


Dans un wok, hors du feu, battre les œufs vivement avec le sucre jusqu’à blanchiment. Ajouter ensuite la farine et la vanille; battre de nouveau jusqu’à homogénéité.


Verser ensuite le lait, petit à petit, tout en fouettant pour éviter la formation de grumeaux. Ajouter la noix de coco râpée et les raisins secs; mélanger.


Mettre ce mélange sur le feu et fouetter sans cesse jusqu’à ce que le mélange bout et que la préparation ait épaissi, comme une crème pâtissière.


Mettre le mélange dans la croûte à tarte et enfourner, de 45 à 60 minutes (ou davantage, selon le four) jusqu’à ce que le mélange ait pris et que la tarte soit brune sur le dessus.

Sortir du four et laisser reposer sur une grille. Lorsque la tarte est à la température de la pièce, la mettre au réfrigérateur pendant toute une nuit avant de la déguster. Bon appétit!